Lesson Info
50. Filling and Refining Existing Light
Lessons
Chapter 1 Introduction
01:26 2Why Just One On-Camera Flash
04:22 35 Reasons to Use Flash
10:37 4Common Flash Myths
06:51 5What Makes Flash Challenging?
04:56 6Chapter 2 Introduction
01:36 7Flash-Strobe vs. Ambient-Constant Light
08:19 8Flash vs. Ambient Light Exposure
03:07Flash vs. Ambient Demo
06:42 10Flash and Ambient Balancing for Natural Effect
07:11 11Flash and Ambient Balancing for Dramatic Effect
04:19 12Flash and Ambient Balancing for Creative Effect
07:10 13Understanding Flash Duration
08:37 14Chapter 3 Introduction
01:34 155 Common Key Light Patterns
08:38 165 Common Key Light Patterns w/ Diffusion & Fill
07:42 175 Common Secondary Light Patterns
08:28 183 Primary Subject Patterns
05:27 19Light Qualities
09:56 20The Inverse Square Law
07:50 21Inverse Square Law in Practice
08:21 22Corrective White Balance
10:02 23Creative White Balance
05:47 24Chapter 4 Introduction
01:58 25On Board vs. Hot Shoe Flash
05:57 26Full Feature vs. Manual Flashes
08:59 27TTL vs. Manual Control
08:12 28TTL vs. Manual Recycle Times
04:43 29Flash Power & Zoom
09:18 30HHS vs. ND Filters
12:29 31FCS vs. RCS
07:11 32Chapter 5 Introduction
01:38 334 Tips When You Must Use Direct Flash
06:00 34Bare Bulbing Done Right
11:42 35Grid Snoot + Direct Flash
06:43 36Mini Beauty + Direct Flash
06:08 37Ring + Direct Flash
07:52 38Understanding Modifiers
09:24 39Direct Flash + Shutter Flash
09:07 40Chapter 6 Introduction
01:55 41Ambient vs. Direct Flash vs. Bounce Flash
14:27 42Silver Bounce
14:27 43More Light Silver
11:02 44Soft White Bounce
15:41 45Overhead Bounce
11:39 46Overhead Bounce + Fill
09:42 47Event Bounce
12:42 48Chapter 7 Introduction
01:38 49Natural vs. Dramatic Light
17:43 50Filling and Refining Existing Light
08:44 51Coloring Light for Corrective Effect
13:33 52Coloring Light for Creative Effect
10:27 53Chapter 8 Introduction
00:43 54Case Study 1 - Dramatic Sunset
09:45 55Case Study 2 - Desert Sunset
10:04 56Case Study 3 - Sinister Headshot
09:40 57Case Study 4 - Family Portrait
08:21 58Case Study 5 - Athlete Portraits
11:19 59Case Study 6 - Working Angles
07:22 60Case Study 7 - Drag + Composite
08:09 61Case Study 8 - Less is More
07:16 62The Good Karma Jar
01:41 63Favorite Feature Flashes
05:52 64Favorite Manual Flashes
21:35 65Favorite On Camera Flash Modifiers
21:21Lesson Info
Filling and Refining Existing Light
In this video, we're getting into phil and refining bounce now what's interesting is that these types of lighting setups that what we're doing in these videos is far less dramatic than the other shots, but I actually feel like the difficulty level of phil and refining bounce is much more difficult than dramatic light. Why? Because dramatic light it's simple you simply going to a scene you just overpower you go to a scene, you just go full power in your flash and you start firing away and balance and overpower like great dramatic awesome refining or adding phil or these small changes to modify color, to modify direction to modify the amount and quality. These are the things that in my book are more difficult because they take a little more experience to understand and to see and it takes a little more of a softer hand to know that hay for the look I'm going for, I don't need full power, I don't need, you know even close to that I just need a small kiss of light anything that requires a ...
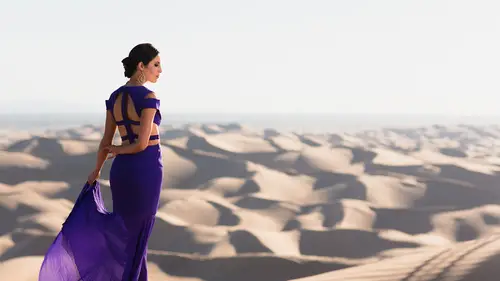
small kiss well, that's a more difficult technique. All right, let's talk to these so the primary tips that a soft fill it could be used to refine the quality or the direction of existing light, so we're kind of going to do all of these in these three examples number two also lighting from the same direction is existing light if you want to amplify is a fantastic tool it's actually what we're doing in this shot right here we're actually just simply adding to the existing direction of light and ramping it up with our flash number three justice before exposed first for the background analyze your subject and then add the light afterwards okay let's start over here now with the gear list again of course on lee, some of these things are going apply to each one, so just feel free to take a look at the gear listen, you consign what you need in each one of these scenes were you certain things I'll talk through each of the gear that we used for each one? Yeah, there we go okay, so start with the top left. This was an actual engagement session that we did with this couple and they want to do kind of like a saturday mid afternoon lifestyle session where it's something that they might do on a saturday might get together they're going to cook, they're gonna enjoy like a nice little brunch together before going out with the puppies and so forth, so we're literally shooting to mimic there a typical day and I love these types of session because the end of being very natural and very just light and candid and they're really fun to shoot so as you can imagine as faras the lighting goes, I want to have a light that matches back kind of emotion, fun, natural, candid if I shoot this and overpower this entire scene and I just have this little spot light right on them and super dramatic it's gonna look really strange it's not gonna look like it fits what they're doing. Instead, I walked in the scene, I took this first shot, okay? So I just took this first shot, I looked at it and, uh and basically we'll show a couple other images too, but basically we have here is the top left images that on a fifty millimeter, one point two l lens again, any familiar will work, but we're one two hundred second f two and four hundred. What I end of noticing is that the ambulance good is coming through the window and everything but it's kind of a little bit lacking in color and justin quality the color of it is a little bit more on the green side because it's kind of bouncing off their walls and all the other stuff that they have in their house, which has a slight green tint to it, and so it doesn't have the cleanest look to the overall color and also as faras the brightness and just contrast everything is just a little bit lacking so what do we do? I think okay, I just need a soft amount of light just a soft amount of phil flash just to kick up the color a little bit kind of clean it up a little bit and get a writer overall. Look, I want to shoot this scene to essentially be what I refer to as pure white or hai ke wantto look bright and look, harry not blown out just bright so on camera, right? I set up a stand with a wide over silver okay, set up relatively high. All I do is just aim my flash right over to that side I dialed a zoom in tow one o five and I just bounce off and we're bouncing in an extremely soft amount, okay, keeping the cameras the same, we're bouncing it around one eighth toe, one sixteenth power or even less we're just adding a subtle kiss of light what that light does immediately it just clean up the overall look in the shot it cleans up the color, cleans it like is more pop to the image and it looks fantastic and I love it, okay? And then we just go through and shoot that exact same way throughout this entire scene, slightly moving the reflector based on my position based on what we were doing at that point amy's number two now this top image is just natural light. So how is the shot was on the eighty five millimeter? What one want to mark too? And this is at one hundred second f two and fifty once again, there is nothing wrong with this first shot. Stylistically, it looks great it's a nice natural light shot it's has a great feel to it, and I dig it. The only thing is that it lacks direction of lighting, so sometimes I like to add a bit of a kiss of direction, like right now, it's just kind of flatly lit, but it still looks good and it's still totally acceptable, but I knew I wanted to add just a little bit of flashed a little kiss a flash again just to kick it up a little bit haddon amplify a little more, catch light and so forth. So what I do again? White over silla reflector displaced off to camera left we're shooting fairly tight honor and with the same settings one hundred seconds, one, two hundred a second f two and fifty bouncing around one quarter toe wanted power and based on the power of the flash right there, I'm pretty sure that we did have the five stop andy filter on because that would've been way too much if we didn't have the five stop idea from this we get this nice we basically just modified we've refined the direction of light we've added a direction of light to the shot and we get this beautiful catch lights were very soft light that white diffused light looks fantastic no additional work done this is the shot over here the top event once again in the desert here we're in the eighty five one went to l a mark two again we're one one sixth of a second at one point two is a one hundred we're with the five stop nd filter what we've done here we've added a silver reflector that's catching the sunlight and it's getting close to around sunset right now so we're catching sunlight it's still fairly bright but it's kind of orange too we're also cutting off the life in the background is by screaming her from the back so I have a reflector behind screaming the light from the back so we have no light coming in from the back are not no light but it's basically just blocked or essentially just dim down we have no direct light from the back from the front we have that silver adding light into her face at one point two is a one hundred and one one sixth of a second this is the shot that I get now is a little bit dark and also the light doesn't quite wrap the way I wanted to so but everything else about it I love it looks really fantastic, but the thing is that I don't want to raise my eyes so I saw one hundred would have the best image quality possible for this image also don't want to change my appetite because I mean I'm at one point too I can't allow any more light in I don't want to change my shutter speaks not one one sixth of a second on the eighty five and make sure his tax sharps I have as much detail as possible so what do I do? Power the flash sun is setting okay so it's not completely set but that leased the light that we're getting from the sun is no longer that fifty five hundred degree kelvin light so I put a gel into the flash we put a gel right on the flash head and with that cpo jail I balance in the reflector so it's matching the same light that's coming from the sun and then going into her now we get a beautiful soft wrap around her, we brightened up everything we amplify I kind of like going into eyes essentially all we've done is we've added a refining light that amplifies existing light the existing like being that silver reflector that were adding in sunlight now we're just boosting that up more with more power with the flash so another great use of it. If you're kind of locked in terms of settings and you can't get additional light, add light with the same direction, the same everything, just by matching the direction of existing light and then pumping more light into it, and it works fantastically in virtually any situation. All right, so that's it here. So for each of these shots, you know, for here, we're actually using a stand in the other places. We actually had things held, just decide most of time, we're going wide over silver for all these. I think, actually, except for this one might have been just silver. I think this one is just over this one, just silver. Everything else was white over silver. That's it for this video. Let's. Go ahead and move to the next one now.
Class Materials
Bonus Materials with Purchase
Ratings and Reviews
Sid
The best class for understanding light and lighting there is bar none. Pye is an excellent teacher and the quality of the material provides for a rich and very informative experience. Pye breaks down the fundamentals in easy to digest packets and then elaborates as needed. If there is one class that you watch this is it! Worth purchasing and saving for future use. I would also HIGHLY recommend downloading the saving the PDF of slides that accompany the videos. Again, and can't say it enough, this is THE BEST video to lighting on Creative Live. A must watch for the novice and the expert.
Petra
Great course, I highly recommend it if you want to become a more confident flash user. Pye is a wonderful instructor and just such a nice guy, it's a pleasure to listen to him
Simon Metselaar
This is the best thing that happened to me since I've been into photography. What a lifesaver. Unfortunately I already payed for some courses that are not Pye, but Pye just nails it. Amazing, and kind of a life hack. Thanks again :)
Student Work
Related Classes
Lighting