Lessons
Course Introduction
08:52 25 Things Every Landscape Photographer Should Know
23:32 3Camera Gear
11:26 4Gear Q & A
33:04 5On Location: Weather & Safety
18:55 6On Location Pre-Visualzation Sutro Baths
07:29 7On Location: Camera Settings
21:59 8On Location: Composition
27:09Matt Klowskowski - My Story
06:28 10On Location: Bracketing
15:15 11On Location: Artistic Choices
16:12 12On Location: Pre-Visualzation Marshall's Beach
06:09 13On Location: Long Exposure
15:05 14On Location: iPhone
17:31 15On Location: Wrap Location
02:15 16Location Challenges: How to Shoot in Open Sun with No Clouds
01:52 17Location Challenges: How to shoot Cloudy, Stormy, & Blah Weather
01:50 18Location Challenges: How to shoot Beaches
01:27 19Location Challenges: How to shoot Waterfalls
01:40 20Location Challenges: How to shoot Panorama Vista Scenes
01:38 21Location Challenges: How to shoot Lakes
02:11 22Location Challenges: How to shoot Mountains
02:24 23Location Challenges: How to shoot Deserts
01:29 24Location Challenges: How to shoot City Skylines
01:44 25Location Challenges: How to shoot Snow
02:53 26Location Challenges: How to shoot Backlit Situations
06:56 27Outdoor Landscape Workflow & Organization
31:38 28Basic Editing in Lightroom: Part 1
44:17 29Basic Editing in Lightroom: Part 2
26:52 30Lightroom and Photoshop: Intermediate Techniques Pt. 1
30:35 31Lightroom and Photoshop: Intermediate Techniques Pt. 2
12:31 32HDR for Landscape Photography
07:54 33Panoramas for Landscape Photography
18:14 34How to shoot Landscape with Adobe Photoshop in Mind
21:14 35Sky Replacement in Photoshop
18:48 36Processing Project: Stormy Mountains
09:12 37Processing Project: Crashing Waves on the Rocks
10:01 38Processing Student Raw Images
41:03 39Final Q&A
14:17Lesson Info
On Location: Camera Settings
Camera settings. So this is going out to whoever had asked a little bit about aperture and focus and all that stuff. So camera settings, what we'll do here is we'll kick over to a video and then we'll come back and I'll kind of review, talk a little bit more detail in depth about some of the stuff we talked about in there. All right, Justin, so we're gonna dive into camera settings. This is a big one. Fortunately it's very formulaic for me. I kinda use all the same settings almost all the time, so I very rarely change them. But I'm gonna dive right into aperture. Sounds great. So aperture. The way I think of aperture is almost how creative do I wanna be with the shot? What do I want to be in focus and what do I not want to be in focus? With landscapes, I can almost always tell you it's gonna be set to one of two apertures, all right? If I have a foreground set up, if I've got a situation where I've got a rock in the foreground, maybe some water, maybe some trees in the middle gro...
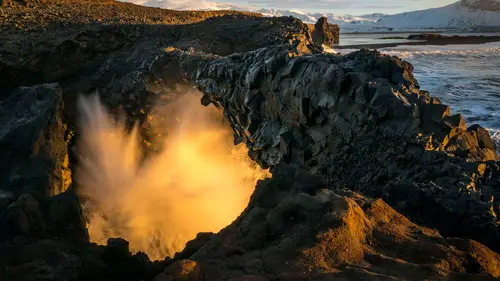
und, maybe a mountain in the background, I'm gonna be at f/16, okay? If I've got a situation like we were right up at the top there, where we're kinda standing there just looking at everything, I have no foreground in front of me, so I don't need to worry about foreground. I don't really even need to worry much about depth of field. I'll shoot at f/8, all right? And the reason being is because that brings us into the next part, which is shutter speed. So I shoot in aperture priority, all right? So I know a lotta photographers out there and I know that it kinda gets tough because you hear so many different things. You hear so many people say you gotta shoot in manual, you gotta shoot in this, you gotta shoot in that. I shoot in aperture priority. I let the camera choose the shutter speed so I don't have to worry about it. My idea when I'm out there shooting is I wanna be as creative as possible, so, which means I wanna make the least amount of tweaks to dials and settings and histograms and all that crap on my camera. So I really wanna be as creative as possible. The more the camera will do for me, the more I'll let it do for me. So if I go into aperture priority, I choose my aperture, which again, is gonna be either f/ if I'm just looking out at everything or f/16 if I have foreground. The camera will choose a shutter speed. I like to go down to f/8 when I don't have any foreground. It gives me a little bit of a faster shutter speed. A lotta times if it's not right at sunrise or sunset, I can hand-hold the shot and don't even have to get my tripod out, so I'll get a faster shutter speed. So I'm usually not worrying about shutter speed unless it's long exposure where, we're gonna tackle long exposure. We'll talk a little bit more about it in another lesson. On my website, I actually have a little long exposure checklist, kind of a fast track, if you wanna download, it's mattk.com, I'll put it on /creativelive, so that way you guys can see that one, too. But we'll talk about when you wanna kinda extend the shutter speeds. Next thing is ISO. Best thing about landscape photography is we're usually gonna be on a tripod. We don't have to worry about ISO, right? We don't have to worry about noise. We don't have to worry about any of that stuff. I just set it to 100. There's gonna be times where maybe if I have a tree or a bush or a plant or something in the foreground, like today, the wind's blowing, and I notice that it's starting to get blurry when I look at the shot, then I'll raise my ISO to get a faster shutter speed. But I can tell you about 90% of the time it's gonna be at 100. Next thing, white balance. I like my stuff warm, all right? I like my photos warm. So I'm usually gonna be on a cloudy or a shady white balance, though I shoot everything in RAW, right? All my landscapes I shoot in RAW, and because of that, it's kind of a free change in Lightroom or Photoshop, so you're not gonna degrade the image at all if you change the white balance later. But I keep it in cloudy or shade, and that kinda just gives me a better starting place. Next up, we got focus. So this is a really popular topic, too. So once we get aperture down and ISO down, the camera's gonna pick the shutter speed. Focus is a really big one, because let's take that example where I gave where I've got a rock in the foreground, I've got some trees and some water in the middle ground, and then I got a mountain in the background. What do you focus on? Well, if you're at f/16, your camera's gonna get the depth of field. It's gonna get most of that photo in focus from front to back. Now, whatever you focus on in the shot is gonna be the sharpest part of the photo. So I kinda throw away all the stuff that says focus a third of the way in. What is a third of the way in? I have no idea. So what I do is I focus on what I think is the most important part of the photo. Usually it's gonna be whatever's in the foreground. That's what your eye's gonna go to. That's why we're putting it in the foreground. So I wanna make sure that that's gonna be the sharpest thing in the foreground. Everything else from there to the back is still gonna be sharp. It'll be plenty sharp enough. But that point that you focus on in the foreground is gonna be just a little bit sharper, and that's gonna be our focal point of the photo. That's why I focus on that, okay? Focal length. Focal length... It's tough to really give you a formula on that one. I could tell you that my favorite focal lengths are usually gonna be in my, if I look at my photo library, most of my photos were taken with my 24 to 70 lens. Reason being is because if I put on my wider lens, my 16 millimeter, what happens is whatever's off in the distance, it's really small, all right? And I wanna showcase what's in the photo. So usually my 24 to 70 is my most used lens. If I got something, a really dominant foreground object, maybe I'll put the 16 to 35 on, and then if it's like where I was shooting on the beach, we had these rocks and I had these waves crashing up, I had to put my 70 to 200 on. So, but I can tell you my focal length is usually gonna be in that middle area. And then finally metering. So the metering part of it, same thing I was talking about before is I want the camera to do all the work that it'll do. I put mine on matrix metering, all right? So matrix metering means it kinda evaluates the entire scene and it picks an exposure for you, and that's gonna be the shot that you get. It pretty much, these cameras are so smart these days, it pretty much nails it every time. We'll talk about bracketing and a couple things like that in another segment, but matrix metering, one shot usually gets me what I need to for most of my photos. So that said, Justin, got any questions on... Yeah. On the camera settings? Yeah. So I know that's a lot to cover, so... I probably have a few, but I'd really just like to touch on one. So are there, there are scenarios, I shoot in aperture priority myself. But could you talk a little bit about some scenarios where you'd wanna control the aperture and the shutter speed? So, you know, when would you actually wanna shoot in manual mode, or are those, do you ever? So for me, as a landscape photographer, most of the time I'm gonna shoot in manual mode is gonna be if I'm gonna do a longer exposure where I wanna control the shutter speed. Meaning, you know, maybe I'm gonna use a neutral density filter and I wanna do a 15-second exposure and, you know, if I go into aperture priority, it's not gonna let me get to what I want to. The other times, the only other times I really use manual mode's gonna be, I don't do much studio work, but if I do studio work with strobes and stuff like that, then I'll usually go into manual and, you know, control the settings there. Cool. Sounds good. Cool. All right, so that takes care of pretty much all of our settings to help us get the shot, and I think it's about time to start putting them into practice, too. Sounds great. All right, so there's our camera settings. I just, I made a, I called an audible on my next live, and I just added it in here, 'cause I watched myself on there. So I found the quote of the day from me, so make sure you tweet this all over the place. Quote of the day, "I like my stuff warm." (audience laughs) Great. I think that's awesome. Great, great quote. All right, so let's take a look here. Some camera settings. Aperture. F/16, f/8. That's generally gonna be the two that I'm on. And I said it in the video, but it kinda depends how deep the scene is, how much depth is there. So let's run through a few photos and I'll give you my aperture thoughts as I look through the photos here. So here we've got a scene in Death Valley where, you know, the showcase is all these patterns in the foreground, and then there's these mountains in the background. So I'm at f/16, which is gonna give me good front to back sharpness, but I'm focused really, you know, mostly up here in the foreground. If I had to pick a spot, I'm probably focused, you know, right up in there. So all that's gonna be nice and sharp, all that's gonna be nice and sharp, but that foreground is what I want to stand out. Same thing on this. You know, I want the patterns in the sand is what grabbed me, and that's really what I wanna worry about. Honestly, that hill and the shadows in the background, you're not gonna know how sharp or not sharp that is. Something like this. So now I have, I got my zoom lens on, all right? F/8. There's no reason not to be. I've got nothing in front of me. And when I say in front of me, I'm usually thinking 10 to 20 feet in front of me. Past that, it's what they call infinity, and your camera, no matter what you do, especially with a wide angle lens on, okay? If you've got a wide angle lens on, past that 10 to 20-foot mark in front of you, they call it what's, they call it infinity, which is you could basically set the focus ring on your camera to almost anything and it's gonna be sharp, okay? It doesn't matter if you focus on something there. Everything that's out there is gonna be about the same sharpness. So wide angle, you don't have anything in front of you, you definitely don't have to worry about it. Zoom, I don't have anything, if I had a person here, then it would be different. If I had a person 10 feet in front of me and I focused on them at f/8, what was in the background would fall out of focus. But since there's nothing there hundreds and hundreds of yards away, f/8 is just fine. Same thing with that shot. That's, that is f/8. Same thing with this photo here. This is, believe it or not, although it looks like a wide scene, this is a, I had my 70 to 200 on for this. It's 'cause it's way out in the distance and you're standing back on this kinda overlook area. So again, that's gonna be at f/8. I have no foreground. Even though those trees, those trees look like they're in the foreground, those trees are still 100 yards in front of me. These houses on the water there. Again, I've got no depth of field issues to tackle, so there's nothing in front of the camera that I have to worry about, so f/8. Something like this. So I'm kinda flipping what I said, right? I've said, okay, if I have something in front of me, then I want it in focus, and I'm gonna shoot at f/ so everything behind me, or behind it's in focus. This is, you know, some of the wildflowers kinda happening at Mount Rainier, and I chose to shoot that at f/8. I don't think I went down as low as, like, f/2.8 or f/4, 'cause that would've really made it blurry in the back. But I probably took it. I probably took a couple versions of it just so I had some to choose from. But I like that you can still see the mountain back there. It's not too blurry. So in this one, it's like, I kinda know my rules and my guidelines that I use, and in this one, I chose to break it, just like I did with the wood on the beach where I focused on that and let everything go soft. There's that shot. So we got our rules, we got our guidelines, but there's, you know, there's always times to break them. Shutter speed. So slow, fast. Mostly gonna affect water, sometimes clouds. So as a landscape/nature photographer, we don't worry too much about shutter speed unless we're gonna get into wildlife. Then if we're gonna get into wildlife, then we're maybe gonna be more aware of our shutter speed and I'm gonna have to start to play with my ISO more to make sure I can freeze the action, if there's a bird flying in the air or something like that. But for most of our still landscape/nature photos, we're really talking about water. So slow or fast. Let's look at a couple of different versions here. So that's super, super slow, slow shutter speed water. That's probably, I guess that's gonna be somewhere in the range of three seconds ish, three to five seconds. This is a waterfall in Portland, just outside of Portland. I just set my camera up on the tripod, and I set it up to, like, do a 10-second timer and then to take, like, 10 photos, because it took me a while to get out there. But then I just set myself up and just kinda, like, climbed over the rocks and just went and stood there and stood really still. So again, longer shutter speed. We're not talking super long, all right? Not talking super long. This is probably half of a second. Same thing here. And just the fact, like, if you guys are wondering about gear and filters for this stuff, just the fact that you're out there at sunrise or sunset, just the fact that you're out in this canopy tree area, your exposure is gonna, your shutter speed, we're on aperture priority, remember? So I choose f/16. My shutter speeds are naturally gonna get longer. If I waited until midday and it gets really bright out, then yeah, maybe I'll have to bring out the filters. But for a lotta this stuff, because I'm shooting towards the edges of the day, your shutter speeds naturally get longer. Again, same thing here. You know, it was probably a half of a second. But it's kinda like, you know, so this is, like, the perfect one for turn around, because where I was, like, shooting out this way, and it's like, I can just hear the splashes of the water behind me, and I look, and the first light of the day happens to be coming through there, and you just get this glow. We're gonna post-process. This is the one for the class, we're gonna post-process this one from scratch tomorrow. This is a good one. You'll like this one. Lights. So it doesn't all have to be water. Lights. I said earlier in the class, you know, we're landscape/outdoor photographers. My guess is most of you like, when you travel around, you like to just photograph the places around, so it doesn't mean that it has to be a true landscape. I think cities, architecture, I think we all kinda just like to photograph our travels. You know, I've been traveling to LA. Here's a way to make a more interesting shot of downtown LA. You know, I could've put my camera there and just click, or I could've waited until sunset and waited for the light to go down and do a longer exposure. Again, no filters on this one. The light's already down. The exposure was plenty long. That's a beautiful city. Where is that? LA. LA, that's just awesome. You can see here it's starting to get a little bit faster shutter speed. I'm capturing the water's moving, but just a little bit faster. And then here's what's interesting, guys, is there's the right shutter speed for the subject, and this means, this is important, because, I mean, it's fun, 'cause you, I mean, I'm constantly learning. I got into a mode where for years, I would shoot long exposure of all water. Like, if I got near water, I'm getting my ND filters out and I'm smoothing out all the water. And as I started to evaluate my own work and just started looking at everything, I started realizing every body of water has the right shutter speed. So a waterfall, the right shutter speed's gonna be, you know, under in a second kind of a range, you know, half a second, to get enough motion in the water. We don't wanna freeze a waterfall. Places like... Let's go back here to... You know, places like that, the right shutter speed's a little bit longer. Let's get some of the cascading effect in the water. So every water has its right shutter speed. You'll see some longer shutter speeds where I totally smooth out the water and it looks like just a glassy lake. To me, had I done that on this shot, I'd've lost all that reflection on the water in the, and it's not a crystal clear reflection, but I love it. Like, could be me personally. That's part of what draws me to that photo is all the colors off of those ripples in the water. And had I done a 30 or 60-second exposure, I'd've never gotten that. It would've flattened out and it would've been a totally different photo. But, and then we talk about framing. That's another photo. That's a framed shot using trees to frame it. So that's letting the exposure go for a few seconds. See all the streakiness? Also take a look at the clouds. Remember I said what's the right shutter speed? Look at the clouds. See how they start to get streaky? So you leave that open for a few seconds. It was a windy day, the clouds were moving, and they almost look like they're blurred. Same thing. You can't see too many clouds in the background on that one, but the clouds are blurred, and then that shot is, that's a 60-second exposure. That's what I was talking about about the glassy type of a look. ISO, metering, focus. This stuff gets pretty simple. So a shot like this. I was in a hot air balloon above another hot air balloon, and I had my Sony, I had my 70 to 200 on, but the sun's going down. You can see this is at the edge of the day. This is towards sunset. My shutter speeds are starting to get longer. So I'm in a moving balloon, what's below me is moving, and I'm out the side of the balloon and I'm shooting, I'm shooting, and I can see I'm starting to get blurry photos. So what do I do? Crank up the ISO, okay? See the area in front of the camera here? It was a windy day and that was moving. It's the focal point of my photo, though. I want you in that, I want you seeing that, and if it's blurry, it's gonna be distracting. Crank up my ISO. Same thing here. I got that foreground. Crank up the ISO. Let's go back to the metering and focus. So where am I focused in there? This one's probably, this one's f/8, just letting the camera auto focus wherever. Again, there's no depth of field. This one I'm focused up close. This one I'm focused up close. I'm focused on all those flowers up front. Everything in the background, it's not gonna be pinpoint tack sharp, but it's plenty sharp enough. Matt, I just wanna have some questions from the internet. Yes. About all the stuff that we just covered, 'cause there was some, you know, kind of some important stuff in there. So we had a question, a lotta questions about live view and whether you use it and how you might, if you do, how you incorporate it. Cool. So yes, live view. Live view on some cameras is something that you actually have to turn on. Most of your Canons and your Nikons and your DSLRs, it's, you know, if you're not familiar with it, it's a feature that basically gives you a live view of what the viewfinder's seeing. On my Sony, I actually don't have a choice, 'cause the Sony is all electronic viewfinder. So when you, even when you look through the eyepiece, you're seeing an electronic version of the photo, which is kinda funky. Kinda, it's weird to get used to. I like it because when you see the screen on the back and when you look through the viewfinder on it, you're seeing the photo that you're gonna get. When you click, it looks exactly like that. Where, has anybody ever looked through, I mean, when I shot Nikon, I used to say, man, I'm looking through the viewfinder. If I could just click a button that took that photo, I'd be good. But that's not the way the scene looks. That's not the way your camera sees it, you know? You look through and you see it. It doesn't see it that way. So when I shot Nikon, yeah, I used live view all the time to kinda get a feel for the photo. A lotta times if auto focus wasn't quite nailing it for me, a lotta the times I would go into live view, and then you can zoom in while you're in live view and then you can do manual focus. You can just kinda rock your focus ring back and focus and get, you know, just tack sharp, perfect focus if auto focus isn't getting it for you. Sometimes it's too dark and it might not pick it up, so... Yes, I use live view. I am a fan of the electronic viewfinder. I absolutely love it now. It's one of the, I know some people can't stand it, but I have adopted it and I dig it now.
Class Materials
Bonus Materials
Ratings and Reviews
Christian Ruvolo
Mat Kloskowski class is really amazing, full of very useful tipps and inspiration. Wonderful pictures by him help to understand the explanations an I am learning A LOT from him!!! Thank you for the class!!! TOP!!!!
Louie
I love Matt's teaching style, humor, honesty, friendliness. I love On1 and all the other demos and critiques he does. He makes me enjoy the craft/art of photography much more and is a great inspiration.
a Creativelive Student
This class was for beginners and I believe Matt did a great job of giving students an great introduction to landscape photography. More on the practical than technical side, but that seems appropriate for an intro class. He comes across as a "real" guy who loves what he does and is eager to share his knowledge. Those new to photography will get a lot of helpful information and tips in this course.