Lesson Info
15. Pre-visualization
Lessons
Day 1
1Class Introduction
23:23 2The Nature of Landscape Photography
29:02 3Finding Your Eye
28:36 4Gear Bag
23:02 5The Creative Trinity
11:15 6Scale
39:20 7Light and Timing
29:26The Technical Trinity
15:06 9Metering, White Balance, and Depth of Field
32:17 10Shutter Speed
10:24 11Focus
15:04 12The Vocabulary of Composition Part 1
32:20 13The Vocabulary of Composition Part 2
36:58 14Techniques in the Field: Scouting
16:23 15Pre-visualization
25:41 16Bracketing
28:11 17Tilt Shift Lens
26:47 18Long Exposures
26:49 19Post Processing: Importing into Lightroom
20:39 20Lightroom Catalog Setup
17:43 21Color Correction
23:35 22Develop Module
31:40 23Basic and HSL Panel
23:35 24Filters - Regional Dynamics
27:46 25Merge HDR Images
17:26 26Stitching Images and Manual Blending
24:12 27Converting to Black and White
27:41Day 2
Lesson Info
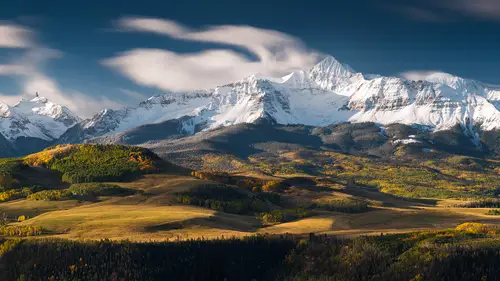
Pre-visualization
Previsualizing. This is something that is really important about scouting as well, because when you're in that place and you're having fun and you're looking around for pictures, hopefully you're thinking about all those things that have come up as we've talked about in composition and lighting. One of them, though, is, of course, the ability to transform a scene in front of you to what it could be at a different time in a different composition even, or with different equipment in some cases. This is an example. This is Telescope Peak in California, near Death Valley, and I'd been roaming around in the desert out there quite a bit. I've logged many hours and nights. You get used to seeing some of the similar landscapes and when we stumbled into this place it was this forest of old Joshuas and it really stood out, made an impression. I think that, if anything, I was amazed that it was so beautiful, and I started taking pictures and the snow was great. But, I was there in the middle of t...
he day so I realized I wasn't gonna get a whole lot. It was a great place to sort of walk around and compose with these big beautiful old Joshuas. It wasn't until that night driving back that I realized, this is really a place for something a little more special. One of the things about night photography is that it really helps to be far away from light pollution. This place out in Death Valley is just that. It's absolutely ideal. We don't have, even though Los Angeles and Vegas are there, they're miles and miles away, and so there's less light pollution out in Death Valley than many areas. That's one of the keys for seeing the Milky Way and seeing all the stars, of course. A couple years later, my friend and I went back and spent the night there and went out at about 2 a.m. and I was able to capture the Milky Way. This is a picture that was taken over the course of about at least 180 degrees, so I've stitched many different images together. One of the aspects of it that I like is that I lined up the Joshua tree on one side with the Joshua on the other so that the Milky Way was touching both Joshuas. That was something that I worked hard at getting to the right position so that I could capture that scene just that way. These are all the pictures. The raw files. You can see the number of pictures. These were all taken using the technique that I'm gonna talk about in a little bit, which is using a nodal slide and doing a stitched pano. Another example of scouting is you drive up and down the Owens River Valley in California. You go through a series of little towns and you're going between the Sierra Nevada Mountains and the Inyo Mountains. It's quite a dramatic valley, in fact. It's one of my favorite places because the Sierras are towering up to 14,000 feet on one side and on the other side of the valley you have the Inyo Mountains. Having been by there many times with my family and hearing my dad as he's driving by. He loved bristlecones, and so he always said "I think there might be bristlecones up there", and it was just one of those things he'd say. Way up on this ridge, at the top of a mountain called Keynot Peak are a series of trees that are scattered about in a way that look like they might be bristlecones. Even with powerful binoculars, it's really difficult to tell because they're just extremely hard to separate from the rocks they're in and where they are, so, it's one of those things that you're just not gonna be able to confirm unless you go up there. A good friend and workshop leader, Dave Porter and I decided we're gonna go find out. One of the problems with this place is that there's no water, so you have to carry all your water or you have to go when there's snow. We timed it when there was a little bit of snow had fallen on the peak, so that when we get up there, we could melt some snow to keep ourselves alive. There's Dave. It's kinda hard to see him down in there, but you get the general essence of how big this place is. It's basically from the bottom of the climb to the top of the peak. You gain about 6500 vertical feet in about 5-6 miles, I think, so the trail goes pretty steep. We didn't get all the way up (laughing) the first day, and this is Dave standing by the tent. You can see we still have quite a ways to go up to where the trees might be bristlecones. And, at this point, we still didn't know, is it a bristlecone or just a pinon or juniper, it could be either or. But, it ended up being a great spot anyways because about that elevation you could look across at the Sierras and see this incredible view that I had not seen before. So, already it's a win. It's a success because I found something that was really exciting. Unfortunately, I know, somebody asked me yesterday that, how do I get a shot this original or unique when there's a crowd of people? My answer to this, at least at my point in my life, is to go climb a 6000 foot mountain. But, I do understand that not everybody can do that, or I'm not gonna be able to do that forever. I just want to address that, because really, as much as you can separate yourself out from what's being done and explore your own path, you'll be happy in the end too, because you're finding something that you hadn't seen and possibly others hadn't seen. At this point, when the sun's coming up and I'm looking across at the Sierras, I'm elated. I can't believe how incredible it is. I hike up to the top and sure enough there's bristlecones, so it really was remarkable and because of that, I realized that this was a good opportunity to go proposition my dad to go hiking up to this place, because it really is something that he had been talking about for a long time. I didn't tell him how high up it was. (audience laughs) He was quite a trooper though. Although he didn't carry a whole lot of water (laughing), I carried a lot of the water. I said that's fine dad, I'll be the mule. It was well worth it. We ended up making it all the way up the first day. We started very early in the morning so that we could get through some of this bottom hotter area in the cool shadow. You can see when you get up there, it's very rugged, very steep and the amazing part is that along this hill right here there was an old trail that we discovered. When Dave and I went up there originally, we had gone up a steeper route on the ridge, so I was able to bring my dad up a trail, though it wasn't much of a trail. It was made by miners. I realized that way up on this mountain in the middle of the desert, somebody had been mining, and I'm not sure if it was for gold or silver. There were a bunch of old tin cans left. On the top of this ridge, we finally made it. My dad got to meet his favorite trees in the world, which are the thousands of year old bristlecone pines. We were both very excited and very exhausted. My dad's version of scouting is just the same, hand-held. I can say with some fairly good confidence he probably won't be too pleased at me now, but he pretty much has given up and he is scouting all the time now. I've tried to give him tripods. I've tried to give him bigger cameras. He's been there, done that, and so he really enjoys scouting. The reason is, it's much more enjoyable to him, because he can be creative, see different things, move different places and cover a lot more ground. I don't blame him. Like I said, he spent at least a third of his life with his hands in a changing bag, changing holders from 4x5 transparencies. This was a great trip because he was able to scout, I was able to scout. We actually found what we wanted. This is just a series of images taken that I would recommend when you're out scouting, you're doing what is called, the way an artist would, sketching. In the process of sketching, as I mentioned yesterday as well, you're getting into the process of taking pictures. Sometimes, at least for me, it takes this process to actually activate enough brain cells to start composing, especially after you hiked up 6000 feet. This is a square picture. I bring that up just again, because a lot of these trees and these compositions out there just don't fit into 2x3 aspect ratio. When we got up there the first night, it was beautiful and we had a great sunset, great late light, and then the next day the wind came up and it blew very hard and out of that, though, came something interesting. I had not seen it before quite this severity, but this is what's called, I guess, a Sierra wave. The wind starts blowing and it comes over the crest of the Sierra Nevada Mountains and it creates this activity here, and so this is a time lapse. This is taken over the course of about an hour, I guess. If you look carefully down at the bottom you can see some of that sand blowing from Owens Lake, and it's a lot of sand, actually. This is looking the other way. The most amazing thing happened. This is, watch right about here, I'll stop it in a minute. See that sand blowing up? I slowed it down. Playing the video again, you can see the middle sand right there, and the sand coming up from the ridge below. I know it might not look like a whole lot, but, really what this is, is something I had never seen. That sand, that's the process that makes the sand dunes. This is the Saline Valley down below we're looking at. Off in the distance is the Eureka Valley. All your life you hear about this, sand blows and it collects at the end of the valley. But, when there's 50 knot winds and you capture it on a time lapse, it was just something quite unique and fun to be able to say that I actually saw. Bristlecone, again we had, not the most dramatic light, but it was really good to be able to capture some of these things that we had actually worked so hard to get up there for. Another shot at night. Again, up there at the Inyo Range, the skies are extremely clear, so the night photography is spectacular, as it is in a lot of the Sierras as well. Technique that you want to think about when you're out, to change gears back to something a little more useful if you're not climbing a big mountain. A good exercise when you're out, even in the park or anywhere, is to consider looking for that foreground and background. You're lining these up, and you're doing it sometimes in order, not always, but in this case, this is out on Catalina Island and I had been there a couple times. A friend of mine, who works out there, had said that there's a forest that's very nice and you might want to go see it. We tooled up and looked at it, and then, in the middle of the day, again, we saw this old dead skeleton and so I realized that that would be a great foreground to capture with the other oak trees in the background but at sunrise, of course. Then the next morning we went up and lined up with the photographer's ephemeris, where the sun would come up, and then I got myself up under this log and was able to capture the sunrise coming up through the old dead skeleton of the tree. This is Mona Lake. I bring this slide up only because when you're walking around Mona Lake, one of the best things is the tufa formations. It's a well known location to photograph in the Sierras. This is one of the places that is a great place to go to exercise compositional skills. We go there on certain workshops just for that reason. It's also a beautiful place to capture photographs. This type of subject is great to be able to line up with a foreground and background. We'll walk around and I'll mention to folks, find a good background, which is one tufa, that's out in the water, and make sure you like it, and then as you're looking at it, walk around below and only look at what's in the foreground. You're separating the two just for a moment so that you can find something that's a foreground. In this case, I walked around and found these nice little tufas covered in snow. The other way to scout is while you're sitting at home and use Google Earth. It's really a wonderful tool. I've used it many times. Places that I can't get to or that I don't have time to get to, or just physically don't wanna spend the effort in case it might not be good. You can go there and there's all kinds of pictures people have taken of these places. It's an amazing resource, as you probably know. The amazing thing, though, are the number of pictures. The way you use it, at least the way I use it, is I kinda locate the overall set. This is for finding something that doesn't have pictures of it. Then you know you're kind of off the grid. There might be one or two pictures that somebody's taken and posted and you'll see 'em show up over the area, but oftentimes they're of something 10-20 miles away, so these are kind of places that are new, undiscovered. What I wanna do is I wanna find a place where it has the potential for a good landscape. It has to have a beautiful backdrop and potential for a beautiful foreground. In this particular one, I had been and heard about Pioneer Lakes Basin up in the Sierras years back, and I think that I had seen some photos of it published, but I hadn't been there. I didn't know exactly what it would be like so I decided to look on Google Earth. You can look at it from right above. Then, of course, you can kind of steer Google Earth around so that you can see it from a different angle. Now I'm coming in looking South. You can see the Pioneer Lakes Basin down there and of course a couple pictures that you see, but some of them aren't even of that area. As I'm coming down in closer, I'm noticing that there are a couple trees scattered about in the higher lakes and then there are more trees at the lake that's lower. One of the interesting things about the Sierras and other alpine areas is that once you get above timberline, the trees, it starts looking very stark. These are areas where it almost gets to the point where it looks like a moonscape. So, for me, a more pleasing landscape, in many cases, is with those trees, especially just at a certain elevation below timberline, where the trees are a little bit taller. I'm going down into that lower lake to where the trees are a little bit higher or taller. That's what I'm looking for. Then, of course, you level Google Earth out, so now you just flew the plane down and you tip the nose up. Now you can see the peaks in the background. Already I'm getting really close and I think I'm close enough. In fact, after I saw this point of view I realized that right where that little stream comes down into the lake, there's a whole lot of potential there for foregrounds. Then, of course, you have the background of the mountain. The other thing to consider here is I'm looking southwest a little bit, so that means that when the sun comes up in the morning those peaks might light up. And, when the sun's setting, and there's that valley right out to the west, this happens in the Sierras a lot, the sun will hit those peaks, maybe at the very end of the day, and turn them pink. All those things are clues for potential, at least in the way that I am hoping that this place will look. Now it's time to get the backpack on and go check this place out. This is Mono Pass. It's one of those areas where you have to hike up and over a big pass. This is a picture to show you what it looked like as we came over Mono Pass. You can see kind of the moonscape in the foreground, then, one of the lakes down here, and this is that area that's not quite as interesting usually, to me personally, for photography. That's that moonscape-ish look. Then off to the right I get my first glimpse of the lake I'm heading for, and that's where the arrow is. Okay, just another tight shot. Here you can see exactly what was on Google Earth. The smaller trees near timberline, up above that lake, and there it is. Now I'm down along the lake and it's afternoon. Once again, it worked out because of the scouting, because the light's coming in the valley and lighting up the peak on that ridge. This is the pass that we hiked over. In addition, the bonus is all those beautiful little grasses and reeds that are in the lake right in front of me. The lake is starting to reflect and then that was the picture that I talked about yesterday. Thanks a lot to some of the pictures online. I was able to make that trip a little easier. In addition, one of the things that I enjoy doing is, of course, a whole lot of variety. As you get back away from that lake, it changes it's shape and form. As you walk around this place and you get up a little bit back from the lake, as I said, that lake and the grass around it creates a whole 'nother picture and a whole 'nother point of view. As I was sitting there, we were watching the clouds go by. It was a great opportunity to photograph what I call a time bracket, and I'll mention that later. But, how you combine three images to create one, and I'll show you this example in a minute. This is a picture just basically from a couple hundred yards from that camp. I had wished that I could get over that little winding stream to be the foreground or leading line, but you can't have everything, so I settled for this. This trip was back a few years, before I was really getting heavily into night photography. I took the picture because it was a beautiful light on the clouds. But I must say that I didn't even realize until I got back that the Milky Way was in there. For me it was a perfect example of, okay, this is something I have to go back and discover this again at a different time. That's exactly what I've been thinking about doing for quite awhile. I haven't done it yet. One of these times I will get back there with the proper camera and everything and go photograph this place at night. I also want to talk about that. I know it is a concern to try to find new places and not only a concern but it's also fun. There are other things to consider. That is to kind of rediscover a place that you've been to, many times at least. As I mentioned earlier, it's kind of like mindful eating, mindful discovery. We walk over things all the time. I'm good at it. I'll walk across the house and leave crap all over the place. I'm just not looking at it. It makes me conscious when I go back to a place, what I missed if I'm mindfully looking at it. I recommend to find a place. Even locally here, Discovery Park. The weather's gonna change, first of all. You're always going to see something different in the weather, in the conditions. One of the projects I did a few years back for the Natural History Museum in Santa Barbara was I documented the growth of the chaparral over the course of a year after one of the fires. This picture was taken a couple months after the fire and you can see the devastation of all the plant life and in some cases the homes down along Santa Barbara. It was quite tragic because it was amazing here, we had three big fires sweep through Santa Barbara. The hills behind Santa Barbara are all covered with this chaparral. The truth is though, about chaparral, is it actually requires the heat from the fire to pop the seeds open to rejuvenate. It's a very natural process. As I go back to this place, I kind of discovered it when I was photographing it after the fires, and realized that, maybe when this place grows back it's going to be something. This is a place called La Cumber Peak, right at the top of Santa Barbara. As time went by and the chaparral grew back, then I've been back there many times. As you can see in this case the fog has come in. We get a lot of fog in different times of the year but most of it's in April, May and June. The May gray and the June gloom is what we call it. Essentially it makes great opportunities for landscape photography. This is a place called San Marcos Pass. Santa Ynez Valley is right on the other side. The fog comes in Santa Ynez Valley and then with the wind it blows over San Marcos Pass and then it looks like it's filling in the shore line or Goleta and Santa Barbara below. It's a great backdrop. Something else interesting that happens in the fog is way off in the background you see fog ripples. That's where it appears as though the wind is actually just like water flowing down a river. It's causing the fog to react like a water ripple. I see that often. It makes for great time lapses. One afternoon I kind of was watching out of the corner of my eye, the weather, while I was editing, and I realized this might be a good time and the sun might pop out underneath those gray clouds. I jumped in the car, ran all the way up. It's about a 40 minute drive to La Cumbre Peak. Since I knew where it was, I knew the composition. I knew exactly where to go. I'd been there 10-20 times. Got out, and then was able to capture this light. It was only because of the amount of time I had invested and spent up there going back to that place that I was able to get this shot. You could go out to Discovery Park or many places around here time and time again and the weather is bad but you have to pay your dues, I think. Sometimes you're gonna get lucky. Of course, if you pay your dues and you find those compositions through scouting, then you're going to end up with the confidence to go up to a place when you don't have much time. Another self portrait taken up on same night on the top of the rocks. I really do love now La Cumbre Peak. I can look down on places where I live. It's become not only a great place to photograph but just a place for me to go get away for a minute and check out what I love to do.
Class Materials
bonus material with purchase
Ratings and Reviews
Jeff McPheeters
This was my first class with Creative Live and also my first exposure to landscape photographer Marc Meunch. I've been a photographer for many years, an educator in science and technical fields for more than two decades, and a lifelong learner of the craft of making photographs. I am pretty picky when it comes to educational resources and when it involves recommending something that I want to reflect my own standards of excellence. That said, I came with an open mind, with some expectation that I would learn a few tricks, but also with the understanding that after spending thousands of hours in books and online courses as well as direct workshop and tutorials from a range of photographer workshops, Adobe training, KelbyOne and other professional organizations, that some of what I'd hear would be stuff I'd already known. My first impression was positive, as I think Creative Live did a good job explaining the purpose, intent, and scope of the workshop, as well as giving me a good idea of the speaker's credentials. As the session begin on Day 1, I was immediately impressed with the quality of the technical aspects of the live feed. It was like I was there. The sound quality was outstanding. The video streamed effortlessly and I only have wireless access to the Internet. I'm not on high speed wired cable. The bandwidth can fluctuate, yet it worked extremely well. The speaker, Marc Meunch, was relaxed, engaging, professional, and possessed such a comprehensive and deep understanding of the topic that I felt extremely lucky to have been told about this workshop. I don't think I've ever been able to watch someone who was so masterful in their presentation, so thorough in their organization and outline, so enthusiastic about their work, so passionate about the craft of landscape portraiture, or so articulate and engaging with the audience; at least in the realm of Photography. I'd jump at any chance to listen to Marc Meunch again; and especially to attend one of his outdoor workshops. One of the unique aspects of this workshop was that Marc uses some video clips from his outdoor workshops to illustrate what he's talking about in the classroom. Very effective. And the slides he chooses to share are effective and easy to understand. It's very inspiring to watch Marc present ideas and illustrate them through his own work, showing before and after and alternate compositions to demonstrate the point he's making. Day 1 was so good that before it was over I'd already purchased the two day workshop. I was that certain it was worth the cost. Frankly, I'm not sure I'd find a class like this for under $100/day. This is a pretty good deal. Day 2 was equal in usefulness and inspiration as Day 1. The discussion of gear selection and scouting techniques along with the introduction to his Lightroom and Photoshop workflow was very helpful and would be especially apropos to someone getting more serious about their landscape work but not very experienced with Lightroom or Photoshop, even perhaps a little intimidated by the prospect of needing to learn those two software giants, because Marc shows the power and easy of learning them. I was pleased I was able to attend and even more pleased I can watch these over and over and study points I didn't quite grasp the first time through. I highly recommend this course. The viewer will be inspired and encouraged as a result. Marc doesn't make it look easy; rather he makes landscape photography look fun and exciting and worthy of the effort and time to find ones own style and vision, clearly imparting the practical how-to's to aid each person in their own journey to make it more enjoyable and satisfying.
a Creativelive Student
I don't like writing reviews. Seems like everyone just wants to hear that everything was... awesome. So, let me try to be specific about what I liked: I thought that the concept of the creative trinity was brilliant. I thought that Marc's presentation on composition was the best I've ever seen. His ideas on having a theme for shooting was inspiring because it was simple. He also had some great tips on light. The other thing I appreciated about Marc's presentation was the wide variety of locations shown and his knowledge of them. I also am always interested to learn more about the people that have inspired presenters. Sometimes, it feel like CL classes are aimed at the lowest experience levels. But, as someone else said in review... there is always a nugget or two and review is beneficial. I wish Marc was more animated. He's obviously very self contained and reflective -- gotta be who you are, right? I have purchased Marc's class, the Shive class, and Art Wolf's class. All have had different benefits. I wish they would do others and take complexity up a notch -- specifically, helping others understand the planning necessary... how they find reliable contacts to guide them and what those things cost. How they are transporting all the gear they carry. More specific information on permits, camping gear, dealing with adverse conditions, etc. And, more information on how they get different images of frequently photographed locations.
Sitka
I happend to stumble upon the course by an email. I clicked on it and realized that Mark had come to my town (Sitka,Alaska) to do a trip with my good friend. So I thought I'd watch a bit. After awhile I realized this is good, way good. So I shot a lot of that day just eating it up. The director would come on every bit and say there was a show price. I thought well I'll just watch. Then on the second day he did some things that the announcer said he had never seen. I thought the same thing. So I bought. I have been shooting for 40 years and I still LOVE to learn. A noted psychologist said "We are happiest when we are learning" and I couldn't agree more. Thank you Creative Live for offering these courses. I live on an Island in Southeast Alaska with 14 miles of road. BUT I can be a front row student with some of the best teachers in the world. Thank You! Also a Huge thank you to Mark. It takes a ton of time to do this, and Im sure you get tired of the same questions again and again, but it truly changes the lives of us who love this type of life.