Lesson Info
7. Light and Timing
Lessons
Day 1
1Class Introduction
23:23 2The Nature of Landscape Photography
29:02 3Finding Your Eye
28:36 4Gear Bag
23:02 5The Creative Trinity
11:15 6Scale
39:20 7Light and Timing
29:26The Technical Trinity
15:06 9Metering, White Balance, and Depth of Field
32:17 10Shutter Speed
10:24 11Focus
15:04 12The Vocabulary of Composition Part 1
32:20 13The Vocabulary of Composition Part 2
36:58 14Techniques in the Field: Scouting
16:23 15Pre-visualization
25:41 16Bracketing
28:11 17Tilt Shift Lens
26:47 18Long Exposures
26:49 19Post Processing: Importing into Lightroom
20:39 20Lightroom Catalog Setup
17:43 21Color Correction
23:35 22Develop Module
31:40 23Basic and HSL Panel
23:35 24Filters - Regional Dynamics
27:46 25Merge HDR Images
17:26 26Stitching Images and Manual Blending
24:12 27Converting to Black and White
27:41Day 2
Lesson Info
Light and Timing
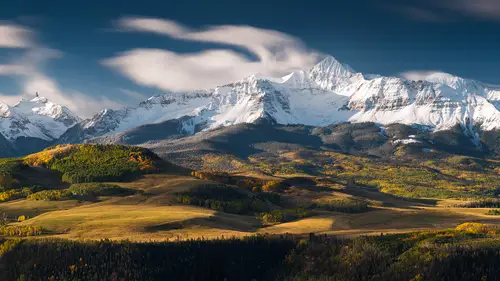
Hopefully, again, I reinforced some of those things that I was talking about. The next thing that I wanna illustrate here or talk about is timing. We had some fun timing out there with the plane flying by and a couple extra waves, but that's not the only part of timing that I wanna mention here. I really wanna illustrate the natural clock. I mentioned earlier the 24 hours in a day, I'm gonna talk about different moments. The decisive moment, again, that is related to capturing something like the plane flying by, and then, of course, your reaction time. So, first thing is sunset, right? We're all used to photographing in what we think is the best light for landscape, sunset, sunrise. But, don't put your camera away, because what happens after sunset is some of the best light possible. And I wrote this us so that you could understand just how many different stages there are, this is basically the stages of sunset and the stages of sunrise on the right, they're kind of reversed. So, first...
of all, after you get the late, warm, dramatic, soothing light, gotta love it, and then you have sunset. Then you have what's called civil twilight, that's a point in which I'll explain in a minute, and along those lines, right at that time you get alpine glow, if you heard that term, and then you have nautical twilight, astronomical twilight, and then, of course, good old night. There's all those stages in between, and they're gonna give you opportunities to photograph the landscape at those times differently. And I just reversed it, basically, until you get the sunrise and then, of course, it's the early, warm, luscious, juicy light, not the warm, dramatic, soothing light. Just kidding, it's two different types of light, that's typically what we photograph when we're out photographing the landscape. So, civic twilight is from sunset to when the sun is six degrees below the horizon, all right? This lasts about 30 minutes depending on location of the globe. If you're in Iceland, it might be a different amount of time, but around here it's safe to say about that amount of time. This is when the stars and the planets just start becoming visible. Color changes, and the contrast decreases, and both of those things are very helpful when photographing the landscape. And so, this really is some of my favorite time to photograph, I could show just a picture here quickly of the color changing in one particular cloud, and this is basically the blue hour, or right before the blue hour, and you're getting that cast, beautiful warm cast off the horizon as it's striking the cloud. So, some incredible things can happen. Your exposures will get long, and it's very fun because then the clouds will start streaking, right? You don't even need a neutral density for that. And, another shot, another example of that time of the night. A lot of this you can't see, it's in the dark, and through digital processing I can bring that out. So, what you're gonna see when you photograph this time of day, or night, is your files or your raw files will look a little bit more like that when they come out of the camera. So, just a warning, I'm gonna talk more about that tomorrow, but that's what the reality is compared to the pictures that you see published, probably. Then you have civic twilight, and that's when one of the cool things can happen, and that is alpine glow, all right? And that's one of the things that us mountaineers love, it's usually when you're on your way to a climb, and that means it's not cloudy. But it also is this time that's very difficult to actually discern with the eyes, okay? Everything's pretty blue, and that glow that's up there is very faint, it's extremely faint, but when you take a picture of it with the digital camera, it's going to become quite apparent. So, this is where you start having your eyeballs have a difficult time seeing this stuff. This example I could hardly see, it was almost dark, I didn't know those clouds were pink until I looked at it on the back of the camera. And so, then, through processing I made it even brighter. Alpine glow doesn't just happen in the mountains, this is a rock in the Galapagos, it's essential, though, that you have clear air between the horizon and the subject, okay? If it's hazy, you're gonna lose a lot of that fine, beautiful light, but here is another example in Arches National Park, this is not in the high alpine, but you still get the same effect, and it is the same thing as alpine glow. Arches is up near around five, 6,000 feet, but the key is is that the horizon is actually out below where the subject is. All right, so nautical twilight is the next part, and it begins approximately 30 minutes later, after sunset, and it goes between six degrees and 12 degrees below the horizon. And this, again, lasts about 30 minutes depending on where you are in the globe, all right? This is when the stars and the planets become even more visible, okay? And this is another example, I showed you this picture earlier, it's a great time to take longer exposures, 'cause they're gonna increase, and because of that, you can use something to paint with, like a flashlight, gives you more time during that exposure to use that flashlight. And, this is when you get the blue hour, the blue skies, okay? Another example is when you combine those blue skies with city lights, complementary colors, and this is a great way to photograph probably some of the city parks around here. At that time of night, you get that low cloud layer coming in, and you can combine that, the warm lit clouds with the nice blue sky. And, another example, this candelabra tree out in Africa, and now you can start seeing the stars, but at the same time you can see the stars, you get that beautiful glow on the horizon. Wonderful time for landscape photography. And then you get to the stage astronomical twilight, and that begins approximately one hour after sunset. So, for those people that've put their bags away, they're probably eating dinner, but you're out taking pictures now, 'cause you know this. And it lasts about 30 minutes, the camera will still show color during long exposures, and that's when your eye cannot see it at all. And, as I mentioned in the first slide, it's really hard to discern the colors at all. And this is when you'll see things like the Milky Way, 'cause it's just dark enough, and again, at the same time, you get some of that beautiful light on the horizon. This is a funny story, Arches National Park has home of Delicate Arch, and it's where the greatest number of high end equipment has trundled down the mountain and shattered at the bottom of the rock. There's one hausa blot, I actually didn't see anything fall that day, but you can see the number of people that go there for sunset, and it's a beautiful time, and the light is gorgeous, and that is what you want, and it is gorgeous. But, don't put your bags away. So, this is a picture my business partner Andy Williams took, and they were up there with a couple of our other participants, and they waited. And the funny thing is is that all those people that were in the previous picture are in their cars driving off in the distance to go get dinner, so it's just a good example of using that time of day to capture something a little bit different. All right, well this has been a great segment, good to actually see you out there shooting and talking a lot about that creativity. We had actually 21 other people all voted for this question, said I live in a place where there are dozens if not hundreds of good landscape photographers with the best available gear. I seem to end up getting the classic shots, which are almost always overshot. What can I do to stand out in the crowd? And I think that this is the start to that answer, I think that throughout the rest of the workshop we'll be talking a lot about creativity and a lot about composition, different ways to actually look at the world, but this, this was the start, what do you think? Yeah, you're implying timing, I assume. Well, timing and like working with scale, and just all the different elements of creativity that you've been talking about. But it's a good situation, because you come up to a viewpoint and there are a lot of people lined up with tripods, and what are you gonna do different? Well, one thing is timing, so you can wait til all the other photographers leave, sometimes that doesn't happen and they're there for the same reason though. But a real interesting aspect of this is that, you know, when I talked about it in the beginning, the stages that I went through as a photographer, you know, one of the biggest stages is exploring. And I don't mean going to climb Mount Rainier, it could literally mean you see the line of people, and there's the great shot, but if you go 20 feet to your left, and you might even look the other way, that can change things up quite a bit. And we've had many situations where we're editing pictures, doing critiques and workshops, and all of a sudden, somebody posts a picture that was taken looking the exact opposite direction. It happens often, so, you know, just get outside your comfort level, I'm not saying get near a cliff, but literally it could be 20 feet, it could be 100 yards away, just away from where those people are, and you'll find something different. You might even stumble into a better picture. So, that would be my logic, that's what I would typically do is try and get away from the crowd in that situation. So, what happens after, remember, if you can get yourself back into that zone, we were just out in Arches National Park and we were watching the cars go off to eat, which is probably why we got hungry. And so, now we're back sitting on that rock, and it's getting darker, it's night. So, most of the time, people think of night, and that's all they think of, it's black. But the truth is, it's anything but black, and I think if anything's changed more, or as much in landscape photography, it's about photographing at night. And it's probably what's responsible, for it is the change in the image sensors, which now are able to see in the dark, basically. So, what's really fun about the rest of the 24 hours that we don't usually see are colors that don't happen, that we can't see with our eyes, the combination of things moving and things still. And so, all that is really basically a mystery to what we see when we're out at night, and that's what makes it so fun. 'Cause when you take a picture like this, you really aren't gonna see those rocks, your eyes just aren't, they're not gonna register, and it won't come out until you see it either on the back of your camera, or back on your computer. And this one was actually one of the first night pictures I ever really took, this is back, oh, probably 15 years ago, or whenever it was I bought a 1DS Mark II Canon camera, and this was I'd take a trip out to the Channel Islands, which is out in front of Santa Barbara, and to go photographing underwater. And, we got up a little too early, actually, our clocks were set wrong, so we started our sail, and it was a good thing because what happened was this low fog came in, and the harbor lights were lighting up the fog from below, and we had a red tide. And so, that red tide is the phosphorescence glowing where the bow of the boat is cutting through the ocean water, so it made for this rather odd picture, but I'm standing on the boat just hand holding it for about 30 seconds, I think that's what the timing was. So, another part of the night is the moon, and when I was talking earlier about being surprised by the full moon, it's because typically now I'm really keen on finding out what cycle the moon is in, in fact, I have it on my calendar, I'll show you later some apps that'll tell you where the moon is and when it's coming up. Because it's critical that you get the timing of the moon right if you wanna certain type of night shot. And, one of my favorite situations or experiences in the full moon was this last summer. Glacier National Park is beautiful, and in the summer, it's one of the most amazing places to go hiking, they have something like over 800 miles of groomed trails. And so, you have to get a permit to camp, and those permits go months in advance, and so this is our answer to that, we didn't get a camp permit, so we just hiked all night. So, we took a little break at about 11 o'clock, and started up our stove, made a snack, and then the full moon comes out, you can see it's starting to cast a shadow on the distant peak there. And this is about almost how bright it is when you see, it's not quite that bright, but you get the idea. It was so bright that we turned our headlamps off while walking around this trail, but you can still see the stars, you can actually make out the Big Dipper up there, and, so you know, obviously it's night. And that's just one of the fun aspects of photographing at night is during a full moon. This was taken on the other end of where I took that last shot, and it's about three miles across that ridge in the particular spot we were, the funny story about this spot is I don't know if you remember, there's a story about a year and a half ago about a bride pushing the groom off the cliff. That's where we think it was, which is why I asked my friend to go up there and get a nice shot of where this location was, but that was kind of interesting about seeing that spot in the middle of the night, a little spooky. But it is a dramatic place, and a dramatic way to see something, is in the full moon. Some of the things you're gonna encounter, if you drop your ISO, and I'm gonna talk about a lot of this coming up in the Tech Trinity, and you're gonna drop your ISO and even your aperture, and you can take longer exposures, of course, at night, and then you get these beautiful streaking clouds. And so, a good time to do this is in the fall, when the seasons are changing, the wind is usually whipping up the storms, and the clouds are moving fast, and you get that full harvest moon at Halloween. Another great experience was in Yosemite Valley, and this is about two A.M., and so once you start seeing this light on the back of your camera, I guarantee you you won't sleep, you will be addicted, and you will continue photographing. There's a little bit of light pollution from one of the cars going by there, I think it was a ranger wondering what we were doing. But essentially, it's a beautiful time to see the place, because like Glacier, even by the roads, there are very few people out, so in a place like Yosemite, which is crowded, usually hordes of people during the day, go out in the middle of the night, especially in the full moon or even half moon and you'll see a whole different side to the park. Looks like daylight, fog came down, full moon shining through the trees. Again, that's probably taken about 1:30 in the morning. And, because of the moonlight, it's actually casting sunlight, and so that's enough light to give you all the color. And so, I added just a little bit of saturation, but otherwise all that color from the sun is bouncing off the moon, and it's lighting everything up the way it would during the day. And then, of course, if you take the moon out of the picture, then you're going to be able to see the stars, and the benefit to that nowadays is very popular is to photograph the Milky Way. And again, Milky Way is, in this shot, it's starting out on the right side and coming over the top of the frame. This is actually an image of four or five images, verticals stitched together, so the field of view is probably 150 degrees, that way you can get the whole Milky Way, or a good part of it. The light on the mountains is a little bit of that astronomical glow that's just touching just a faint bit, it was very hard to see, again. And this is a moonrise, okay, so a lot like the sunrise, when the moon is coming up, it's casting the same kind of light on the atmosphere that the sun would. And so, I couldn't see that pink at all in the exposure, but after I got back, in fact, I could hardly even see the boulders in front of me. When I stumbled out there it was foggy, and the rain had stopped, and the fog was all over the Alabama hills, and by the time I got to this rock, the fog was just lifting. But what made the shot was the moon coming up right over my shoulders, and you can see it lighting up some of the peaks back here, but it's also really lighting up the high cirrus clouds above. And then, of course, if you go far enough north, then you get the Northern Lights. And so, if you think you're gonna be awake all night down here in the lower 48 during the regular season, then once you get into the season when you get the Northern Lights, that particular time of year, then I guarantee you you'll be up staring at the monitors wondering when the Northern Lights are gonna hit, because it's extremely addicting, because they're mesmerizing. We were photographing this church, it's a black church out in Iceland, a couple hours from Reykjavík, and literally, within 10 minutes, it was a moonlit night, there were no Northern Lights at all, and you could see a little streak through the sky, like a gray streak, and once you see that gray streak, the only way to tell if it's the Northern Light is to photograph it, 'cause then it'll come out red, usually it starts with red and then it turns green, but you cannot tell that color until you see it with a naked eye. The funny thing is, we got back to the rooms and we were all looking at our computers, and a lot of people thought oh, wow, or not a lot, sorry, a couple people thought wow, something's wrong with my picture, and they had only seen the red, they couldn't see the green with their spectrum 'cause they were slightly colorblind. So, chances are, you might not even be able to see that green until you see it on your computer. And again, there is something about the certain timing, and so I wanna finish this with, I know I touched on this one when we were looking at the video of what I was taking out on the park out here the other day, and it really is one of the elements that I love, and that is the decisive moment with the subject. This is kind of taking timing, a different aspect of timing, not necessarily the daylight, but timing in your reaction time, and so, I'm switching gears here a little bit. Just like that biplane that flew by, I was having this model doing yoga on the beach, and firing away pictures, and I had no idea that she was throwing biscuits in the air, no, I'm just kidding. The actual bird came by, and through serendipity, we got the shot of the seagull looking down at her. She was not throwing biscuits in the air. All right, so you've gotta work on your timing, and that's one of the reasons why I tell people to keep shooting through something, because a lot of times you stop and you might start fiddling with the camera, but when you're photographing action or somebody doing something like that, like I say, anything can happen. In the landscape, the same thing happens with moving clouds, the light changes instantly, this is an example of a shot where the sun came out just for a moment, and it was literally two, three seconds lit up, just enough of the playa, and the critical timing was that the sun was behind the cloud just a little bit so that I wouldn't get a bunch of big flares on the front of the lens. And then, shots like this, that lasted about 10 seconds, you know, and so I was standing there, it was completely gray, the fog was beautiful, but once that sun hit it, boom, there was the shot, and it was over in moments. So, your reaction time is critical. The other obvious timing issue is when you're photographing things that you can kind of anticipate, and so you wanna get everything set up, make sure your camera settings are right, and I'm gonna talk about that in the Technical Trinity about shutter speeds and all that to capture something like the crashing wave so that you don't take this at a half a second. 'Cause if you take it at a half a second, then all that's just a blur, okay? So, part of this is getting ready for moments like this, you know, the lion gets up from the nap, and you've only got a couple seconds, then he yawns, looks like he's gonna eat somebody, and then shoot through it, and it looks like hey, what the heck are you guys doing in my territory? That's actually my favorite shot of the sequence, a lion with personality. So, it's your timing that's really critical in this situation, especially wildlife, photographing people, and like I said, photographing in certain scenarios where clouds are moving and the light's changing quickly. So, we're gonna do a little video here on how you can deal with, it'll help you understand your camera a little more, I always recommend that people do some of these drills. So, this is about drills, and the reason I reinforce this is that cameras nowadays have a lot of buttons, a lot of gadgets, a lot of menu items, and you know, if you're a weekend photographer, or even once a month, you forget where the buttons are, and they're easy to mess up, especially at critical times when things are happening and you wanna capture a bird in flight in the middle of taking a landscape shot. So, how do you deal with all these changes at once? Well, one option is Canon cameras have camera profiles, and the new Nikon cameras have 'em as well. So, you can preset all kinds of things like shutter speed, continuous high, auto focus settings, all those things, even ISO, whatever you wanna set, change that so that all you have to do is turn the dial and it goes to that preset profile. That's one thing, the other thing is you do wanna know where these buttons are, because sometimes you'll be out shooting in the dark, and your headlamp batteries die for whatever reason, you just wanna become more familiar with your camera. And I guarantee you, even when it's light out, and the sun's going down, there's gonna be less time to fiddle around with this stuff, and so you wanna be able to go at it with that muscle memory. So, what I recommend is to be able to change your ISO, shutter speed, and aperture in the dark. So, there's nothing better than a real drill, so blind yourself, and you come up to the camera, turn it on, and you fiddle around on the top, and one of these buttons is actually white balance, quality, but you wanna hit ISO, and if I come down here and hit info, and ISO, and then you can change the ISO here. And, you gotta memorize the number of clicks, and you come back down and you hit the info button again, and now you can change the shutter speed and the aperture. All those things you wanna be able to get at without seeing the camera. We had nothing else to use. We didn't have the official blindfold. All kidding aside though, this is very important because, like I said earlier, you're gonna have that moment where something happens and you really wish you had known exactly where that button was. And so, I recommend that you literally know and memorize where that ISO button is, or two buttons, how to change it, and your aperture and shutter speed, because those drills will pay off, I guarantee it. And other things too, you wanna go down your menu items in your camera, I know it's boring reading the manual, but if you can look at that manual and make some sense of it to what really are the important features to change, then it's gonna help you. I think, though, it's ISO, shutter speed, and aperture. If you can do those things without looking at the camera and know where they are, that's a good start. And kind of to sum this up, you bring together scale, location, concept, experience, timing, everything, and once and a while, you have all that skill, you get that culmination of everything, and so, this is one of those pictures that I was happy enough to be in the middle of a scene when I was able to capture it. And because of all the things I've been talking about, it was possible. We were actually following these two male lions in the Mara, and I was with my wife and daughter at the time, and so it was a thrill because it was a time for them to be able to experience this as well. This guy, the guides had given him a name, but they don't keep their names, there's only one lion in the Mara that really has a name, I think it's Notch, maybe you've seen him in the movies. But this guy was actually missing his brother, and so he started walking up this grassy hill, and right towards the top we started following him, because there's was really nothing else going on, and at the time I hadn't see the cloud, it was just kinda gray and dark. And, he started calling, the big lion roar, to try and find his brother, and it was rather interesting, and so we kept following him and he kept going up the hill, and he was obviously lost and missing his brother so he kept calling, and finally, his brother answered, and just about then he turned around, and I realized oh, that's the shot. And so, I grabbed the camera, put it in bracketing mode, held it out the door as low as I could to separate him against the horizon and the background, and then, of course, get the cloud, the super cell thunderstorm in the background as well. So, one of my favorite experiences and pictures, and bringing together all these things I've been talking about. To summarize, a couple things, when you're working with a model, ask them where they would like to go before telling them. Sometimes you don't know what it looks like, okay, it sounds silly, but honestly, what this does is two things, it keeps 'em safe, but it also gives them a chance to do something natural. 'Cause if you tell 'em to walk sideways, it's gonna be a lot more difficult to get them in a natural pose than if they're walking the way they should. Exercise, I recommend create three images utilizing scale, one with a person, one with a tree or some other natural environment, and one with an animal. You can do this at a zoo, with a friend, and with any other element, such as a tree. So, it's just a good practice, a good exercise. So, I'm gonna switch gears now, and I'm gonna keep going Real quick, before you do, just wanna address a couple things, I see a lot of people, Maria, Angelica R., Peddler Fort X, and others who are asking all about the technical settings of those last images that you were just showing. Well, actually, that's coming up in this next segment. The last segment we were talking all about looking for those moments, and being aware of timing, and how that impacts your images, not necessarily about the setting itself and how that impacts it visually, but creatively how it impacts the story you're telling with your image. So, that's what we were looking at, we will go into plenty of settings coming up here soon. Just one question though, we've got a couple people, we're gonna be talking about focusing later on as well, which, there's I know questions are coming in on that, and then Photomaker and three others were wondering, and I think this is an interesting question, I don't know if you're gonna be talking about it. In the campfire shot in the pitch dark, what do you meter on, the contrast between the sky and the hills, or the campfire? Good question, so that scene was utilizing my typical night settings, and the typical night settings are 3200 ISO, F2.8 for 30 seconds, pretty much that simple. You can modify it a little bit because of the moon, okay, so you might change the ISO from 3200 to 1600, or you might change the time from 30 seconds to 15, so that's where I start though. When I can't see, those are the numbers that I start with, and then I modify from that point.
Class Materials
bonus material with purchase
Ratings and Reviews
Jeff McPheeters
This was my first class with Creative Live and also my first exposure to landscape photographer Marc Meunch. I've been a photographer for many years, an educator in science and technical fields for more than two decades, and a lifelong learner of the craft of making photographs. I am pretty picky when it comes to educational resources and when it involves recommending something that I want to reflect my own standards of excellence. That said, I came with an open mind, with some expectation that I would learn a few tricks, but also with the understanding that after spending thousands of hours in books and online courses as well as direct workshop and tutorials from a range of photographer workshops, Adobe training, KelbyOne and other professional organizations, that some of what I'd hear would be stuff I'd already known. My first impression was positive, as I think Creative Live did a good job explaining the purpose, intent, and scope of the workshop, as well as giving me a good idea of the speaker's credentials. As the session begin on Day 1, I was immediately impressed with the quality of the technical aspects of the live feed. It was like I was there. The sound quality was outstanding. The video streamed effortlessly and I only have wireless access to the Internet. I'm not on high speed wired cable. The bandwidth can fluctuate, yet it worked extremely well. The speaker, Marc Meunch, was relaxed, engaging, professional, and possessed such a comprehensive and deep understanding of the topic that I felt extremely lucky to have been told about this workshop. I don't think I've ever been able to watch someone who was so masterful in their presentation, so thorough in their organization and outline, so enthusiastic about their work, so passionate about the craft of landscape portraiture, or so articulate and engaging with the audience; at least in the realm of Photography. I'd jump at any chance to listen to Marc Meunch again; and especially to attend one of his outdoor workshops. One of the unique aspects of this workshop was that Marc uses some video clips from his outdoor workshops to illustrate what he's talking about in the classroom. Very effective. And the slides he chooses to share are effective and easy to understand. It's very inspiring to watch Marc present ideas and illustrate them through his own work, showing before and after and alternate compositions to demonstrate the point he's making. Day 1 was so good that before it was over I'd already purchased the two day workshop. I was that certain it was worth the cost. Frankly, I'm not sure I'd find a class like this for under $100/day. This is a pretty good deal. Day 2 was equal in usefulness and inspiration as Day 1. The discussion of gear selection and scouting techniques along with the introduction to his Lightroom and Photoshop workflow was very helpful and would be especially apropos to someone getting more serious about their landscape work but not very experienced with Lightroom or Photoshop, even perhaps a little intimidated by the prospect of needing to learn those two software giants, because Marc shows the power and easy of learning them. I was pleased I was able to attend and even more pleased I can watch these over and over and study points I didn't quite grasp the first time through. I highly recommend this course. The viewer will be inspired and encouraged as a result. Marc doesn't make it look easy; rather he makes landscape photography look fun and exciting and worthy of the effort and time to find ones own style and vision, clearly imparting the practical how-to's to aid each person in their own journey to make it more enjoyable and satisfying.
a Creativelive Student
I don't like writing reviews. Seems like everyone just wants to hear that everything was... awesome. So, let me try to be specific about what I liked: I thought that the concept of the creative trinity was brilliant. I thought that Marc's presentation on composition was the best I've ever seen. His ideas on having a theme for shooting was inspiring because it was simple. He also had some great tips on light. The other thing I appreciated about Marc's presentation was the wide variety of locations shown and his knowledge of them. I also am always interested to learn more about the people that have inspired presenters. Sometimes, it feel like CL classes are aimed at the lowest experience levels. But, as someone else said in review... there is always a nugget or two and review is beneficial. I wish Marc was more animated. He's obviously very self contained and reflective -- gotta be who you are, right? I have purchased Marc's class, the Shive class, and Art Wolf's class. All have had different benefits. I wish they would do others and take complexity up a notch -- specifically, helping others understand the planning necessary... how they find reliable contacts to guide them and what those things cost. How they are transporting all the gear they carry. More specific information on permits, camping gear, dealing with adverse conditions, etc. And, more information on how they get different images of frequently photographed locations.
Sitka
I happend to stumble upon the course by an email. I clicked on it and realized that Mark had come to my town (Sitka,Alaska) to do a trip with my good friend. So I thought I'd watch a bit. After awhile I realized this is good, way good. So I shot a lot of that day just eating it up. The director would come on every bit and say there was a show price. I thought well I'll just watch. Then on the second day he did some things that the announcer said he had never seen. I thought the same thing. So I bought. I have been shooting for 40 years and I still LOVE to learn. A noted psychologist said "We are happiest when we are learning" and I couldn't agree more. Thank you Creative Live for offering these courses. I live on an Island in Southeast Alaska with 14 miles of road. BUT I can be a front row student with some of the best teachers in the world. Thank You! Also a Huge thank you to Mark. It takes a ton of time to do this, and Im sure you get tired of the same questions again and again, but it truly changes the lives of us who love this type of life.