Lesson Info
3. How to Increase Using M1, YO, and kf&b Methods
Lessons
Class Introduction
01:26 2Class Introduction
06:28 3How to Increase Using M1, YO, and kf&b Methods
10:38 4How to Basic Cable Stitch
16:48 5How to Use Mosaic Colorwork Stitch Pattern
10:59 6How to Lace Diamond Stitch Pattern & Read Chart
14:48 7How to Block
10:25 8How to Bobble Stitch
06:50Lesson Info
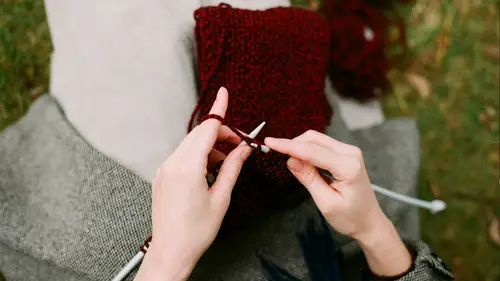
How to Increase Using M1, YO, and kf&b Methods
Alright, once you've made sort of your initial projects that are straight, maybe you started with a scarf or a techie sleeve or something, you might want to consider doing a little shaping. And that starts with increasing stitches. So, taking a stitch and making two out of one, and this will make your piece larger, obviously. This will be used any time you might want to, if you're working from the top down and you might want to do some shoulder shaping or maybe you started a waistband and you want that to be firmer and then you need to create some more fabric for the body of it. There are tons of different times when you would need to go from lesser stitches to more. So, I'm going to show you how to do three different types of increases. I'm going to take you over and show you on this swatch that I'm working on. Why you would use the different increase for a different piece, or just how they look different. So, the first one that we're going to be showing is a make one. Now, this is ab...
solutely probably the most invisible of the three that I'm showing today. This is a really nice, solid increase that's called for in a lot of patterns. I will caution you, though. Knitting is an oral tradition, so it's been passed down from generation to generations, so that sometimes means there's a little bit of discrepancy between some terms. Most of them have been standardized, but make one is one of those that even amongst professionals sometimes there's disagreement with which method is actually called a make one. I'm going to teach you the one that I'm pretty sure is the right way. But, make one is always going to be this way unless the author of the book or the designer of the pattern lets you know differently, whatever their version is. Okay, so that's nice and clean, pretty invisible. This next one is really sort of loud and proud. This is a yarn over. This is going to create almost a lace effect. I'm going to pull in this piece over here. You can see I did a series-- actually, it would go this way. I started small and I did a series of the yarn overs, with one stitch that I didn't touch in between. It kind of gives a cool little tree look that has nothing to do with anything, but I was kind of happy with how that looked. So, I use this increase a lot when I'm designing sweaters from the top down. More for women than for men, because I like that really nice eyelet effect that it creates, so it looks like a design feature, and it's also practical, utilitarian, it's getting you where you need to be. So, that's the next one. The other one is also relatively decorative, it's just more subtle. And this is the KFB. And you can see right here, there are these little bars. So, it's subtle, but it will create a nice little line of bumps. I actually really like tiny textural details like that, so I'll use the KFB, which is Knit Front and Back, often. This also, as a side note, is the increase I would always use if I was knitting in garter stitch, which is knitting every row. Because it has those bumps that you get with garter stitch, it would be absolutely invisible, so if you weren't looking for a design extra, if you didn't want it to be noticeable, that is the go-to increase to use for garter stitch. So, why don't I show you how to do all three now? Alright, so you're knitting along, happy as can be, and you are ready to increase. So, for a make one, we are going to-- here's the stitch that's on your needle, right? You can see that that's loaded on your needle. Now, the row before, below, is this stitch. Do you see that? It's the loop. So, you can see knit stitches look like upside down raindrops. I mean, you know, sort of. What I imagine an upside down raindrop would look like. And so, you can see that whole stitch is right there. This is where you're going to get that extra stitch. This is going to be where you make one. So, you insert your left-hand needle into that loop in the stitch below and you're going to just lift it and place it on your left-hand needle. And then you would just knit it as if it were forever and always a stitch and then you'd also knit the stitch next to it, and then you'd just continue on. So, you've turned that one stitch into two. Let me show you one more time. Okay, so this is our stitch that we would normally just knit, right? But instead of that, we're going to go to his buddy right below him. We're going to lift up the loop and place it on the left-hand needle. And then--and we want to make sure it's oriented the right way. I don't know if you can see that. But this is what it should look like on the needle. If you lifted it up the other way, it would be twisted and you can see those clearly like a twist or a little X. You'll also notice--I say clearly, if for whatever reason, if you don't notice, if it feels hard to get your needle in, like a little bit snug, take a look, make sure that you haven't done that, because this should be really open and easy to knit. Okay, and just cause we're here, we're all here together, I'm just going to show you one more time. So, we get to the stitch where we want to be, we lift up the loop from the row below, place it on the needle, and then we knit it. And that is a make one. In a pattern, it will be an M1, that will be the abbreviation, and all of the abbreviations for this course are bonus material that you can download so you don't ever have to try to decode on your own. We've got your back. Alright, so now I'm going to move over to yarn overs. yarn overs-- I'm going to actually even just pause and pull something in for really quickly. The scarf that I was wearing earlier is... Once you delve into lace work, lace work is almost... Always, lace work will have yarn overs in it. That's what creates this really pretty open weave. Those are all made by these increases. So, for lacework, and we're going to touch a little bit on lace later, a different stitch pattern, but lace. Lace is always created with a series of yarn overs and then decreases, to create sort of these beautiful kind of open weave looking piece. So, I'm going to set this aside. So, to do it, and it's actually probably the easiest of all of them to do but it also has, I think, the most impact. Alright, so we're to the place that we want to be. Actually, let me get one stitch over. So, to yarn over, you're going to wrap the yarn around the needle so it's laying on top of it, on top of the right needle. And then you just knit the next stitch. That's it, you're done. Yarn over... Knit. And you can see, that that creates this big hole. And just since you've laid this yarn over the needle, that's actually creating the extra stitch. Because if you had your yarn in back, it would be out of the way, right? But because you've brought it around front, you have to go back again to pick up that next stitch, and that's when the actual yarn over is truly created. Is right there when you're knitting that next stitch. So, now you can see I just did three in a row, so it's starting to really open up. I also really love yarn overs for really sweet details, like eyelets. If I was working on a baby garment I might just do a row of, like, alternate yarn overs and then knit stitch and it would just give this really sweet little, open, kind of dotted pattern. You can work a row of yarn overs and knit ones and then you can fold it over and you get kind of a pico edge, there's a lot of things that you can do with them, it seems super simple, but it really sort of-- I mean, no pun intended, but opens up knitting possibilities. Alright, so. The last one that I'm going to show you, let me just get over to where I need to be on the piece. Is called a KFB. That means Knit Front and Back. Again, that's the abbreviation for it, abbreviations are in bonus material so you don't need to remember that. And normally if you're working in a pattern, there will either be the abbreviations also listed on... On the pattern itself, or if you're working out of a magazine or a book, it will also be listed in either the front or the back matter of it. So, you don't ever really need to worry about memorizing them, but after a while, obviously, it becomes second nature. Alright, so, to knit in front and the back of a stitch, you're going to insert the needle as you normally would if you're knitting the stitch. You knit that stitch, except you don't pull the loop off of the left-hand needle. You leave it there and then you knit it again, only this time through the back of the loop. So, this is the front of the loop, this is back of the loop. So, I take my needle and I insert it through the back, and then I knit it. And so now, I've turned that one stitch into two and you can see the backs, when you knit through the back loop, it gives you almost sort of like what looks like a purl bump. And that's that bar you were seeing at the beginning that I was telling you. And that's where you're going to get your sort of textural effect too. So, let's do it again. We're going to knit through this is also called the front leg of a stitch, so the front, leave the stitch on the left-hand needle. Knit through the back leg or the back of the loop. Let that go. Okay, I'm going to show you one last time. Knit through the front. And knit through the back. So, now we've just turned what were three stitches into six stitches and you can see how it alternates, how you can see there's like a little scar, or that little purl bump, or whatever you want to call it, alternating with what looks like a just your regular old knit stitch. So, you've increased, you've added a little detailing, and now you're absolutely on your way to be able to work with any garment that has a little shaping to it. So, let's see what we can look at next.
Class Materials
Bonus Materials with Purchase
Ratings and Reviews
Ramona Morrissette-Nagai
She is engaging, warm, and educational.
Student Work
Related Classes
Knitting