Lessons
Lesson Info
Overview of Editing Process Workflow
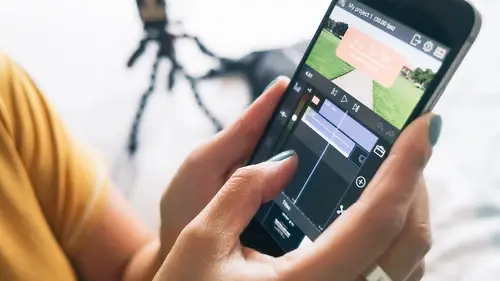
So once things are in the timeline, you can still trim them; you're not stuck with this forever. So let's say I want this clip to be a little bit longer, there are these handles to the left and right that you can drag, so you can drag this handle here, make it longer and same thing on the other side. And I'm just showing you, there's many ways to do this same thing; it's kind of like whatever works for you. I'm a dragger, so I just kind of drag things in and out, but you can also cut them, so for those of you that have done editing before, you're familiar with this. So I'll move the play head to, say I wanna cut it right here. See the scissors on the right? So if I tap on that, it cut it. And then, I'm gonna zoom in, and then I can delete it with the trash can here. But if somehow you're like "Oh no! I didn't want to cut that part out!" you can still recover it. Just tap on that clip, and then you can drag it back out. So nothing's ever destroyed which is great because I go back and fo...
rth a lot. So then, we're just gonna import a few more clips, and we're gonna put together a cool story or a nice simple vignette. So we have the timelapse, we have a little bit of footage at the beach, and then I want to show me actually going onto the beach to shoot some photos. It was a super windy day, so I'm going to scrub through to where I enter the frame up there. Let me zoom here. And we're gonna do the same thing. The thing with this, see this is a 55 second clip? I don't wanna include all 55 seconds, but I know there are certain parts of it that I want to include, so you can actually just pick two seconds here, three seconds in the middle, and so on, and bring them in, so that's what we're gonna do right now. So, I'm gonna pick this part here, and I mark the endpoints, and then I'm gonna maybe here, mark the outpoint by tapping on the right bracket. I'm gonna double tap, and then bring it down into the timeline. And then we're gonna go back to that same clip. So let me pause here for a second. I don't know if you can see 'cause it's small, but the clips that I've already imported, and you will see they're yellow bars, you can see how much of that clip you've brought in and which clips you have used. They have a yellow check so that you know, "Oh, I already used this" or "I only used the end of this." It's really helpful. So now we're back in this clip. Let me zoom again. And I know I crouch down here, so I want that, so I mark the end, and then a few seconds of that, mark the out, double tap, and then bring it back down. And then, I'm gonna do the same thing. Tap back on there again, and let me know if I'm going too fast; I'm happy to slow down. So then, let me zoom in. So I move; I kinda like that, I'm going like this, it's like "Ah, so windy," so I'm gonna include that and a little bit of that, so you see I'm not super "yeah, close enough." So I'll double tap that, bring it down, and then we're gonna go back here and then do the same thing, just here I crouch down, here. The idea behind here is showing that I went different parts of the beach to take different photos, so that's why I'm including all these different clips. So cool. I think I'm happy with that, so let me just scrub back, and I'm gonna zoom out so that I see the whole all of the clips that I have in here, so I'll move this back. So we have a fairly good rough cut. We have that, and then we have that. And you can also bring photos in, so let's do that. So I did take a few photos, so as part of the story, you wanna show "Tada, here are the photos from this vintage lens." So I will tap on this photo. You see the interface is a little bit different. It doesn't have...you can't mark things in out 'cause it's a still, so all you can do is just bring it down, so I've tapped here, and then drop it down. So let me zoom in to the timeline. By default, it gives you two seconds of that, but you can change it just like any of the other clips. You can bring it in, bring it out, depending on what you want, so I think I'm gonna keep it around two seconds. And then there's another photo here that I'm gonna bring in, so I think that's good. I keep it at two seconds, and then let's say another photo over here, and then I'm gonna bring that in as well. So, that was not super hard, right? A lot of it is just deciding what you wanna include, but not getting too tied to it because later on, you're really going to be doing your fine tuning. Let me add a couple more things because I know I really wanna drive in the point that I took pictures, So I'm going to include some of this here, so we're gonna do the same thing here. So we're going to bring it in, select an outpoint right there, and now, it's like "Oh, where do I wanna place this?" So I'm gonna scrub in the timeline. I wanna place it after this clip. So I'm gonna go back here, I drag, and then I can make sure it goes in between, and then I can place it in between. And that's a little too long for me 'cause it's three seconds; we'll do that. And I think that is good, one more... I can totally do this all day long. I get in a zone, it's like "Oh yeah, this looks good. Bring that in," okay there. I'm gonna pause right there because it seems like it takes a long time because it does. I would say if I were to talk about percentage of time that I spend on putting this rough cut together, 70 percent of the editing goes into creating the rough cut. Because this is where you're putting your story together. This matters a lot, and this is where you play around where things should go, so we can choose to move things around. For example, I say "I want this clip actually to be here," so I actually spend quite a bit of time in creating the rough cut. Alright, so I am going to pause there and see if any of you have questions so far, anyone? Could you go back over the name of this app? Yes, the app is called LumaFusion. LumaFusion, and is it just for iPhone, or Android, too? Yeah, it is just for iPhone. Okay. Unfortunately, I know. I wish it could be on Android as well, it's a great app. Alright, any questions? Alright, good! There was a question... Through different lenses, like mobile lenses, like Moment and other mobile lenses, does that affect any...how would that affect... How would it affect editing? Yeah. It wouldn't, it just means you have a different look to your footage. You're just changing an aspect ratio, right? Yeah basically, so it doesn't really affect the footage. What it affects is if you are filming vertical and then horizontal and you have both kinds in your video, that's a tough one 'cause you have to decide one way or the other, are you gonna go with horizontal or crop everything and have it be vertical, right? And so one's gonna have black bars one way or the other, so typically, if you want a clean looking video, try to shoot everything the same way, so everything horizontal or everything vertical. Otherwise, you're gonna be cropping things. Yeah, good question. Yes! Are there file limitations as far as the video goes? Do you have to shoot it with your phone? Or could you potentially shoot with, say, a point and shoot that does video, and then put that file on your phone? Yup. Yes. So what I'll...You're not limited to what you shot with your phone. In fact, what a lot of photographers or film-makers do is they'll shoot with their DSLR's, and then they'll download the footage onto a drive like Dropbox, for example. And then you can import your footage from Dropbox. Actually, let me just show you that, how you do that; it's a great question. The way I showed you my footage was already on my phone, so that was easy, right? And let me show you how you could potentially import footage from elsewhere. So let's go show the iPhone screen real quick. See this icon here? See this folder "Imported"? If you import anything from Dropbox, it would be in there. The way to import from Dropbox or Google Drive or whatever, see these three dots, here? So let me tap on that. You do import media; you can import any kind of media. In fact, this is what I use regularly. We'll go over this in music. Music or footage that you shot with other devices, and then you can say import media, and then these are all the different things you can connect to, so you just have to log in with your account, so I have a Dropbox account, so I'll tap my Dropbox, and then it has all the different ways that you can import in, so it's super cool. You're not limited to your footage from your iPhone.
Class Materials
Free Bonus Material
Ratings and Reviews
Sparkle Queen
really liked the instructor; super clear and went at a good pace that meant you could follow instructions but also not get bored! Have been trying to get my head around video editing for ages but its hard to find clear instruction and guidance; the discovery last month of 'Creative Live' and its classes has totally de mystified the whole process! Feeling excited to try this out myself now - when i feel i have it nailed will try to remember to post some work in here to show my efforts!
Sheila
Excellent class but I wish it was longer. I learned so much! Cielo is a natural when it comes to the great work she creates, as well as teaching others. I couldn't recommend this class more!
Stavroula Fotiou
Great instructor and great class. She really breaks it down so you can grasp the small steps that lead to the end result.
Student Work
Related Classes
Mobile Photography