Lessons
Class Introduction
02:36 2Lens Choice for Macro Photography
06:14 3How to Use Extension Tubes
06:06 4Inexpensive Macro Tools
08:01 5Camera Settings
04:16 6Camera Support
07:05 7Shutter Releases
03:29 8Lighting
06:52Lesson Info
Depth of Field Control
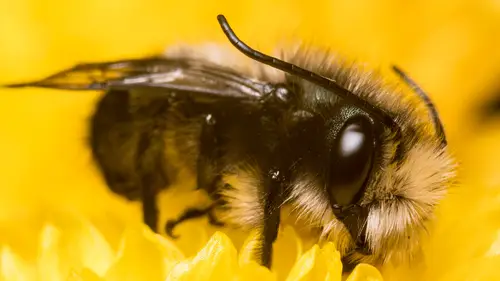
Controlling your depth of field is super important in macro photography. You know, it's-- In portraiture, when you shoot a portrait of a person, a lot of times you want that background to go blurry. And, that provides us visual separation between the subject and the environment. And that's a really nice effect. In the case of that photo we just showed with that flower, well there really is no background in that photo, right? The photo is the whole photo, and so it'd be nice for the everything in that image to be in focus. So, even at f/16, our depth of field is very close, or very narrow close focus. So, f/16, I recommend f/22, f/40, something like that. And if you're handholding and you're using just ambient light out in nature, like it's a cloudy day, you might need to bump your ISO up so you can get a shutter speed that you can use. You know, ISO, let's say ISO 100 at f/40, even on a sunny day is gonna give you like a half a second exposure, so you gotta start bumping up your ISOs w...
hen you're handholding this stuff, okay? Well, let me show you, I wanna go back to Lightroom and I just wanna show you a photo that I took. Let's see, go back to here. Scroll down to my CreativeLive folder. There we go, CreativeLive macro. Let me just show you a couple of shots here. So we'll go, let's go E, shift tab, I. There we go. So this image, I took at 70 millimeter with my 24 to 70 lens. Okay. And, I think with this shot I actually had an extension tube in play. And, you see that I shot that at f/2.8. So the size of that, I don't even know what that is, that pretty green Dr. Seussy type of plant. The size of that was maybe the size of a dime. The head of that was about the size of a dime. So, you can see the background. I really like that background, right? The background's fantastic. Wouldn't it be ideal if there was a way that we could focus from the front to the back and get all that in focus, but have the background that nice and blurry. And, that's what this next technique I wanna show you is is called focus stacking.
Class Materials
Bonus Materials with Purchase
Bonus Materials with RSVP
Ratings and Reviews
Audrey Reed
This is probably the 30th class I purchased, and the first I watched in full. I like the instructor. He is funny, engaging and obviously knowledgeable. I don't shoot marco and was expecting and introduction, and that is what I got. Lots of good info on gear and techniques. I am excited to try some of his ideas!
Linda
I learned a great deal. Taking photos and attending classes prior to this class. He showed examples of both bugs and flowers. Yes, he did use a Nikon camera but it is unrealistic for him to show all the examples that he did with several different brands of cameras! I have a Canon 5DM4. It doesn't have focus stacking yet. But I did learn that they applied for a patent. So it is coming. If you are doing studio work, the focus stacking is built into the Canon software that comes with the camera. For lighting I have the Canon macro flash that fits around the lens. I have the 100mm and 180mm macro lens. Just received Canon's two extension tubes today. They did work with the autofocus and camera settings. I thought his style was approachable. My macro work is all about flowers. His flower examples were on point. All in all, it was a solid class presented by someone who enjoys his work! PS The iguana's eye photo was stunning!