Drawing in the Round
Lesson 9 from: Introduction to Figure Drawing: Essential Gesture & StructureAmy Wynne
Drawing in the Round
Lesson 9 from: Introduction to Figure Drawing: Essential Gesture & StructureAmy Wynne
Lesson Info
9. Drawing in the Round
Lessons
Lesson Info
Drawing in the Round
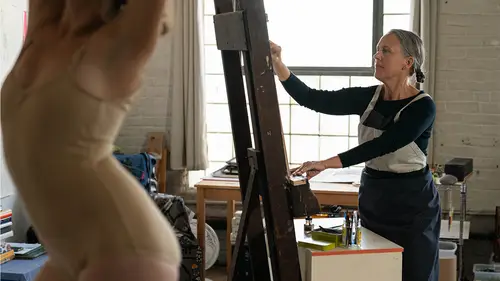
so now it's time to put it all together and draw the figure in the round. So drawing the figure from multiple views is really getting a sculptural sense of what's happening with the body. When I was in graduate school um I was required to take a sculpture a sculpture class even though I was a painting and drawing major and at first I thought a sculpture class like why would I want to do that? But I was amazed when I did sculpture and they moved the model on this large lazy Susan, they would they would rotate the model in space over and over and as you did that you rotate your sculpture. I started to really my drawings improve so much. So even if I'm not doing sculpture now, I really love the opportunity to draw the figure all the way around and you can do this. If you're at a drawing group of drawing session you can move around the figure if the, if the model stand is in the middle of the room, what we're gonna do is actually have Sarah move incrementally almost like on a sundial and t...
urn her body in space and I'm going to draw her each time she turns and it might have the illusion. A little bit of something like this, almost an animated sequence where we're incorporating mostly structure constellation points the connection between those points and if we have the time, like a little bit of a sense of the head to the torso to the pelvis, but really the sense of like what is the body doing as it turns in space and really allowing that to inform what we know what we understand. Alright, so we're gonna give it a go. I have a slightly different set up here, it's kind of fun. I have a scroll of paper, it allows me to work a little wider because we are maybe gonna work in this animated sequence. I think what I'd like to do and if you try this out, you can buy long scrolls of paper, you know or you can put pieces of paper together but in terms of sort of magnetize ng the body and keeping them all about the same size, what I am going to do to get started is actually draw a line across the top here which is more or less where the head will magnetize and I'm gonna draw a line across. I'm not gonna make these um figures super big. I'm mostly interested in this animated sequence. So they'll kind of occupy this distance and you may want to try this, you may want to draw lines across just to give yourself like an arena a place. Okay, Sarah you ready to roll. So I'm gonna be so Sarah is going to be turning in space very like subtle turns every we'll see maybe every 30 10 I'll let you know when to turn and I'm gonna be trying to keep up with her and I'm going to be creating the structure and a few volumes as we go along. Alright, alright, this is the first one. So this first one, I'm going to establish my points, hip to hip, need a foot shoulder point. So I'm loosely I'm I'm finding my way so much of gesture drawing is finding your way, like not necessarily making the perfect mark right off the bat, like actually trying a few times to try to make it happen. And then once you sort of have the structure, may be starting to work a little bit with some of these volumes we talked about and how that's sort of this frontal view. All right, that's our first one. Okay, let's try another. So, she's turning in space, keeping you can keep your Yeah, that'd be great. So, we're just gonna try to keep relatively the same pose with a subtle turn. So now I'm gonna draw the same pose, but slightly different angle. I'm gonna start with the points again, this time the elbow is in a slightly different place and I'm gonna put these drawings right next to each other, so they really start to associate back leg comes and hits the ground here. I'm still working with this idea of like this matrix of marks, this map these coordinates of the body and then a sense of the head again, this sort of egg shaped sense of the torso coming in and then the region of the pelvis and now, rather than the torso being straight on which was before it slightly turned away for me. So there's that sense of turning in space. Alright, let's try another. So again, very subtle turn. But suddenly, even with a subtle turn, I almost have a profile view. So again, mapping the points, shoulder to elbow, elbow to wrist, wrist to knee, need a foot. The Farney shows up a little bit and then Hides behind the front. one far hand is right about here and then I'm gonna start with some of my oval shapes again, just trying to relay a sense of volume in the core, really, the core of the body. Mhm Great, let's try another another one. Great. Alright, so now what's being revealed is a bit of a back view again. You know this this repetition. I mean, I consider it fun. It is a little rigorous, but you know, through the rigor, if you can sort of have a sense of humor about it too, like through the rigor, fluidity is going to happen. And it's this idea of, you know, taking the structure, trusting, just actually trusting that not speeding ahead to some kind of preconceived idea of what the drawing needs to be, not speeding ahead and just allowing yourself to explore. You know, that is actually what's going to create a beautiful fluid situation. So, really feeling your way, spending a good amount of time just like looking at the model, not obsessing too much about the outcome, That's where the flow comes from. Okay, sarah, you can shift again. Great. So now I have more or less a full um back view and I'm going to plot the points of the shoulders to the elbow, to the wrist again, every time. This is so interesting. One pose in the round can give you an incredible amount of variation. Uh so, you know, if the, if you're working with a model and they're running out of ideas for poses to take, you can just say, hey, you know, take this pose and move it in the round and you'll have really all you need in terms of understanding structure and having variety. So, I place my points, I've made some structure now from the back view, I'm just gonna add, you know, my oval for uh the ribcage and an oval for the region of the pelvis, noticing where they connect together. Let's shift again. Great. So once again, point to point this elbow now is protruding a little bit more as it comes to me. That area. This shoulder to this elbow again, looking across like this elbows a little higher than the wrist. Okay, so that's, you know, point to self good to know the shift of the hips is really, you can really see it here side to side, the weight falling mostly on the back leg coming down, placing the foot, remembering about that foot placement, but also just remembering to be loose about it loose and changeable because the chance of you getting it just right or be getting it just right the first time is slim And it's this searching quality to the drawing that actually um can create a sense of beauty and fluidity like extra lines. No erasing like really trying to create a sense of fluidity and movement shift again. So we're coming around to the other side once again creating these points in space, shoulder to elbow to wrist and then coming down the body on the other side, shoulder sticking back here and then kind of tracking this wire of the spine, you know forward back and forward again placing a hip point. That hip point comes to the knee and then down to the foot. The back coming down to this foot giving a little bit of a sense of the pelvic tilt here, A little sense of what the torso is doing and then a sense of what the heads doing just topping it off from this side view a little space between the feet and shift again. Coming around again to the opposite sort of three quarter view, shoulder to elbow, elbow to wrist. And then coming down to the region of the pelvis down to the knee, down to the region of the foot. Really planting that foot. And then noticing what the back leg is doing. The back foot plants a little higher in space because it's further back in space. And then we can start to play with the region of the pelvis. Again, this recorder view the region of the torso and then adding the part the region of the head and space and then shifting again. This is our second to last pose before we come all the way around. And again we're going to plot our points, shoulder to elbow, elbow to wrist, back elbows just showing a little bit to the hand. Hip points. One is a little lower ones a little higher from those hip points. We can come out to the front knee and then planting the foot and space back knees a little higher. And we can plant that back foot a little higher up in space, giving a region of the neck, working from cranium into the region of the rib cage, slightly three quarter view and into the region of the pelvis. And then one last um one just facing me again, just come all the way around and we'll just go ahead and plot the points just coming full circle, shoulder to elbow to hand. Hit 0.2 hip point across knee to foot, hip to knee. And again, there's that foot placement again and then just a nice simple oval for the head, a simple egg shape for the region of the torso and a searching oval for the pelvis from the frontal view
Class Materials
Bonus Materials with Purchase