Using Photoshop Luminosity Masks To Work The Zone System
Lesson 18 from: Introduction to Black & White Film PhotographyDaniel Gregory
Using Photoshop Luminosity Masks To Work The Zone System
Lesson 18 from: Introduction to Black & White Film PhotographyDaniel Gregory
Lesson Info
18. Using Photoshop Luminosity Masks To Work The Zone System
Lessons
What Is Film
05:45 2Types Of Film
10:18 3The Film Scale
03:17 4Film Speed
06:46 5Film Cameras
03:50 6Loading Film Into The Camera
09:26 7Zone System Basics
15:46 8Metering For Black & White
15:04Camera Basics: ISO
12:11 10Safety In The Dark Room
07:22 11Film Development Process And Supplies
15:14 12The Film Developing Process Step-By-Step
32:31 13Storage And Organization Of Images
16:43 14Scanning 101
12:01 15Scanning Your Own Negatives Demo/Guidelines
19:29 16Enhancing Your Scans With Photoshop
25:46 17Dodge And Burn In Photoshop
07:05 18Using Photoshop Luminosity Masks To Work The Zone System
08:19 19Printing Options
05:10 20Printing Papers
05:28 21How Film Develops
06:41 22Film Density By Zone
05:58 23Film Pushing And Pulling
05:37 24Film Filters
13:11 25Reciprocity Failure
05:21 26Advanced Film Exposure
03:57 27Making The Analog Print
06:02 28Black And White Resources
04:14 29Alternative Processes
21:02Lesson Info
Using Photoshop Luminosity Masks To Work The Zone System
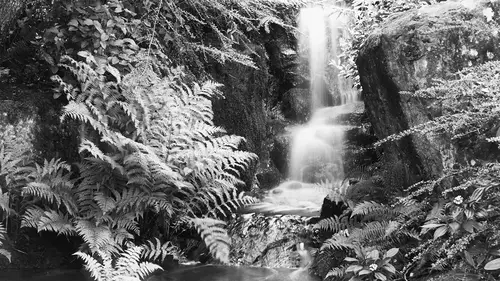
We used a luminosity mask to create the edges early on. (mumbles) We did the command click on the gray scale we created the luminosity mask. What's interesting about luminosity mask is they continue to compound on themselves. You can select 50%, and then 50% of 50%, and 50% of 50%, and each time it's grabbing a percentage of the luminous values of the pixels. Let's say we grabbed around 10 of those, and we grab from the darkest dark pixels to the brightest white pixels, and we set those masks up to be in about 10% chunks. Does that sound like something called the zone system? If I create that luminosity mask and save it. I'll come down and click on that again. Okay, load that luminosity mask, and then I hold down the Command + Shift key. I get a plus sign. I click on it again. I've now grabbed the next set, and I continue to command click, or control plus. Try that again, Control + Shift, Command + Shift, and just continue to build my mask. Now, if I create this one, deselect that, whi...
te reveals, black conceals. You can see how it's getting lighter and lighter. Now I can invert that mask. So now this mask is going to ignore all the highlights and work in the mid tones and shadows. Okay, so that's how these masks get created. So what I need to do is figure out, can I use a luminosity mask to grab specific tones within my image and manipulate those tones. So if I have where I wanna deal with just highlights or just shadows, can I go on ahead and do that? You basically just build a series of these. So what I build is for my self is this little action, luminosity mask gray scale, I also have it for color. And then it builds all these mask. Darks, darker, darkest, super darks, mega darks. Basically black. I just call them stuff that when I looked at them I'd be like, oh that's appropriate. My buddy's like, hey, do you sell that action? I'm like, oh, no. The names are too embarrassing. You'll be like, what's mega black? I'll be like, it's not quite all the way black. But we look at bright whites. So you can see that mask right here is basically just the waterfall. So now I can come in here. I'm gonna load this mask right here. So I Command + Click on it or Control + Click on it it tells me no more than 50% is selected, fine. What that tells me is there was no higher selection. I'm gonna turn that off. I'll turn back on my gray. Come on. (humming) And now I wanna make a curves adjustment. Here's the mask that got loaded. So now only that waterfall's being adjusted by that curve. So let's grab that, just the luminosity values there in that section. So that's a way for me to kinda control and pin down, and control that. Now one of the other cool parts about this is, I'm gonna delete that layer. Delete, no. Just delete the whole thing. Okay, I'm gonna come back into those channels. The darks and the lights there, darks is ignoring the darkest. If I grab light here, that's ignoring the highlights mostly. You know white reveals, black conceals, doing the opposite here. If I Command + Click on the darks, I've loaded that mask. Now I am hopefully gonna pick the correct mask. If not, we'll do it again and definitely click their correct mask. And then I gotta see if I can. Can I zoom in? No I can't, okay. I'm gonna load that mask. Undelete. I'm gonna load this mask, okay. Then on the whites up here, if I hold down Command + Option + Shift, it turns into a little X, and if I click on lights now I get told no more than 50% are selected again. What the X means is build an intersection mask. So take the pixels that were selected in the darker mask, take the pixels that were selected in the lighter mask, and where they're both selected, make the mask out of that. What that is is the mid tones. So I've got masks to do highlights, masks to do shadows in varying degrees, and then I can intersect them and get to my mid tones. So if I take this now and not use my eraser side, click okay, come over here and I create a levels adjustment. Oop, that's cause I left the channel selected. I do that all the time. Here's the mask. So I basically have grabbed the mid tones of my image. So if I want to now make just a mid tones adjustment with the levels, that impact is just in the mid tones. So I've now been able to come in and selectively grab those pieces and elements. So those pieces are kinda the high level. Those are my kinda go to tools. Edge mask, surface mask to blur, the overlay dodge and burn pretty much all the time, and then these luminosity masks to go in and target specific brightness values within the image, and I like the luminosity mask because it's still a regular mask. So if I come in here and I'm like, well I don't want this side of the image, great. Whoops, if I actually choose the right color brush. I can paint. Oop, turn my opacity up to 100. I can paint that side out and ignore the mask. So it's just giving me the starting point for the luminosity, but that's a great way for me to go on ahead and come in and selectively target, and because black and white is about luminous tonal values that move. The luminosity mask is selecting each of the pixels at their relative percentages against one another, so things are moving more evenly like what I would expect from a darkroom print. We had some questions about whether you're out of luck if you just work in Lightroom, or if some of those things you could do in Lightroom. Okay, so, if I'm in Lightroom... You need the inversion to happen. So if you're only Lightroom and you don't have any other tool, take the scan to the positive and let the scanner make the inversion for you. And then you can jump into Lightroom and use all the tools you'd use. A lot of my workflow in there, if I'm in Photoshop, is actually gonna create a smart object and use the camera off filter. So all the tools will work just fine. The tone curve in Lightroom, if you take the lower left corner and take it to the upper right, and take the upper right and drop it to the lower left, will actually invert your negative. The problem in Lightroom is, you only get one tone curve adjustment. So if you're not gonna use the tone curve for anything else, you could do the inversion that way in Lightroom. But if you're ever gonna touch the tone curve again you would lose your inversion. So, if I didn't have Photoshop I would do the inversion in the software. If I had Photoshop and Lightroom, I was on the Creative Cloud subscription, I would come into Photoshop, do the inversion, set the gamma, and then drop it back into Lightroom, and then use all my Lightroom tools. Yeah, there's no reason not to use any of the tools, and Lightroom does an amazing job. The gradations, the adjustment brush, all work great. You just will not have any of the black and white adjustment sliders are pointless, cause you have no black and white color for it to absorb. So you're stuck basically with the basic panel, transform, sharpness, and those kind of things.
Class Materials
Bonus Materials with Purchase
Ratings and Reviews
LEO DE BOCK
I am really fond of Daniel Gregory as a teacher. He does a great job. To me, his enthousiasm, his passion for and his dedication to film photography are infectuous. It's great that CreativeLive makes place for film photography and for such a pro teaching it. It can never do so enough for me. Thanks. I am a fan.
Texas Beauty Photography
Great class!! It's jam packed with usable information for anyone wanting to shoot, process, and print black and white images. There is so much detail presented in this class, I can practically guarantee you'll come back to it again and again. I successfully used this class to capture b/w photographs, process the negatives, capture them digitally, and finally, produce beautiful prints that I'm proud to show my friends and clients. This may well be one of the best classes on all of CreativeLive. Highly recommended!
user-661816
This is an excellent course and Daniel is a great teacher! I'm coming back to shooting film and darkroom work after 20 years away. I have some wonderful film cameras sitting in my cabinet and I decided I wanted to use them--so I have decided to shoot BW with film, and shoot color with my digital cameras. I will develop the BW film myself and scan and print digitally. This class is perfect for me!