Lessons
Lesson Info
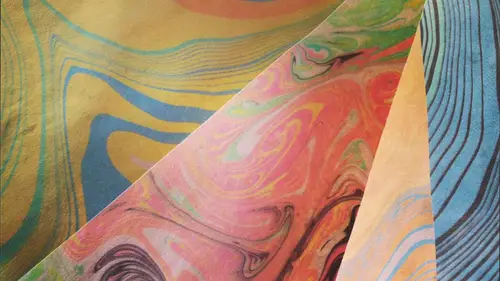
Paper Marbling Demo
The first thing you don't want to do is just pick out two of your colors and I'm going to begin today with a black ink and an orange inc and these go a surprisingly long way you don't need to use an enormous amount of them, and what I'm going to do is I'm going to put about five drops one too three, four five into one of the paint wells, and then I'm going to do the same thing with the orange one, two, three, four, five now a couple things about application of the ink to the surface of the water, the inks floating on the water are very sensitive to air currents in the room, so we have actually turned off the air conditioning here in the studio today, just for this segment just to kind of cut down on any of the breeze is flowing around, but you'll find as we get into some of the manipulation techniques aa lot of them have to do with your breath and blowing onto the water to move them around. So at this point, I think I'm going to ask if the ladies in the studio audience, if you wouldn't...
mind just coming up and gathering around this is a two least initially a nice thing to see up close as faras demonstration is concerned, and what I am going to be doing is taking a brush in both hands and I'm going to be dipping the bristles down into the yanks, and you're just going to hold it there for second, allowing them to kind of soak up into the bristles and then you're gonna bring them over and you can if it's more comfortable, you can kind of rest your wrists on the side of the basin and you're going to begin by just lightly tapping the surface of the water. You don't want to plunge the brush down into the water. The goal is really just a kind of lately touch it on the top and you can kind of see that just magically spreads out then right in the center of that I'm going to touch it again with the orange, and I'm just going to start going back and forth, building up this beautiful pattern of concentric circles and you will see that some of the ink will sink down below the surface of the water. Not to worry that in no way is going to effect the design that you create when you get to the point where you feel like very little link is coming off of your bristles, it's probably time to go back and reload, so I'm just gonna go back over to the paint palette I'm gonna add in. A little bit more. Allow it to soak up into the bristles, and then I'm going to go back and just continue on with this pattern. Now you can build up this pattern as large as you would like, and you can kind of see. The brushes that I'm using are just really simple. Children's art supply brushes. They're probably a little bit irregular in shape, and as a result, some of this shapes, instead of coming out as perfect circles, are getting these little sort of swirls, and eddie is around them. I'm going to go back a one more time to load up the brushes and see if I can get a little bit more on the surface of the water. And the longer that you hold it to the surface, the larger ring. It will appear because you're allowing more ink to flow down onto the surface of the water. So at this point, then I want to manipulate the ink in some way I certainly could create a pattern not unlike this one with the concentric circles that almost looks like faux guar tree ring pattern, but one simple basic way to manipulate it is to turn your paintbrush around and drag the handle end through the surface of the water and you can create some nice sort of interesting patterns through that, so I'm just going to sort of plunge it down to the center and drag it out, and I'm going to do this at intervals around, and you can kind of see is I'm pulling it through it's, creating these little curly queues and swirls and eddies, and then between those I'm going to go drag in just to kind of get the opposite movement and you can kind of see there's, you have a little control, but it also has a little bit of a mind of its own on dh that's really part of the beauty of the marbling is getting these very sort of like, free flowing, almost organic like designs. So once we've gotten to that point, I am going to take one of my pieces of paper in place he's place these samples aside and I'm going to take some paper towels and I'm just gonna lay a few of them down on the work surface beside me and you can see even as I'm talking that the ink is continuing to sort of like migrate around the surface of the water bath but what we want to do is we just want to lay it down on the surface and you're going to allow it to sit for just three to five seconds and then lifted up so we'll lay it down and you can sometimes it will soak up enough you can see it coming through the paper and then we'll lift it up immediately he can see this one is a little bit muddy um we're gonna play around with that a little bit and I'm gonna take a second piece of paper towel I'm gonna block the surface here it's gonna get up a little bit of that excess ink but not an awful lot honestly she can kind of see it did bring up some of it and with that it became a little less muddy andi as it dries the tonal quality of the paper will even out a little bit but that's a good starting point and you can see in our water bath now there is a lot of this ink that's just sort of floating around in there and we want to get rid of that in order to be able to reuse the water bath that's one of the nice things is you don't have to change your water between each of the the designs so you simply just take it through and you can see it's starting to capture some of that and that I think that has floated down to the bottom we don't even need to worry about it's not going to affect us on the surface of the water and creating our next design so that is our basic for the first one so if you want to go ahead and return to your seats everybody's got a water bath and we're going to experiment with some different ways of manipulating that ink on the surface of the water now we don't get too far ahead robert asking can you use this with fabrics as well? You can in a limited way and I have to say one of the things that I have done in the past is taken silk scarves silk in particular seems to work quite well I've tried it with heavier cotton fabrics and again I think it's the situation with some of the paper manufacturing where it's got a certain amount of sizing it that repels the water but silk scarves you can lay down in a very similar manner there is just one additional step you'll need to get a an ink die set and this is ah product that they will sell it the craft supply store you mix it in with some water allow it to soak for about five minutes and it permanently sets the inks into the fabric so that you can then wash or dry clean them. So great question, though. There any particular weight of papal card stop it, you're using you think of the season today, honestly, is just inexpensive construction paper there were going to experiment a little bit later in the session with some nicer stationery and making stationary sets again with the sizing the paper, the more sizing there is, thie lighter, the design will be, but again, it's ah it's, a process of experimentation and kind of playing around with that.
Class Materials
bonus material with purchase
Ratings and Reviews
Deborah Willis
Instructor is very knowledgeable. Love that he has a very soothing voice. I LOVE his teaching style-he is very encouraging of his students to experiment, and I love that he comments on their creations during the session causing you to see elements of their creations that you might have otherwise missed.