Lessons
Lesson Info
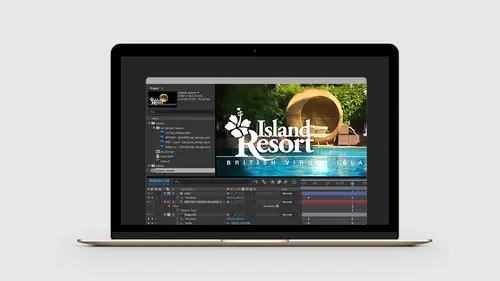
How to Add Video and Audio
So we've got all this stuff animating at the top and when we we started in photoshop, we have our design comp here and we have our FPO. So what we did is we had that video that we shot. Just a simple iPhone video on a little tripod of a swimming pool. And we just went through the video and just copied a frame out, pasted into photoshop so we could just start to do our design work. So now, let's replace that FPO artwork with an actual video. We're gonna go back to the exercise files. In the assets folder, I have a copy of the original pool video. Let's grab that. Let's drag that right into after effects. Right into the timeline panel. And instead of dragging, of course you can go to the file menu and you can come down and choose import. I like to drag and drop things on my operating system but file import does exactly the same thing. So now we have this pool. That impact four showing up in our project panel. Besides, you might have guessed we can simply grab this and just drag and drop ...
this right into our canvas. And if our screenshots line up, if I turn the video on and off, the circular chair should be in the exact same spot. So now with this selected, I'm hitting command left bracket. I wanna move this all the way down till that it's underneath the solid. And so now when I drag this back and forth, notice that after effects is playing their video for me in real time as I drag this timeline. So video is really just a whole sequence of images wrapped in a particular file format, this video format. And then after effect sees this. And after effects will also take the frames of that video and match them perfectly, frame by frame, on the timeline to any other artwork I have in this stage. And this is an incredibly powerful tool because after effects will interpolate this video, understand what's going on in there, and then give me, again, a frame by frame precision for creating an animation that's not up here. So let's come in here. Let's turn off all the other layers for a moment. Let's come down and let's delete our design comp and delete the FPO layers. So now I have all of the final pieces of artwork that I'm gonna be using for my project. And so now, the pool, mp4, if you watch the whole video, there's a spot where the video sort of shakes a little bit. Maybe I was hitting the shutter, who knows what I was doing. It'll sort of move a little bit. Again, it might be hard to see but right about here, you could see it sort of moves a little bit. So what we can do in after effects is we can pick what's called an in and out point for the video. So I'm bringing this in and I only want this video to be maybe six or seven seconds. Again, somebody's scrolling through this on a video feed, I just want this to play quickly. So I'm only gonna be concerned about a real small portion of this video. I don't need the full 24 seconds. Or at eight seconds. Eight second that's in this video. So what I wanna do is let's find this spot where it shakes a little bit. So it's shaking out here. So maybe I just wanna cut out some of the ending here. I come back to the beginning, I'm looking at this. And so what I can do is in the timeline panel, if I select this video layer and I move my cursor to the left hand side of the screen, I get this little double sided arrow. What this does is it lets me set an in point and anybody who's ever done non-linear video editing, is using in and out points all the time to create the different pieces of where the video stops and starts even though it's a full video, we're just picking those pieces. We can do that by simply grabbing these arrows here. This is the visual way to do it. And just click and drag this over. So if I just drag this back a little bit to about right here, drag the timeline back, I have no video now showing up in that first point. I have set an in point for this video that starts at this point here. Now I'm gonna click and drag so that the beginning of my video starts at the zero point of the timeline. So now I can see this showing up. So I'll bring this out in the place. So around seven seconds or so, this is about where I want this to end. So now what I'm gonna do is I'm gonna bring my play head to the seven second mark. So with the play head over here at seven seconds, we have this other feature down here which is this little timeline, this little layer here, this is the work area. So the timeline has a couple of different settings here. This top little gray bar indicates how much of the timeline I'm looking at at the current time. So, for example, if I come up here and click on this, I'm looking at the full amount of duration which is 10 seconds, if I drag this backward or come down here to the lower area of the timeline panel and change the scale, what I'm doing is I'm looking at a more zoomed-in version of the timeline. Let's come in here and just talk a little about one of these so let's hit the U key for book it. Scroll back a little bit. Notice how far apart the key frames are in here because I'm looking at frame by frame. Here's frame 12, 13, 14. Or I can zoom back out. The second item here, this is something called the work area And so what the work area does is it lets me define an area inside of after effects that I wanna work with in this comp. So the comp is 10 seconds long. And typically, I don't like to crop my entire timeline. I like to have a bigger timeline area and just set a work area so I can pick a specific point. When I export or render this after effects, it's only gonna render what's in the work area. So what I can do is I can grab the play head or the work area and drag this back until it lines up on this piece here. A nice keyboard shortcut I like is the letter N for end. Almost like opacity, you pick a letter in the middle. So if I hit the N key, that's going to bring the work area down to the end. If I hit the B key, that will set a beginning point. So, for example, if I wanted to set the beginning to here I could hit the B key and assign it to there. So now I have my entire work area that's showing up in place here. So now, the video doesn't look all that awesome. Actually, I did a few things to make it look kinda bad so we could fix it. When I created the video, I actually de-saturated it so that we could take a look at how we could sort of re-saturate and make this look a little more bit interesting. I also wanna add an effect. We wanna just really play up sort of the water here and just give this a little bit more interest. So just like any other artwork inside of after effects, we can apply effects to these individual pieces. So since I accidentally closed my work space, let me come down and let me bring back my effect controls. I like to stick those to the left hand side here. Let's select the pool layer. Let's open our effects and presets. Let's come down to hue saturation. Double click on it, that's gonna apply that to the shape here. And I really like saturated stuff. In our after effects graphic design course, I was setting a lot of saturation. So I just really like the way it looks. And, of course, you can do this to whatever taste you or your clients have. I'm just gonna bump this up a little bit maybe to about 20 or 30. Just to sort of give a little impact for this particular shape here. And then the second thing that would be really interesting is since the water is moving, and it's a sunny day, there's no sun actually hitting the pool at this particular time. So we're gonna fake some of that by using another effect called light raise which is one of my favorite effects. So I'll type in the word, raise, and that will bring up CC light raise. And so what light raise do is they basically, it's an effect that gets applied to an image or a video and it will actually sort of burst light through the individual pixels as if there were light shining on the object and then that light could actually reflect back out. So it's really an amazing filter and it's almost impossible to do, not impossible, it will take you a long time to do something like this in photoshop. But this effect can be applied almost immediately in after effects. So let's just double click and turn on the light raise effect. Let me toggle down hue saturation. And so in the light raise, property panel here, we could see all the different settings. And the light ray gets dropped in the upper left hand quadrant. So now if I click and drag this around, you can see what happens. As I drag this across my image, wherever the light ray center point hits these pixels, these pixels will start to sort of burst out and create this really nice effect. One of the most important things with after effects is to play with all of the settings. Even if you don't know what some of these mean. The engineers will use really technical terms sometimes in the effects setting here. Especially in our other course when we take a look at particles, for example, they use all these physics term. Just play with these settings. Just see what they do and play with them. So let's see. I got this little guy here. Let's just move him over here. For intensity, if I drag this up, this will increase the intensity of that light bursting or that light ray. So I'll leave this back to 100 for a minute. The centering, this is what we were just playing with. You can actually just click and drag that or move it around here. The radius controls how much of the area or how much of a sample area around this point gets sampled to then be sort of reflected out. So when I increase the radius, I'm increasing the number of pixels that we pick and then use the radius to come out. So as you can imagine, this can be hours of fun just playing with some of these different effects. We also have a softness setting, too. I'm gonna bring the softness down a little bit. Radius is way too big. I wanna really sort of play up the swimming pool. And there's also another feature here of changing the shape from either around shape to a square shape. I like to use the square shape on some of these effects because if I choose a square shape, I can change the direction and I can actually rotate that around. How cool is that? Okay, so now let's drag this down and let's put this into the swimming pool. Now, because these effects are live, what that means is as the artwork underneath changes, we're gonna get that effect being applied to that video. So as the pixels underneath this point change from light to dark because they're are some light and dark pixels that are moving in the water, that effect with all these settings are going to be reapplied. Every one of these frames across our entire timeline. So after effects is gonna do that work for us the entire way So that's gonna give us that sort of really interesting artwork to show up in this piece. Isn't that great? That just looks awesome. Never gets old. Okay. Let's go back to the timeline and now let's turn on all of our layers. And the last thing I wanna do before we start rendering this out is I wanna have the video sort of fade into place. So the timeline is back at its zero position mark. The effect that we applied is not animated which is another key point. The light raise is just being applied, no animation, but because the video underneath is changing the pixels in the lightness, we're getting the effect of animation even though it's not animated. But I do wanna add an animation to the video so that the video will fade up. So let's go back to the zero mark. Let's click on the pool layer. I'm gonna hit the letter T key for opacity. Turn on the stopwatch to create a key frame. Let's come out to figure out a good spot. So we want the pool to fade on. Our mask starts to come out here at about one second so let's come back to about here. Add another key frame. That's also 100%. Let's go back to zero. Let's set this to zero. So now we have the video fading in. The logo's coming up. Again, this is where we can make additional decisions. Maybe about here I want the mask to come in. So I come back to the solid layer, hit the U key. Click and drag and change my settings here. So we do have one question, Chris, from the internet and I actually had the same question myself. From Nicholas, can you add multiple light raise to a video? Yes, you can. Cool. Great. Thank you very much. You can have as many as you want. Actually, if I select the light ray in the effects panel, to duplicate that, you can simply hit command or control D to duplicate that and add your second item here. So all of your effects in the effects panel, again, these could be treated almost like a layers panel. So command D will duplicate them and let you assign other properties to them. And if that's too much, you can just simply delete that and move away.
Class Materials
Bonus Materials with Purchase
Ratings and Reviews
Cara Stein
I’ve known for some time that I should learn After Effects, but it seemed so overwhelming and yucky. This course gave me a concise, approachable starting point that gives me the confidence to start making a simple video. I know I’ll learn more as I go. Getting started is the hardest part, and this course has solved that for me. Yay! I especially liked the asides about making the workflow more efficient and about what makes animation more polished. I’d love to see a more in-depth course from this instructor now that I’ve had this taste.
Nelson Mueller
Wonderful After Effects course! He teaches the software so well and in such an easy way, that you will not just know how to but most importantly also 'understand.' I am very happy for the time I invested in this course and I look forward to learn more from him.
user-871475
I've always wondered why video tutorials don't start with the similarities with other Adobe design apps. Those similarities make the intuitive leaps of learning this new experience much easier. Mr. Converse moves at a comfortable, reassuring pace. Very happy I bought this!