Lessons
Lesson Info
Overdubs
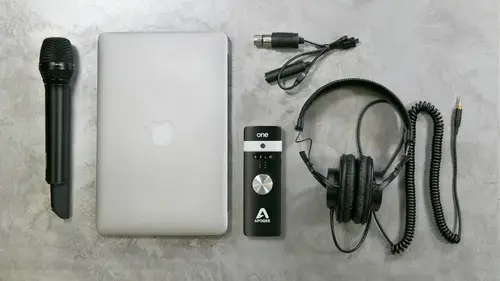
What we've done so far is basically record a scratch track set up a session recorded drum track that we've programmed along with the track label all the different sections, and now we're ready to start building, which is kind of the fun part overdubs where you start to really start to build out the layers of the song and you start to add different instrumentation and different pieces. You could spend days and weeks on this part, we're going to try to just give you some examples of some different techniques that producers typically use in the studio you think some acoustic instruments with a microphone, you think something called doubling, which we'll talk about, which really adds, too, just like the bigness of a sound and being able to sound buildout of stereo field of some different instruments on then we'll kind of go through and work with virtual instruments and adding things like oregon, maybe some guitars and some virtual is from base stuff, and then finally we'll go back into mix...
ing, which is another whole section you could spend a lot of time talking about will go through and talk about some really basic tools for mixing on basically what I do when I'm trying to pull up a mix really quick and get something sounding, you know. Sounding all right so yeah we're just going to jump right and I've pulled up the session where we kind of left off from before was about half done so we pulled up the session that we finished that you can download so let's just start off really quick just kind of by hearing the entire section here as we go through and start to build out some of these sections I don't know pants are held up by a robot again this gets me playing a song sing your way got nothing he made it down going and me wait wait wait wait yeah that's kind of the basic rhythm track we created in advance a little different than what we created this morning but we're gonna start building on top of that one thing I forgot to mention about easy drummer I just want to throw in really quick it's a really cool feature it allows you to sort of edit in the end it play style you can add it sort of volume in which the intensity which each instruments being hit which towards the end there that last half was really important because they were playing with the same intensity throughout that ending part is this track it's softer? It really wouldn't make a lot of sense musically eso I'm gonna pull up just a section if you could see the shaker playing here well actually I'll go here towards the end uh, you can see the shaker, I'm going to go ahead and play style and the shaker, I can actually change the velocity on def, you see, what I've done is each generation of the shaker gets quieter and quieter as it gets softer and softer, so as it gets throughout the song, it goes down and down from the shaker gets quieter and quieter with the track is it's going out, you consort automate that in it's something you could do an automation and mixing, but that just changes the volume, and this is actually changing the intensity in which the person that recorded this sample is actually playing it. So you get sort of this natural, a sense of the track moving in further and further away it's those little elements that you can start to play with that really add to the humanness of virtual instruments and make them sound like an actual part. So I really encourage you if you get a chance to mess around with easy drummer, to try things like that, just to really try to make it this customizable is possible, so it sounds like there's, some musicality and what you're actually doing on going to do that with a lot of different virtual instruments this afternoon, so the first thing we're gonna do is we're actually going to record a new acoustic guitar part, but instead of using just the die on his guitar plugged in, which sounds a little bit stale in a little bit processed, we're going to try to get him on natural sound out of the acoustic guitar. So we're going to use this microphone to be able to sort of get an acoustic sound on, do some overdubs. So again, I'm gonna go upto new to create a new track, a new model audio track and label this acoustic guitar. We're going to set the input here to input one, because that's, what the microphone is playing into, we're gonna have mute it and hit record if you go in and one snap in front of micro quick, just snapping from the micro quick. So you wanna make sure we're getting some signal here and that I'm actually gonna go over and show talk a little bit about mike placement. So what we're gonna do with the overdubs is we're actually going to go through, set up the microphone and record the sound of his natural acoustic guitar, playing along with the track on, and then we'll go back through and double it, so you have to use two guitars and won't talk about how that kind of sounds a little bit bigger um, so we'll set up the microphone here. When you're recording acoustic guitars especially with large diaphragm condensers they pick up a lot of different sounds all a full range of frequencies especially low frequencies way want to try to minimize as many of those low frequencies as possible so there's something with a gruesome guitarist called the twelfth flat fret rule that a lot of people use you basically want to keep the microphone around the twelve threat the closely to get to the actual sound hole the more like low end and big bhumi sound you get which is really hard to deal with in mixing so we want to try to get a balance of that big sound with sort of the natural sound of his guitar so we're going to go about eight to twelve inches away from the fretboard kind of centered around the twelve threat and try to get a sound from that so if you want to go and just play for a little bit josh way to go back to the maestro rap we're gonna meet his guitar that's just coming through the d I if you want to play again john ah it's a nice kind of earth you sound to it a little bit we'll do the same for his headphones so he's only hearing the microphone so again here I'm muting in the maester apple muting the died guitar so all he's hearing is the microphone along with the track that he's playing along to um so we're going back to the beginning now, again, I want to remind you about the idea of layton see that often what happens with w's is when you're trying to monitor the sound coming through pro tools and then back to his headphones, there's a delay, and that delay could be really distracting for performers. So we're going to use the maestro app to send the signal coming in straight to his headphones, blended with the tracks, and he doesn't hear that delay and had that sort of found, which means we're going to mute the track approach those here. So he's not hearing the return he's only hearing what's coming straight out of the interface. Okay, I think we're ready to go. We're gonna go back to the beginning of the track. I want to remind josh before he starts recording how much time he has before the track actually starts. So I'm gonna play for him where I'm starting, so you can hear the click track come in. The other thing about this is that this drum track, I didn't have the drums come in until the course, so I'm going to keep the click track going until the chorus, before I mute, when the drums come in that way, he still has something to follow along with and be ableto here where he's playing so let's see here see that's two full bars of beats before he starts playing on gonna go ahead and mute his other gets hard so that he can just hear the guitar that he's playing and he raided do it over the trash guitar too just to make sure match it or I yeah it kind of depends on them that's a scratch yeah ok scratch track we're going to listen when you double that you want to match it as much as possible because there's drums you're playing along with two now you want to follow the drums so that it's more aligned to the rhythmic center the natural yeah ok stuff so um yeah so we'll go ahead and record this and again keep in mind especially home recording you want to try to minimize the click bleed as much as possible especially the ends and the tail end of the song so I'm going to keep the click as low as possible as I can in his headphones so there's not much bleed and then at the end of the song I'm gonna muted when it goes into the court into the very end of the song so that if there's no bleeders that track fades out so yeah here we go wait now I mean I don't know wait yes way wait you want to do a punch in yeah okay. What do you want to start from uh just before where we ended like maybe two or three bars okay something zoom in here again I'm going to grid mode so I could start in a specific bar and I'm just going to go to uh two bars before he finished now keep in mind I'm gonna have toe a nude and the new guitar so you can hear when he was playing before you're ready wait awesome so we've done on acoustic overdub we can now go on you the other guitar I'm gonna go back in again to where he did the punch in and again visually I'm going to look at where that way form is and find a clean spot right and sort of make a jump remember I want to be in slip modes that I couldn't make that cut wherever I want and not snap to the nearest grid point somebody go back a little bit right there and they were just going to do a little bit of a cross fade and we'll hear how that sounds it's kind of awkward spots we're gonna try to find a better place to make that cut here let's see that's much better save that wait we got a pretty good sounding kind of route see guitar sound what we're going to do now is do what's called a double and purpose behind doubling instruments is that they're never perfectly aligned the parts are perfectly line but the wave forms are a little different so instead of just doubling the track, which would be exactly the same and just make it sound twice as loud. This actually makes it sound bigger because each part, even though played exactly the same, is slightly different just in all those little tiny ways that makes the whole track sound much bigger than you could do is take you to those double parts and pan them left and right. So you have kind of a broader stereo sound of the acoustic it's just kind of a trick that a lot of producers use on things like guitars and vocals to make them sound much bigger than just one individual track by itself. So in order to do that, the key part is that to make it not sound like a separate part, he has to play it almost exactly the same as the way he played it. Originally, we're going to add a new track and kind of go through this process with josh. What I'm going to do now is put one of those tracks, the original one in his left headphone, someone, a pan, it all the way left, and then I'm going to go back to the maestro app and take the current microphone and panic here all the way, right? That way he's hearing the first when he recorded the left here and then the new one that he's playing now in the right here and he can compare the two and distinguish between the two and his headphones while he's playing along um we're gonna go back through and kind of listening to that really quick and try to do a double we'll call this acoustic guitar double and then once this one's recorded will go ahead and pan this one too so again it's the exact same process it's monitoring by playing back from pro tools through the apogee maestro mixer to blend in the original mike so there's no late missy um we're gonna start at the very beginning again with the click track and then I began I'm gonna meet it as soon as he's done is there's no believe when it's coming out already okay let's get a shot go go dancer held up by the road but can this way songs sing best way wait don't no way wait down wait awesome so now we've got a double part what we're gonna do now is take each of these and pan them left and right so you can sort of hear the pan sound of what those two guitar sound like again I'm just going to sort of clean up the beginning here get rid of some of that bleed at the very top and do the same at the end and then I'm gonna do a faint at the end of it right here and how I just did that fade. I showed you before how to do a fade by putting them. I'll just do this again so you can see, but putting the cursor towards the end with the multi tool, you can create that box and then just drag a fade the other way is that you can actually drag over the area that you want to fade in her, fade out and hit command f and it brings up the fade dialogue and you can actually edit to faint if you want to make it different shapes or sizes or last different links, you could make it equal power equal day there's just a lot of different ways. You can create a fade, so we'll start with that and then we'll go through and listen, and typically anytime when you're editing, anytime that you have an instrument, start or stop, you want to put a fade in to fade out, even if it's just tiny, just in case there's any sort of little clicker pop that would end up in the recording, someone to do a favor right at the beginning there, too, I mean.
Ratings and Reviews
kyle
Clear, concise, interesting! Zach presents a lot of information in the context of an actual song being constructed from start to finish. The entire process was easy to follow, and Zach provides key insights for each step. For example, when starting a project, I've never known what to do first - lay down a drum track, record guitar, record vocal ... ? After watching this course, I have a much better idea about how to decide which thing to do first, and the concept of scratch tracks adds a lot of flexibility to the process. The addition of doubled tracks and other instrument layers ("overdubs") made a huge impact on the overall sound and these seem like very achievable steps for a home studio. I've done some home recording and mixing with garage band and an old version of logic. This course is a great update on that. While Zach demonstrates protools, I think it's pretty easy to map most of what he did to other apps like garageband (which admittedly has more restricted functionality). I'm looking forward to starting my next recording project using what I've learned here!
Mark73
This was a great course! I've found some valuable information over the years here and there, but this is the first time I've actually found a substantial amount of stuff I can actually use in the same place. It's the best course I could've imagined taking on the subject and I even learned a thing or two about other products and plugins that I may use in the future. Right now I'm using the simplest version of Pro Tools available (SE), but even so, I learned a few new functions on it that I had no idea how to perform before taking this class, as well as some valuable recording techniques and concepts that will help me for years to come. Best class I've ever taken and I look forward to taking several others! Many thanks!
Don Trapani
This was a great course for beginners, it was a true introduction. Of course the instructor used high-end software and equipment; he is a professional music producer, and is comfortable with the tools he uses on an everyday basis. I did not hear him say you had to get the products he was using, he just identified the tools so anyone watching can do their own research. After watching this class, I checked out several sources for more info, and found that you can get a basic interface that comes with the DAW software, for as little as $100. If you have an interest at all in home recording but don't know where to start, this is the course for you. 5 stars.
Student Work
Related Classes
Sound Mixing