How to Make Graphics 3D
Lesson 24 from: Infographic Elements from Scratch in IllustratorJason Hoppe
How to Make Graphics 3D
Lesson 24 from: Infographic Elements from Scratch in IllustratorJason Hoppe
Lessons
Class Introduction
06:47 2Basic Shapes Overview
05:55 3Start Creating Basic Shapes
13:36 4Edit Basic Shapes
07:58 5How to Use Corner Widgets
16:39 6Get Creative with Shapes
15:32 7Add Lines to Shapes
05:57 8Shapes with Offset Path
06:38Create Custom Lines
06:01 10Add Curves Into Shapes
21:49 11Curvature Tool
08:35 12Width Shape Tool
14:25 13How to Create a Dotted Line
06:00 14How to Segment a Circle
05:50 15Create Basic Shapes Using Pathfinder Panel
20:20 16Advanced Techniques in Pathfinder Panel
10:27 17How to Create a Slip Shadow
08:50 18Tips & Tricks for Chart Tools
12:34 19Combine Shapes Together
19:27 20Create Perspective in Shapes
11:34 21Combine Multiple Elements into One Graphic
23:17 22Create with Reflect & Shear Tool
07:26 23Create Implied Shading
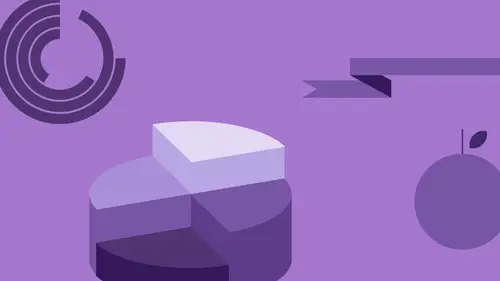
17:02 24How to Make Graphics 3D
16:29 25Q & A
05:02Lesson Info
How to Make Graphics 3D
Let's see what we can do with some 3-D stuff here. Now this is cool, so I don't know if you knew that Illustrator can do 3-D items, but you can, really simply. And, the way 3-D is done is you take any shape that you create and you can go and actually do an extrude or a revolve with it. I'm gonna do something really simple, just a very basic circle here, and with this circle, wouldn't it be fun to make like a crazy straw out of this? Yeah, we certainly could. So I can do a whole bunch of things with this. I can create a tube out of this, I can actually create a straw where we could actually just have the outside jacket where it runs through, I could also create a donut out of this, it's actually called a taurus, and a whole bunch of things. So if I take a basic shape, what I'm gonna do is I'm gonna go into the effect menu and we have all these 3-D items, extrude, bevel, revolve and rotate. So I am going to extrude this, so very much like that little playdough machine where you shove the...
tubes through, that's what I'm gonna do. So when I go through and I do an extrude or bevel I'm gonna click on the preview here, it's gonna take my shape, and I can control the depth of this shape so that I literally get a cylinder from this circle. The artwork being the main face of this object. You can just take that and do that. This little cube here allows me to rotate this, and I can kind of see how that looks, and the blue face is that face that's going to be facing you, and that's the face that you create with this shape right here. So, there's my shape, I can render that and it's like wow, it's still just a circle and by the way if I change that circle, it changes the whole shape. It's like, whoa, yeah. So that's just taking something and extruding it, just like that, I could do this with a triangle, I could do this with a star as well. If I do that, effect, 3-D, extrude, gotta click the preview every single time which is so annoying, and I can extrude that whole thing. But check this out, this is doing it with a fill color here so if I change the fill color, I'm gonna see the shadow and shading, I'm gonna switch the fill for the stroke. And when I do that, oh my gosh, it actually creates an actual hole in this here. But, you know, I've done this and I wanna get back into edit this again, so I of course would go back into the effect menu and go back and choose this, and then all of a sudden it says blah, blah, blah, blah, blah, blah, blah, and it's like, what are they talking about? Well every time you go in and put an effect on here like that wavy line, or a 3-D effect right here, what happens is you can't go back under this menu and reapply what you've done,it's just gonna start all over. So what they told you is that you have to go under your appearance menu, and your appearance menu is going to be where we edit, any of the effects on our objects. So were gonna show you with that little wavy line if we didn't like it, we couldn't just go back in and do our distort and transform. So here I've got to call out my appearance menu and funny enough with the appearance menu I've got all that I need right here in the appearance menu, my fill, my stroke, my opacity, and any effects here and I literally hover over this and it says something like click to edit and so I'm gonna click to edit, and I get this back and I can see how this looks. Now if I wanted to see through this, I could turn the face looking just like that and I can see right through this. So I have like a little triangular straw, well that can be kinda cool, you know I can see through the other side, pretty awesome. Or I could just extrude this and this is just because I have a stroke around the object, okay that's kinda cool. So, now I can create these basic objects here and this is just a basic extrusion, so any shape, extrude it. I'm gonna create a donut, so there's my donut. And in this case, I'm gonna make it a, kind of a chocolatey donut, and I'm gonna go under the effect, 3-D, and I'm gonna revolve this around. So it's going to literally turn into a donut, commonly called a taurus, okay, so it's actually revolving it around instead of extruding it straight through, so when I do this you'll see it's a very, just a mini little donut here, but we need a huge donut, ya know, I mean seriously, this isn't even worth eating, if there's no little donut hole. So what I can do is I can offset this a certain distance from the edge, so if I do the offset here, it allows me to offset this and I can turn this here so you can literally see the donut. And the offset just allows me to offset it so that it moves it a little bit further away, a little bit further away, so we can do a life preserver ring, a donut, whatever it may be, and turn this so that the face is going to be wherever you want it, and you've got your little taurus, that's what it is, there's your little donut, pretty cool. But what's really awesome about this kind of stuff here I'm gonna reduce this down in size here because I want a teeny donut, oh yeah, I'm gonna move that over. And remember these are just the appearance, okay, just like that little wavy line, in fact, before I go on I'm gonna quickly just show you what we talk about when we have an appearance here. Anytime we apply any effect here like we did with our zigzag and we had our smooth line right here and we create our wave right here. If I want to edit this, the only way I can go in and edit the amount of the effect here is to select the line and then go back in to my appearance panel and edit it here. That's the only place. If I go back in and I do this, it's going to want to go in and get rid of what I've done and have you start over. But I can click on this and I can edit it and you've gotta click the preview button, every single time. So now I can edit that, change that shape, every time I want because it's just an appearance, right there. So, that's something to keep in mind with the appearance panel. So now we got our donuts, everything here, and I wanna go in and move this out of the way, I wanna create something even more awesome, like this. So you remember that little Christmas tree that I showed you I want a three dimensionally revolved Christmas tree, I know, crazy isn't it. So I'm gonna create a Christmas tree here and I'm gonna use a triangle, and then I'm going to take another triangle here and I'm gonna make it slightly bigger, take another triangle here, make it slightly bigger, and I'm gonna take another triangle here and make it slightly bigger, and move that down. I'm gonna merge these all together with my path finder here, I've got it hidden, where is my path finder, here's my layers, merge those all together. And then, I'm gonna go in here and I'm going to chop off half my Christmas tree, actually I'm gonna chop off half my Christmas tree here, and I'm gonna move that point so that it's right in line with that. That's my Christmas tree. When I'm doing a 3-D revolve here, all I need is half the object, I don't want all the object, I only want half. So I'm gonna make this Christmasy tree like, and I'm gonna take this and I truly want half the object, 3-D, and I'm gonna revolve, when I do this I revolve the whole thing. Now it's going from the wrong edge, it's going from the left edge, so I want to revolve it from the right edge, and there's my little Christmas tree. Because it takes half the object and goes right around. If I move this from the edge, obviously it starts to create this dog dish kind of cone, but then I can rotate this, and it's like, wow, cool. I like doing this with, hmm, a wine bottle. Oh my gosh, how do you do that? Well folks, if there's one thing I know very well, it's how to use illustrator. (laughs) So I'm gonna create a wine bottle and I could either do it doing half of a wine bottle but I'm just gonna do all of the wine bottle here using my grid structure to kind of snap the things to it, and yes it looks kind of crude, put those together. But then I'm gonna use my little widget tools and I'm gonna grab just those corners, I'm gonna widget those corners right up, and I got my little wine bottle and then I can put a little bit of a lip on the top up here, like this, and so I've got a little bit of a cap right there and this is where using the grid doesn't work as well because it's snapping a little bit too far, but you get the picture. Now what I'm gonna do is I'm gonna take this, I'm gonna cut this perfectly in half. So I take my shape, I know I spend all that time making it and I'm gonna cut it in half here, like that, so I got half my wind bottle. Now, I'm going to go under my effect, 3-D, revolve, turn that on, make sure I have it from the right edge of the left edge, there's my wine bottle. And I can change that right there, that's really cool. There's no opening on the top, what kind of wine bottle was this, it's like, oh please. So because I had a solid shape, it's going to give me a solid shape. So what I'm gonna go back here and do is, I'm gonna go back and I'm actually gonna shut my appearance off here. I'm gonna switch from my stroke and I'm gonna actually get rid of this line right here, and I'm gonna take this, and I'm going to get rid of that, and kind of move this back here, and I'm gonna do this, gonna move this right back here, and I'm gonna just bump up the stroke a little bit and apply my 3-D again to that. Now that I've gone in and I've actually created just an outline, I now actually have a bottle the thickness of my line is actually the thickness of the glass, that's pretty awesome isn't it? If I want to change some of the lighting and stuff, again you gotta click the preview every time. I could do plastic shading and such, and I could click on the more options and I can control the light source here on my object, closer to the top, right there as well, and it's like, okay, this is like ridiculously cool. It's really simple, I click okay and there it is. It's like, what, ya know, could do a vase, anything, whatsoever. The big difference is understanding when you do an outline around here, which is actually going to give you a thin wall around everything if you do a solid shape and it will be solid all the way through. And you can see how dynamically that can really change the look and feel of your objects. Yep, so I don't use this very often, but it is kinda cool to go ahead and do this as well, ya know, say we have our little paint bucket and we wanna go ahead and do a paint bucket. I could do my paint bucket and I could get rid of the top of the paint bucket, switch the fill for the stroke, make this kind of a little wider, I got that little lip on the top right there, so we do that. Effect, 3-D, revolve, nope actually, one step ahead. I need to take this and I need to cut this in half so I'm actually gonna take my scissor tool, cut it in half, right there. Because I only want half of the shape. Effect, 3-D, revolve, preview, now it looks like a paper towel holder cuz it's going from the wrong edge. Do it from that edge, and then I can move that around and I can see, and there's my little paint bucket, or it's my little cup, or whatever it may be. Mm-hmm, yeah, and you can dynamically change the color, right now I just have the stroke of that color but whenever I change the stroke it's automatically gonna change the fill and so on. Mm-hmm, oh yes. Now of course you're probably saying, okay, so we can do all this cool stuff in here and how do I go ahead and take one of my cool little info graphic icons here and actually use it as a label on here? Uh-huh, see I read your mind, exactly. Because we've done all this cool stuff, and I would love to take like, this gear and put it on my wine bottle, or you know take something like that. Um, oh you know let's do the heart, wouldn't that be perfect take that heart I'm gonna copy that, I'm gonna paste it down here, and I wanna merge this together so they're nice and tidy and clean. I wanna put that heart on my wine bottle to make it look really cool. Now, I can't just go and put it on the wine bottle and have it map to it, just gotta do a special step here. I need to turn this into a symbol, and I don't know why we turn it into a symbol, but that's the only thing that we can use in order to map artwork to any 3-D surface. And, so I'm gonna take my heart and go under my symbols panel and I'm just gonna turn this object into a symbol, like taking this object, drawing it into the symbol panel, and I'm gonna call this a heart it's gonna be a graphic and click okay, and it turns into a symbol. Okay, it doesn't look any different, it doesn't act any differently in this regard. But when I go and I use my wine bottle here, actually I'm gonna use this because I've got a little bit better color on this, I'm gonna take my object and I'm gonna go in and I'm gonna click on the 3-D revolve, and I want to map art to the surface. So I'm gonna click my map art, and I have to choose the face, or I have to choose the symbol I wanna use. So there's my heart, now I need to go in and I need to figure out what surface I want to put it on. So, I can't choose my object first, I do this every time, I need to go through and I need to figure out what surface I want to map it to, and it's hard because we've got all these surfaces, so you gotta pay attention to the little red indicating area here, and I go through, and it's like, okay, here's the outside surface of my object or else I have the inside surface too, and that's the inside surface, that's the outside surface. That looks like the outside surface. The light areas are the areas that you're going to see, the dark areas are the shaded areas, so with, what I think is the outside, I'm gonna go ahead and I'm gonna apply my heart to that, and I'm gonna put it into the highlight area, right there. You can move it around, you can scale it, whatever, you can have it so it kind of goes around the shaded area, if you want to, right there, and click okay, click okay, and there is my shape with my object. Nicely shaded, on there. I can select just my basic shape, change any of the attributes to it, it allows me to change the colors of it as well. I can reduce, you know, the stroke, which is going to reduce the thin-ness or thick-ness of the object, as well. And then, did I knock the mapped artwork off there, I must have. So that's the inside, I don't know where that came from I think we just knocked it off, there's the outside. I must have to go in and apply it again. Oh yeah, there it is, I think with me messing with it it knocked it off. Mm-hmm, yes, so wouldn't it be great to create a bottle of shampoo and then put some lipstick on it, you could. And all you have to do is, and it's crazy because we've been talking about creating all these shapes, but when you do any of these 3-D shapes it literally, when we go into outline mode, they're all half shapes.
Class Materials
Bonus Materials with Purchase
Ratings and Reviews
Patricia Green
This class is so much fun! I gobbled it up because I enjoyed every minute. It begins my journey into infographics, something I intend to put in my portfolio. Jason Hoppe is a great instructor who really knows his stuff. If you want to have fun with Illustrator, this is the class for you!
user-a27ddb
I bought the first version of the course of Infographics and I strongly recommend it to anyone who wants to learn how to use Illustrator. Exactly as he explains in the video, this is not a course just to learn how to make graphics. At the end of the course you will be able to develop just about anything in Illustrator. Really! All the knowledge I have today of this tool, started from this course of Infographics to which he refers. Not only the content is comprehensive, but Jason is a great teacher, explaining everything very, very simply. I'm looking forward to watching this update.
scuevas1023
Jason, you ROCK! I learned a lot of things during this class. Thank you for being such a great teacher and taking time to share your knowledge. Will continue to purchase your classes. Sandra
Student Work
Related Classes
Adobe Illustrator