Lessons
Lesson Info
Button Set-Up
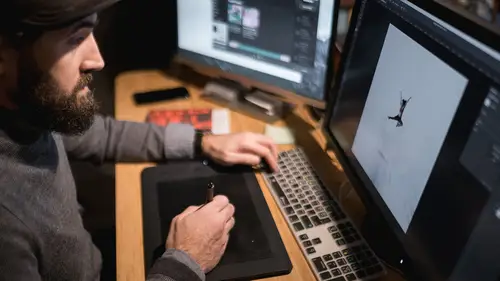
If you look at this area here, you have first is your device. And you can have multiple devices. So, Wacom could, you could have a Wacom tablet, and then you could have, they make like a little remote for the, for the, the video screen Wacom tablets. They make a remote for those, and you don't have to have the screen to have the remote, and the remote then is a USB device, and you can plug that in. And so you could have that over here with more buttons, (audience laughs) and those buttons could do other things. And so that would show up as another device. So you can have multiple devices on one system. So, first, you're gonna choose the device. Then you're gonna choose the tool. So, you have function keys, which are all of these keys here, plus the radial filters that you're going into, or the radial buttons. And then you have Touch. Now, notice that I haven't done anything with Touch, because I don't use it. But you can do all sorts of gestures, like look at all these gestures, and yo...
u can program gestures and tell it what you want three-finger dragging to do, and you can, you can go like this, and it'll zoom in, and go like this, and it'll zoom out. And so there's a whole bunch of things you can do with Touch. I just don't get into it. But, you could definitely do it, and you could say, every time I go like this, I want you to zoom into my photo, and this to zoom out of my photo. And so then you could free up your Z key over here on the buttons by using your fingers. I just don't know why, but I just don't do it. But that's there for you in the Touch area. And then you also have a pen, and then the pen has several things as well, and notice that it has the eraser. So for this, it's a right-click, 'cause you have to have a right-click. And I don't wanna have to grab my pen and hold down the Control key and right-click it, right? And so I just spin it around and right-click and close what I want, and then, 'cause I don't, it's not like you're using the right-click all the time, but like, if you want to merge something, or if you wanted to, you just turn it over, right-click, do what you wanna do, and then back over, okay? So, a right-click can be, but this one's limited. I'm actually a little disappointed that it's, that it doesn't have more capabilities. It's limited to certain types of clicking, certain keystrokes, erase, and application. What I want it to be able to do, really, is when I turn it over, I want it to be like, brush B in Lightroom or something. You know, that kind of a thing would be nice, but. I wish it had more capabilities. But, it's great as a right-click. It's great as an erase, if you're gonna use erase inside of Photoshop or something like that, although I don't use the erase that much, so that's why I don't, this never is an eraser for me, because I don't use erase. All right. So, what we're gonna do is we're gonna start, let's start with the pen tool. Now, notice that below the pen tool, you have applications. You have all applications here, so you have every application, you have Lightroom, and you have Photoshop. You can add any program you want. Right now, my computer, when I go to Lightroom, the tablet sees Lightroom, and so it changes all of its buttons to suit Lightroom. When I go to Photoshop, it changes all of its buttons to shoot, to suit Photoshop. When I go to any other program, including the operating system, it does whatever's on this all others, right? So, all others is how it starts, and what I would suggest is that you first start without adding any programs, start with the all others and set it up the way you would like it to just generally operate. Once you've set that up, when you create a new program, all of those general settings will copy into that, and then you go from there. That way, you're not having to re-set up all of your like, sensitivities and, you know, right-clicks and whatever. It'll just transfer 'em over, and then you start adjusting those buttons. It'll save you a little time in having to set each one up. So, all others is every program, and if I want to override that, what's in the all others category, then I have to click on this little plus button, and I have to go look for a program. And these are the ones it's suggesting, but you can browse to any program on your system. You could do iTunes. You could do Chrome. You could do, doesn't matter. If you have a specific need in a specific program, you're always doing a very specific thing, set it up on these keystrokes, and then never have to do the other stuff again. So, use it, use it wisely, and we'll teach you how to use it wisely. All right, so now, let's go into the pen. I'm not gonna teach you how to do anything in the all others. We're gonna to straight into Lightroom, and we're gonna talk about Lightroom and the pen. So, when I'm in Lightroom, I want the top of my pen, or I mean, sorry, the very, the closest button to the nib, is that radial button section. That gives me all other options. The next button is pan and scroll, and pan and scroll is a normal thing. It's like, like, when you look at this, you actually have navigation, pan and scroll, and there's a lot of different navigation, but pan and scroll is important, because when you're on a tablet, you don't have a mouse wheel. Does that make sense? So then when I'm in Photoshop, or when I'm in Lightroom, so, let me just, when I'm in Lightroom, and I wanna get down to the bottom of this, I don't have a mouse wheel anymore. So I simply click on the top of this button here, and I grab it, and then I can scroll just by, do you see that? I'm just moving my mouse, or, not my mouse, but my, and I'm just scrolling down or up. And then the same thing works down here. It's pan and scroll, because pan is the operation that you would use down here in the bottom set of images right there. So that's, if you wanna get back and forth in that film strip view, you've gotta pan, and then if you're going up and down, it's scroll, okay? So just, that's why I use it. It's easy access, and it's right on that top button, pan and scroll, 'cause you don't have a mouse wheel, all right? Now, if you set up your touch, you could, say, two finger scroll up and down if you'd like to do that. All right? So, either way, just, just recognize that you wanna set that up. So if I wanted to, actually, that's not a bad idea. So let's go here and say, okay, let's go back to the touch, and let's set up Lightroom. So, you click on Lightroom and hit OK. So now Touch has Lightroom as part of it, and then I would go in and say Standard Gestures, and I want my standard gestures, first I've gotta turn on my Touch capabilities. See how I switched that switch on, and then I would say, okay, scrolling is a natural scrolling or standard. On a Mac, I don't know if PCs will do this, but you can reverse the scrolling so you're pushing the page up, so it's natural. It seems like you're pushing the page up. So now, that works. So it's, all of the touching is exactly the way it would be on my, on my trackpad here, generally speaking. So now, when I go back over to Lightroom, if I'm here, I can just scroll up and down as well. Okay? Again, Touch bothers me a little bit, so I'm gonna just... (audience laughs) Turn it off. But, I don't know. It's weird. I just have a thing against like, it doing things when I accidentally touch it. So, but you could limit that and only turn on certain amounts of Touch. So only two fingers, that's it. And that would limit the ability for it to do random things when you touch it, okay? So, and don't, don't get me wrong. I'm not saying it's poorly designed. It's just, I'm poorly designed. I have a weird thing against, don't touch me, I don't know. So, we're going back to the buttons here, and we're, so we've already talked about the pen, and we've set up our pan and scrolling, and we've, we've, oh, so you're wondering, how do you get this button here to open up that little radial button, which is awesome. So what you do is you choose the button that you want to open up the radial tool, and you click on it, and then you're gonna come down here to this On-Screen Controls. And I've set up a radial button set called Lightroom. And I've also set one up called Photoshop. And then notice that there's these other things that have squares on them. They're like a grid. Those are subcategories of buttons and tools. So, when I clicked on the radial tool and I clicked on Color Labels and it opened up the set of options with buttons on it, those buttons are right here, where is it, color ratings. That's that, all right? So, but the first thing you have to do in order to utilize that is you have to go back to the functions area. That's where we're gonna do the buttons, and we will start by doing these On-Screen Controls. So, the On-Screen Controls, if I click on this Lightroom section here, you see all of the different radial buttons that I've set up. And each one of those, so if I click here, you can see that the top of the pie is going to be LR to PS. S it's going to open up a set of options that give me buttons that will tell me, like, export to Lightroom, right? And if I go down to the Star Rating, which is kind of that seven o'clockish on the clock, it's Lightroom Star Ratings. And then below that is Color Ratings, which is at nine o'clock. So Color Ratings is a button set, right? So you have to create a radial button, that's your main one. So the first thing that you find when you click on that little top or the front button on your pen is you wanna see that radial pop up. Then once the radial pops up, then you want to program each section or pie wedge to do something. You can program it to do something immediately, so it can just have a hot key to it. So if you click on, say, the 12 o'clock wedge, it could just copy and paste, or it could send you to Photoshop, or it could just click on it and it'll do something, or, and that only gives you two, four, six, eight options. So that's not enough. So, instead, we use the wedges to open up other things. So, the wedges open up a panel of options, and that's how I did that. So, when I made the color labels, I first realized I wanted to make a color label set of buttons. So the first thing I have to do is I have to come over here, and I have to click on this little plus button here. This little plus button right there allows me to create a panel, and I can choose what kind of panel it's gonna be. It can either be a vertical set of buttons, it can be a horizontal set of buttons, it can be another radial set of buttons, or it can be like this insane, like, group of buttons that's like a keypad, and it's like 35 buttons, which is totally confusing. I wouldn't use it. It's just too many. So, it's better to go with something simple like this one, this one, this one, or that one. So, then I click on that, and I say, we're gonna just call this an example, and it's important to display it at the cursor. Otherwise, it puts it in a specific location. Now, if you want it to be in a specific location, great, but otherwise, I want it to be right there, so I click, click, click, and I'm done. So, wherever my cursor is, this set of buttons is gonna show up right there so that I can just click it, okay? So I want it to show up at the cursor, and I'm gonna hit OK. Once I've got my example set there, then I simply go to these tools here and start choosing what they're gonna do. So in this case, I would say I want the top, the first button to do a keystroke, and I want that keystroke to be Command + Q, quit. I don't know why you would do that. I'm just amusing myself. (audience laughs) I'm Done, right? So then you click on that, and now I've got I'm Done as a button, and it would just show up as a button. Then I could do, the next one could be a navigational thing like Zoom Out or Zoom In, which I have a Z key right here, but if you wanted to zoom out or zoom in, that's what you'd do, or you could do find an application, open a specific application, or you could do more on-screen controls and have a completely different set of buttons that shows up. So you could just go down a rabbit hole, and just keep going and going and going and going and going until finally, you're like, man, when am I gonna hit a button that does something, right? 'Cause it'll just stack 'em down. So, don't go too far down that rabbit hole. I would say you want a radial, and then that radial opens panels that have buttons on 'em. That's it. And in Photoshop, because I do much less in Photoshop than I do in Lightroom, I actually don't have all that many. I have quite a few that, when I click on the radial, I click on it, and it just does the thing I want it to do. So, you'll find that sometimes, eight is plenty. But it's a good way to organize. Okay, so you have a lot of different settings here. So, this Keystroke area is the most powerful, because once you understand the keystrokes, you can actually have it do a series of keystrokes. Like, for instance, you know that little button that I programmed that selected six images? I'll show you how I programmed that. You ready? Yeah? Okay. So the first thing it has to do is it has to go to the grid. So, no matter where you are, it has to go to the grid. So, G takes you to the grid. Then once you're done in the grid, I think it's Shift + Option + D. Anyway, we'll look at it, and I'll give you. But notice how I did G, and then I did a Command. So, the first thing you have to have it do is go to the grid. Then you have to have it say whatever my selection is, I want the next image. That's what that does. And then it says, okay, after that, I want to add images to the selection, so I hit Shift + Arrow Over five times to add, is that, one, two, three, four, five, five times, so that makes six total. Then once I'm done with that, I have to go back to the survey mode in order to show it to me in a nice pretty way, so I hit n for survey. So you see what it did? So that's a set of keystrokes, and when I click it, it does all of them, one right after the other. So, that also means, by the way, that if you want to, if I hit Delete to delete this n, watch what happens. It adds Delete to the series. So, if you want to interact with these and edit, you need to come in here and edit with the Delete key here and clear here, because it will, it just remembers your keystrokes. If I wanted to have it open up, say, like, for instance, say I wanted to have it keyword something for me, the way I would do that is Command + K is add a keyword to a photo in Photoshop. That's what it is. So if I wanted, and by the way, oh, see, I just messed it up. So, if I wanted to keyword an image from anywhere, I could say, go to the grid, so G, Command + K, go into the thing, type in the word love, and then hit the Escape or then hit the Enter key, and then hit Escape, and that would literally take me to the grid, open up the keyword, add love to it, hit Enter to make sure it got in there, and then escape out of that panel so I'd be back in. And then I could say, and then take me back to the Develop module. So, I could be in the Develop module and say, I love this photo, and I could keyword it, and it would go, and then it'd come back. (audience laughs) Do you see how powerful that can be? Like, if you have a series of keywords that you use on a regular basis, put 'em into a radial filter, and just say, keywords, and then just open a panel that just says, like, you know, details, say you're a wedding photographer. Details, bride, humor, child, whatever, and if you're just working on a photo, and you're like, I should keyword that one, done. And it would just go, and you'd be right back where you were. Do you see how... So, if you think about what you want to do, there's almost no way not to do it. Like, you can get it done. But it's just a matter of thinking through what you want it to do. So, I actually cancel outta here, and let's go to the, let's go to our, oh, I know where that is. So if I go to my express keys, and I go to Lightroom, see that Keystrokes Next 6 Images? So that's programmed on the button. And we program the buttons exactly the same way that we program the radial filters. I'm gonna click on that Keystroke, I'm gonna go to the Keyboard, hit Keystrokes. There it is. So, it's, it's actually just Command + Arrow. So it goes G, then Command + Arrow. That gets me to the next image. It deselects this set of images and selects the next one, and then it goes Shift, Arrow, Shift, Arrow, Shift, Arrow, Shift, Arrow, then n. So that's the keystroke. So if you are watching right now and you want to do that, then you just need to remember those settings, and then program yours to do it, and you will have the same next six. And if you want eight, or if you have a 30-inch monitor, maybe 12 images at a time, you can just simply program that strokes, those strokes in, and then that way, when you are working on your images here and you wanna select the next six images, you just simply push that button, and they show up, and then you push this button, and they show up, right? If you go to the Touch ring, the Touch ring has four quadrants, and you're gonna set those up based on what you need it to do. So, you can, this button is kind of an automatic thing, so it's AutoScroll and Zoom, which means that it will automatically figure out what you're doing, and so it will automatically zoom and zoom out if that's an option, or it will automatically scroll. So if I'm hovering over, say, the, the sliders, over on the right-hand side of the Develop, it'll scroll up and down on those, so it'll choose what you're doing. If I want to feather the brush, then I go over to this next panel on the right-hand side, so the top-right quadrant area is for feathering my brush. So, if I'm working on something and I wanna increase or decrease the size of my brush, I use the brush feathering, and that's just simply a keystroke. So, keystroke of Shift and brackets decreases or increases the feathering of the brush. So when I'm in the Develop, if I wanna increase or decrease my feathering, so I'm in here, and I'm doing the Develop module, and I wanna do something, and I'm over here in the brush area, and I'm brushing, and I want to change that, I just simply take my, I'm gonna feather my brush and watch, see how the feathering is changing there? So I can, that's very feathered. That's 100% feathered, and that's super sharp. That's zero percent feathered. And then I can also increase the, so, the reason AutoScrolling is so useful is because it's intelligent and knows what you're doing, and so because it's, I'm on a brush right now hovering over the image, it knows to decrease or increase the size of the brush. But if I go over here, it knows to scroll on this panel. So, where possible, instead of using a keystroke, use the things that Wacom has already set up knowing that they can kind of manipulate it so you get two effects out of one control. All right, now. I'm gonna give you a couple of thoughts and rules on the way you set these things up. If you have a, I mean, you're gonna be using this in your right hand, or you're gonna be using it in your left hand, and you're gonna have a hand free. So, this hand is sitting right here, and it's doing nothing. The buttons that you set up over here should be thought of as buttons that your thumb or your forefinger are gonna push. Don't think of it as I'm gonna bring this over here, 'cause you're not. You're gonna keep this one here, and you're gonna go like that. There are some people that have it right here, and in that case, okay, maybe that person might use these bottom things here with their left hand, but most people are going to put their tablet to the side, and they're gonna work this way, especially if they're using a laptop and a small one. So if that's the case, if this is what you're doing, then realize that you have this button free. So if you want the hand tool, like, let's say we zoomed in, and I wanted to move around this photograph. Well, we all know that the Space key turns it to a hand so that I can move things around. There's no reason for me to program a Space key and waste a whole key over here when I have a space key that's really big, easy to find. My hand knows where it is. I could do it in the dark, right? So I'm just here. I just push the Space key, and now, I've got a whole bunch of buttons over here that are really useful as well. I just wanna program this to do the things that I can do from one touch here. And so that's usually not modifier keys. Modifier keys are right here. There's Space, Command, Option, Control, Shift. All of those are right there. So if I need a Shift key, there's no reason to go over here, move my hand all the way over to here, hit the Shift key, when I have a Shift key right here where my hand is naturally sitting. Does that make sense? So don't think of this, I gotta put every key right here. What you wanna do is things that you're going to be doing while you're working on the tablet, things that'll make it easier. For instance, next six. That's a complicated set of keystrokes. Look for things that are buried in menus that you hate going to.
Ratings and Reviews
a Creativelive Student
Anything Jared Platt teaches is going to be wonderful!! Can’t wait to see him teach about the Wacom tablet!! I have a tablet and want to see a fantastic photographer use a Wacom!! I can’t get the hang of the tablet yet and I know Jared will inspire me and others!!
JUAN SOL
Interesting course. Jared is giving a full descripction of all the possibilities of this hardware and the tools to customize it to our own convenience. Good job, Jared, once again, and I love your sense of humor.
Jennifer Genevish
Great understanding on how to set up and use the Wacom tablet, I am glad it is like the shuttlePro v2. I was worried that I would have to create a new system to edit photos in LR. Just transfer my setting over to the tablet. He did a great job taking about the tablet in basic terms, while explaining and show examples. Thanks so Much Jared Platt and CreativeLive.