Lessons
Class Introduction
01:51 2White Balance
08:07 3Mixed Lighting
04:06 4Color Contamination
12:33 5Camera Files & Settings
05:09 6Color Management
07:04 7Exposure
05:00 8Quality of Light
07:36Lesson Info
Quality of Light
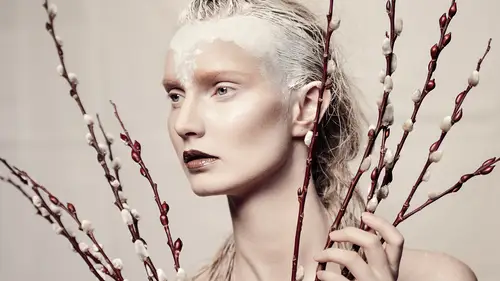
Now, these are the things that people usually think about when flattering skin, the more obvious one would be the quality, and then the next one I'm gonna do is gonna be the direction of light. So, the quality of light you think of as hard light verses soft light. What are the transitions like on the skin. I said this, hard light verses soft light. Picture on the left is with very soft, flat light, we'll talk about direction later, but very, very soft light. Picture on the right is very hard. And so here are the characteristics of these different light sources. Alright, so, for example, in a hard light source, something like this, something like a zoom reflector. Zoom reflector, really hard light source and there's a couple reasons it's a hard light source. I'll give you some of the lighting rules. It is a small light source; the smaller the light is, compared to the size of your subject, the harder the light. So, I mean, compared to your head it's really small. Also, silver is harder ...
than white. So it's silver and it's small, this gives you really hard light. But what is hard light exactly, if we take a look at her picture. What hard light does, is it makes the transition from highlight to shadow very abrupt. It basically is a line. There's no subtle transition on the face. And so what that does is, on her, the light's pretty flat, but you can see it's a sharp line underneath her nose, and it's a sharp line underneath her jaw, but how does this affect the skin? What are we thinking about for the skin? Well first of all, if it's abrupt transition, it's gonna show abrupt transition on wrinkles. So, it's gonna draw out those wrinkles, and it's gonna show abrupt transitions when the blemishes stick out, it's gonna emphasis them. It's not going to be subtle or forgiving. And so, what fundamentally, what hard light is doing is emphasizing texture. Highlights get brighter, you can see this, right? The highlights on her skin? Much, much brighter. And shadows get darker and more crisp. So, it's showing texture, more specular highlights, and it's just more crisp light. For most people, most portraits you're going to do, if you light them with this, you're being mean. Within reason. Because that's what it's gonna do, it's gonna show all texture, and it's gonna show all blemishes, all issues. And also, remember how I said this increases contrast, brights get brighter, shadows get darker? In Photoshop, have you ever drawn a lasso around someones face and increased the contrast? Highlights get brighter, shadows get darker. But did you notice that saturation increases as well. Like if you increase the contrast on someones face, it gets redder, usually? Guess what, lighting has the same effect. You point this at someones face, look at the red in her skin. It's much more red, so you're also emphasizing blotchiness. Usually this is rough, unless... Unless your photographing someone who's older, and your intending to show wrinkles and texture, and you're going for that more weathered portrait look. Maybe that's what you're trying to do. Or, for me, as a beauty photographer, I use this all the time. And the reason I use it because I want really, really crisp shadows in the jawline, and the cheek bones, and I really wanna emphasize their features. The skin's, it's gonna be tough but I know I retouch it. 'Cause sometimes I want hard light, but I know it's tough on the skin. So, maybe retouching is part of your equation. Typically, not what you want for portraits. On the other end of the spectrum, would be something like this, okay? So a soft box, okay? Soft box's what's gonna give you soft light, in the feeling of the left shot. That was not a soft box, the picture on the left is actually a giant V-Flat, so big, reflector board. And so I'm actually, if I were the photographer, I am in this one shooting, there's a window behind her. And I don't know if you can see the catch lights in her eyes, but see how big they are? I stood in the fold of the V-Flat. So she's there, I'm here, and the light bounces into the V-Flat, and so, the light source illuminating her is eight foot tall, and several feet wide. So, over here, I said the smaller the light source is, compared to the size of the subject, the harder the light. Well, let's go the opposite extreme. The bigger the light source is, compared to the subject, the softer the light. So in this instance that light is as soft as possible because she's sitting right next to it and it's a huge eight foot tall, several feet wide reflector board. And it just gives her really soft light, and this was hard and silver, reflector board: white. White is much softer. So these are kinda the two extremes. Soft gets you very subtle transition from shadow to highlight. There's not as much difference between the highlight and shadow as far as brightness and darkness. And so these are your considerations. Now for the soft box, it's great, I use it all the time, it's just a matter of direction. And that'll be the next thing on the list. By the way, taking a look these. The picture on the left, let me see, I can look at the-- The picture on the left is three by four foot soft box. I was looking at the catch light, in case you were wondering why I was poppin' in there. Through my four foot catch light, through my four foot soft box on the left. And the picture on the right is this zoom reflector. And you see how the highlights, and the shadows get darker. And you can see how the shadows are more abrupt. And so in the picture on the right, notice, right? It shows more texture, because it's a harder light source. And they're both in the exact same position. When I want softer light, I go, okay, softer. I need it bigger, I need it diffused, I need it white, if I can. If want harder light, I go smaller, silver, direct. But all of those suck for skin, so we go in the softer direction. Bigger softer, white, diffused, all of that. My favorite modifiers that I use for portraits are either soft boxes, something like three foot or five foot octaboxes. Also, the other soft box around the corner, rectangle. There's some differences between them, but for the most part, you're gonna get very similar light. But probably my favorite to give me soft light for portraits, is a large umbrella with diffusion. Somewhere 40 plus in inches. I usually go somewhere around the 60 inch range. The big umbrella's with diffusion give you really, really soft light, and they're easy to setup, and they're less expensive than soft boxes. So, that's usually what I do if I'm going for that soft, forgiving portrait light. So we talk about this. Alright, so, let's take a look at this gentleman real quick. First one is the zoom reflector, next one's a beauty dish, next one's a soft box. Harder, in between, soft. And so you see when I took pictures of his forehead you see that the mole and the wrinkles are more defined on the left. But then, as I move over to the softer light source, they have less definition to them. All of them were in the exact same position, relative to the subject. So, I just know, if I want to be more forgiving, I go softer, or someplace between.
Class Materials
Bonus Materials with Purchase
Ratings and Reviews
Amy Vaughn
The topic is too big to cover all the solutions in depth in such a short amount of time, but this seems like a great overview for beginners to understand the range of problems with making skin look good in photos. Lindsay does a great job of making her class topics easy to understand.
Frank Gutierrez
I just love Lindsay's work! It's so impressive; especially the sampling photos captured of the elderly gentleman. It brought all she taught throughout the video together seamlessly! I'm so going to watch this over and over again!
Danielle
Great primer on skin tones, lighting, and considerations for different types of skin. One of the few teachers that discusses dark skin tones!
Student Work
Related Classes
Glamour & Beauty