Lessons
Lesson Info
Making Stamps
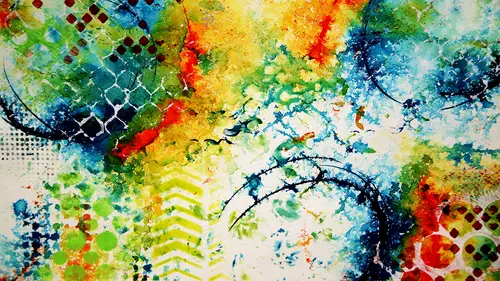
All right, I am so excited to be here if your hands are clean right now they're not going to be clean for very long, so hopefully you don't get a manicure yesterday and you don't need to like go to a business meeting tomorrow because your hands are going to be messy. We're going to start by creating our own stamps it's so easy to make stamps that are not commercially bought. When I look at my artwork, I like to see things that are my own hand rather than something that you know they say, oh, I saw that except in such a big box store, I have that stamp you want to make things that, um have your own hand in them, so what you have in front of you guys is you've got a stack of fun foam we're using the black fund foam and you've also got some sticky back fund foam and let me tell you a little bit about before we get into this a little bit about why we're making our own collage papers hey, you can go out and you can buy a bunch of different printed papers and things like that, but they all b...
egin to look the same to me and so by making your own collage papers using our supplies that you have at hand and this may look overwhelming to you, you the are our sponsors were super generous but you can really use this the fewest art supplies to make your own collage papers so we're using all acrylics today because they layer wonderfully and when they're dry they don't lead up or blender around so that's one thing to keep in mind as we're using all acrylic mediums today on and just simple paints that's all really paint and acrylic inks why were you making your own collage papers again is to get our own hand into a bit because then we have this unlimited supply of papers that we can use and other types of art. So what are some of the things that we might want to use collage b percent we might want to make things that we could put up on our wall so we make art lie this okay? All of these air hand made collage papers in here so none of it is store bought and a lot of it the backgrounds might be my kid's homework, right? I'm making collage papers with all different kinds of paper. Um some of it is music paper some of it is just regular old printer paper that I've done all these fun techniques and layered them all together t make bright beautiful paper other things that I used my kalash paper and as I use them in my art journals, sometimes I even make an art journal from the paper's that I do all these fun techniques on, so I start out doing all of these techniques, which we're going to dio and then actually full cut them, pulled him up and bind my own books. So when you're thinking about what you're going to be wanting to use your collage papers for, I'm you want to think about what am I going todo am I goingto make it into a book, then you're going to want to start with some thicker papers, right? Because we want the paper to hold up to the binding process am I going to collage down onto the surface of the canvas? If I'm going to do that, then you want somethin or papers so that it actually adheres to the campus easier. Okay, so keeping that in mind, but we're not you're not going to have to worry about that at all because I gave you a packet of all different kinds of paper each of you after seat should have this on baloo a paper and you can paint your envelope, you can paint around below you, so don't get that too far away because we'll get some marks on there now the different types of papers that you have in here, we have music paper, some of the older vintage papers are really crumbly, so I wouldn't necessarily have this be a standalone book page after I was done but it's beautifully it's beautiful to cut it up and use it old ledger paper even very simple graph paper just tourney out of a notebook and I even like these little frayed edges right here you have card stock I'm not really going to go through everything that you haven't because it's obvious what we have as we go through and use it some of my favorite things to use in my collage papers is my kid's old homework so I went in my daughter's room last night I'm like dude where's your math homework because it's the end of the year we've got stacks and stacks of math homework, okay, how cool is that as the base for collage paper, we're going to do all kinds of layers of paint and stuff like that over top you may or may not have some of my kids homework in your yeah because it's pretty precious to me at the end of the year like I have to go in and and scour there backpacks and get all that old homework I'm like do you have any that's not crumpled because that would be really cool but it's all right, ok, so there that's just a little run down of the different types of paper that we're going to be using so you've got card stock oh look at this I even have security envelopes, okay nothing is safe in my house my kids know not to throw away their homework for one but also my husband I've even got him trained so when he's opening the bills he's like oh here's your stack of security envelope because I know you like those right? So when we cut these open we have great look at that there's pattern already because building your own collage paper is really all about layering the patterns and so you have some book paper in here that's layer number one already done you've got security envelopes layer number one already done so some of my work's already done as far as that goes so there's our stack of papers that we're gonna be working with the now let's get back to making our own stamps because like I said what? We have lots of cool things that we can buy in the stores but once you realize how simple it is to make your own stamp to be making the marks on the papers you're going to go crazy and make all kind have literally buckets of stamps made like this. I brought some of my favorite ones today um and these are simply sticky back fund foam layered on top of a thicker fund foam so it's too layers we're going to be designing our stamp, cutting it out of the sticky back fund foam and then we're gonna peel and stick it on too a little chunk of this you guys all have a full sheet of it for some reason I didn't get my full sheet up here my fault but this is all I need so this is going to be the base for my stamp and then here's my sticky back fund foam don't eat all of that but I'm going to take a little bit of it just like this typically in my own designs I like to do geometric shapes maybe leaf shapes here's some more concentric ovals of a thing for robles and circles squares, rectangles typically I like to do designs that doesn't matter which way is up I can flip it around sideways upside down it all looks great so although I like the shape of a heart or a house, an upside down heart doesn't mean looks kind of funny so I'm going to do things for this for the stand making process that can be flipped around any difference but you guys can you do whatever you want? Let me tell you so what we're going to do is you're going to take your paris scissors and you're going to cut out some shapes with the fund foam and to get to the inside if I want to do these open circles I just folded in half cut it out so and the rougher the better okay? It doesn't this is not made by machine which is the greatest thing about it? This is your own hand in there so that I'm going to stick this piece of fun foam on the thicker peace. Now this thicker piece is going to be service the handle right for stamping this inside peace sometimes I just shave a little bit of it away so that I could have a little piece on the inside there. Can you guys see what I'm doing? Okay? It feels kind of funny because you can't really see me out there, but you can. So so this is just a really super basic stamp, but like I said, you can build it up and make something bigger. You guys have a big a chunk of that fund foam to work with, so why don't you go ahead and get started doing that? And, well, you're well, you start working on your designs, I want to talk about some other ways, so can you listen to me? Well, I'm okay you work, I'm going to talk a little bit more about how to get these designs cut out now we're using sticky back fund foam that's this stuff right here on dh we're using this three million or five millimeter I think a foam as our base, I have an alternative to hand cutting, you have a little personal die cutting machine yes this stuff cuts through the little personal die cutting machine like the cuddle bug or the physics machine even the thick stuff okay so that just rocked your world I'm sure because now every die that you have access to you can make into a stamp so each of you have at your seat I created these these came from a concentric circle set remember how I said I love the concentric circles right these don't have the sticky on the back ok but let me tell you again magical here's a piece of plexiglass okay just from tap plastics or wherever you want to get plexi glass and on this plexi glass I have put a sheet of re stick a ble re a position herbal double sided adhesive so this should be in your carts right next tio kind of at the back of the car there you go everybody has got one of these kind now check this out well uh I'm making my own stamp so fast and easy I can fit them all on there what I love about these concentric circles is that you can layer them up you guys were supposed to be cutting your fund foam out and making it the hard way now okay all right I know that's usually the way it goes right we show you the manual way of doing and then all of a sudden the machine makes it easier for us but that's ok, you guys have this stuff so you can make your own but the great thing about this removable adhesive is that okay? So I want to lay it out like this right now later on I'm just going to pull those off and I'm going to put on the rectangles because I could do that too. Okay, so, um and think about it letters you can cut letters out with this is a matter of fact we have these in my pop. I've got these magic pockets, right, there's all kind who knows what's in here? Here's one so this is really how did I know that I have it in my pocket because I just dio um so I could throw in some I'm not going to in this design, but I can throw in letters here and have totally random stuff going on. Are they that those scissors? Sorry. So here's, the exciting news. Everything on your cart except for well around the scissors and the dryer are yours to take home. Hey, right, that was my little yes. So thanks, tio. Right. Okay, but we've got to give a shout out to we're thanking, um, deco art donated a ton of paint, they're just awesome. We got sprays and mediums and then art alternatives gave us jess oh, brushes the pallets that you guys have it your seat I work on freezer paper is a palette or a piece of plexi glass but we this is a pad hello a pad of freezer paper so we're just working right they actually make up had a freeze of people ask me all the time where do you get the freezer paper oh you just have a moment you changed my life ok people ask me all the time where do you get the freezer paper because I use it all the time for my palate and I say at the grocery store where you find the saran wrap and stuff like that but surprisingly enough it's not as easy to find as one would think so art alternatives has this in a pad and it just makes it so easy for us okay so you guys are making your own handmade stamps yes excellent we're going to get into the juicy painting stuff really soon I promise because I promised to messi hands today before we get to that that we want to show you one more way to make a stamp okay as if this was not enough okay so the other way to make a stamp we're talking about things with a raised surface what if you wanted a sunken in surface so in other words when I stamp it everything that's on the surface stamps except for the lines that's when I'm going to get something that's called scratch foam now yes I did by something called scratch phone but does this not look like a phone plate? I mean it's the same material a meat tray although I don't eat we don't do meet in our house we could probably find access to that type of trey um so this sort of material again I'm just going to cut a little piece of it you have a big piece of it toe work with I'm just going to cut a little piece of it and into this piece of foam I'm going tio draw design again I am fond of the circle shape and I'm just drawing on here with a pencil and impressing hard and that might do little scallops around it so it actually looks more like a flower but in a few minutes you're going to see exactly how all of these stamps come into play. The scratch foam is not super easy tio to draw into with a sharp instrument it works really great with a ballpoint pen because the ballpoint pen seems to glide along the surface but the pencil really does dig in there nicely and give you a good groove. Can you guys see that just a little drawn motif into and if I wanted tio because it's going to stamp everything that's on the surface if I don't want it to stamp in a square I'm just going to cut this out so now I'm going to be able to stamp this in the shape of a circle. But inside the circle is going to be that little flower motif. Okay, we're ready to get juicy. Yeah, I call it because they're so quiet up there. I call this class juicy papers, but that's not very descriptive for those of you buying this class at home. So this is handmade collage paper for you, but it is really, truly juicy papers, because we're using all these wet layers on top of each other. And, like I said before, we're using acrylic so that when they're dry, the layer stay put. Um, I love all art supplies equally, but acrylics have a special place in my heart just because of that, that stay put aspect of them.
Class Materials
Free Downloads
Bonus Materials with Purchase
Ratings and Reviews
carlos.lijeron
As a proud father looking for ways to share good times with my kids, I'm glad to have found this course. I have tons of ideas that I can now capture on paper using a variety of tools. My plan is to take some time on Sundays to do only ART with my kiddos, especially on cold Winter days. The class is very informative, particularly in the items to get. Since this is new to me, I would not have any clue on what to buy, but Andrea gives you the ins and outs of what works and what doesn't ... a really good time/money saver. I highly recommend this course. Thanks CreativeLive !! You guys are awesome.
Haden
Wow, that was SO much fun! Lots of wonderful techniques I hadn't tried before.
Melissa
This is a great beginner course and is loaded with creative and simple ideas. I love the fact that Andrea doesn't waste anything! She makes great suggestions for reusing items that would normally end up in the trash and she shows you simple ways to cut corners on your crafting supplies. This is about making collage paper, not a final work of art. I can't wait to get started trying out her ideas.
Student Work
Related Classes
Paper Craft Ideas