Live Makeup Session: Continuing First Model
Lesson 4 from: Working with Hair and MakeupSimona Janek, Sue Bryce
Live Makeup Session: Continuing First Model
Lesson 4 from: Working with Hair and MakeupSimona Janek, Sue Bryce
Lessons
Day 1
1Introduction to Sue and Simona
07:27 2Live Makeup Session: First Model
17:12 3Live Makeup Session: Second Model
14:39 4Live Makeup Session: Continuing First Model
25:27 5Morning Makeup Q&A
13:29 6Live Makeup Session: Continuing Second Model
21:33 7Student Makeup Review
30:42Noon Makeup Q&A
12:25 9Smokey Eye Makeup
12:04 10Hairstyling for Each Model
21:35 11Beauty Shoot: Susan and Midori
22:47 12Beauty Shoot: Erica and Annette
32:46 13Beauty Shoot: Caity
08:54 14Shooting the Hair and Makeup
21:59 15Simona's Business and Q&A
25:57 16Today's Images
03:33Day 2
17Introduction and Simona's Hair Kit
08:31 18Live Hair Demos: Krista and Hannah
19:06 19Live Hair Demos: Jowhara and Carolyn
28:13 20Live Hair Demo: Toni
21:43 21Finishing Hair on All Models
49:07 22Applying Your Own Makeup
24:53 23Group Makeup Lesson
50:04 24Today's Image Review
18:14 25Discussion of Body Image, Beauty, and Connection
44:32Lesson Info
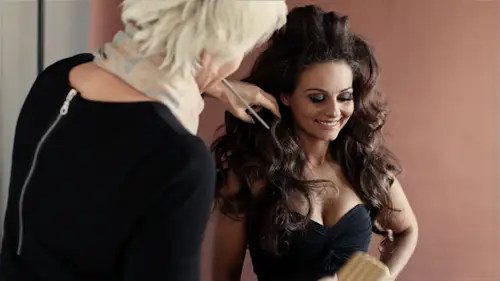
Live Makeup Session: Continuing First Model
Do you have a tight line under the lid to get that line, or do you get it right from on top? Kind of a combination? Um, is this your line of it? One of a man that's, a little little one. So if you, if you stop the line of short, which come out, if you stop the line of short, it kind of makes the I stop short. So always try and take it right into the corner and ride out as well. So looking down for me, a swell katie and slides sideways. And sometimes they take it right into the teeth left and now the spine. Then close for me. And at this point, like pre lashes and everything else, would you do the underline er as well, or did you that for the end, when you I think we'll take that next step, we go a little bit darker, so go ahead and curl. Delicious. Um, put ms carr on and then just choose instead of falsies, or maybe individual. Maybe we could do individual with how long her lashes already are that she's seven, fifteen years we'll do in elections. That's a good idea. We'll keep you nice...
and fresh. Okay, thank you. I'm gonna go back to susan. I should I tell it. Okay, so when you look at susan straight ahead, the area that I want to push back through here see she's a little bit full of through there. So I'm going to keep the lead for this stage of the makeup light, and I'm going to contra through he just to push that area back on her lips, close for me and for people who are brand new to make up, can you talk a little bit about what that term contour? 00:01:57.474 --> 00:02:01. So, uh, highlighting and shading. But that's. What 00:02:01.38 --> 00:02:03. contouring actually means. Great. So 00:02:05.66 --> 00:02:07. shading is pushing something back 00:02:08.77 --> 00:02:11. and making it look smaller or making it receipt. 00:02:13.77 --> 00:02:14. Dodging and burning out 00:02:17.37 --> 00:02:21. susan says. Dodging and burning for photographers. 00:02:21.08 --> 00:02:22. Good one. Good one. 00:02:26.37 --> 00:02:28. Eyes against. I'm just going to go a lot higher in 00:02:28.63 --> 00:02:29. the corner here. 00:02:32.27 --> 00:02:34. Another question from diva mom she's, wondering if 00:02:34.62 --> 00:02:38. you use any make up any other makeup setting products 00:02:38.77 --> 00:02:42. like spritzers, do you rely exclusively on counter? 00:02:43.21 --> 00:02:47. Um, I do use the fixed plan, and if I've got someone 00:02:47.16 --> 00:02:49. with really dry skin in the studio, 00:02:50.37 --> 00:02:52. I don't always patter the foundation, depending on 00:02:52.75 --> 00:02:54. how it's sitting. But if it looks like it's going 00:02:54.66 --> 00:02:58. to move, then always patter. I'm sometimes up because 00:02:58.66 --> 00:03:01. I'm day to touch up. So sometimes I will leave the 00:03:01.95 --> 00:03:03. skin. Unpowered it if they're quite dry. 00:03:06.07 --> 00:03:09. Uh, do you ever set the neck as well? Sorry, you ever 00:03:09.58 --> 00:03:12. set the neck as well, or just the face? Um, yeah, 00:03:12.93 --> 00:03:15. I'll usually I'll do that with a pressed, all sort 00:03:15.6 --> 00:03:17. of buffet into the deck. Latasha, 00:03:18.37 --> 00:03:18. thank you. 00:03:19.91 --> 00:03:23. Clothes for me. So just re here. I want to dock in 00:03:23.41 --> 00:03:28. this area, but I don't want to bring it to you down 00:03:28.1 --> 00:03:31. this way, because I want to keep a lift in the ice. 00:03:31.06 --> 00:03:33. So what most women want is a bigger eye and a more 00:03:33.8 --> 00:03:36. lifted. I said by pushing them 00:03:38.47 --> 00:03:39. this area back in here. 00:03:42.1 --> 00:03:43. And I'm not blending in yet. So it's 00:03:45.17 --> 00:03:46. a little bit messy. 00:03:58.73 --> 00:04:00. You can see where have applied the color and it's 00:04:00.71 --> 00:04:02. not blended so it's, quite rough looking. 00:04:04.19 --> 00:04:05. And then I'll grab my 00:04:06.79 --> 00:04:10. brush that I had before for the light color. And just 00:04:10.2 --> 00:04:13. go through and blend that socket out. So I'm not going 00:04:13.1 --> 00:04:16. down this way. I'm blending into the island and then 00:04:16.9 --> 00:04:17. up through here. 00:04:24.19 --> 00:04:25. Since I'm on the other side. 00:04:33.89 --> 00:04:36. Go browns. Next. We've jumped. Eyes already is well. 00:04:43.49 --> 00:04:46. Okay, so I'm not going. Tio put any strong highlight 00:04:46.91 --> 00:04:49. through underneath the brax. I don't want to just 00:04:50.19 --> 00:04:52. push that back, so I don't want to make that jump 00:04:52.5 --> 00:04:54. out. I'm just going to leave that 00:04:55.44 --> 00:04:57. the natural color, that the foundation is there for 00:04:57.64 --> 00:04:58. the moment. 00:05:00.99 --> 00:05:02. And go ahead and put some line around. 00:05:04.26 --> 00:05:06. When you're prepping your clients, you do ask him 00:05:06.63 --> 00:05:10. together, salon are wax on their eyebrows or clean 00:05:10.3 --> 00:05:14. all that up. Or do you ever do that? I will do that. 00:05:15.49 --> 00:05:16. Nothing, you need it. 00:05:17.68 --> 00:05:20. I'll do that with tweezers, so not waxing or anything 00:05:20.31 --> 00:05:20. like that. 00:05:22.09 --> 00:05:22. It's for me. 00:05:31.82 --> 00:05:34. I'm just rubbing the pencil, riding to the lash line 00:05:34.7 --> 00:05:35. there. 00:05:44.14 --> 00:05:46. And sometimes, when it's warm points back home, it's, 00:05:46.96 --> 00:05:49. often quite warm. Pencil can be a bit soft, and you 00:05:49.7 --> 00:05:51. sort of get it everywhere. So then I get an angle. 00:05:51.98 --> 00:05:53. Sin angle, brush. 00:05:56.89 --> 00:05:59. And what's. Even sometimes, tio is actually around 00:05:59.74 --> 00:06:03. the brush on the pencil. And then apply the pencil 00:06:03.17 --> 00:06:03. that way. Can you show us? Show us that again? Just how you're rubbing. Yeah, please. So I'm going. Sticker on the outer ends off the liner and keeping it nice and thin from the inner part of the eye. I have gone all the way in there, and I'll get her to look down and also just blended in. So I just have an angle brush, like so and a rabbit backwards and forth. And get the color on there. And then I apply the pencil. That way. Look down for me that way. Stephen, go riding here into the lash line and back this with you. Here. Do you use the same basic eye color on everyone there? Do you have a different I do use a lot of neutrals for the glamour photography with sue so it's, it's, all mutual, brown's, neutral grace, and then, occasionally I'll pop a little bit of coloring. They're swell. What? Yeah, touching your face, yes. Always used. Um, yeah, ten, too, because once I've done the foundation that I'm not messing it up with my own hand. It's, just a powder puff. Oh, you've just got yet. Okay, so, um, once you've got your liner in, I do go through and powder it with, like a dark gray shadow or a brown. You can choose whatever if you don't, most likely it's gonna end up printing and marking the eye, because the pencil is a wax. So you want to sit. Same, like a foundation. You want to set the wax. Question from vivian. If you deal high idea with people who might have allergies to certain products used or have extremely sensitive skin, if they do, I get them to bring their own products, because usually they have worked out what they're not allergic to anymore. But in saying that, I've never had anyone have a reaction to anything that I use. And if they're extremely allergic. Sometimes it's a color in something as well. And they all know. So I'd get them to bring their own lipstick or whatever it is that they know that the problem with look straight ahead for me. Go right to the root of the lash first, and then sort of slowly move open. Colorless and then move up the ladder. Extradition again. It was strange. Please, okay, yeah, and I got and sorry, I should have asked, you cannot do this to you first. Before I jumped right in, stop teasing so again, because I was confused on how to use one of these. When I first started to use it, you're starting all the way in, so you get it in a close as you can squeeze and then release, move up the lash. I have a lift, and, well, what you're doing is kind of squeezing it about three times and moving out to the end. So it's, not just one kink in the lash, but you're actually creating a little bit more of a cool. All right, you start doing that. Hey, pop, some scar on eagle's down, lashes on no good. You wanna go ahead and put some lashes on. After the break. King down for me, for the miss kara. Get my client to look down, and I just pulled the lid off a little bit. And then, with zigzag motion, I got top. And but, um another question from carrie higgs. Is there a trend with and don't look up, stay looking straight ahead. And slightly down again, going a question from carrie higgs is there a trick for woman that have really straight lashes that don't curl? Well, you can get hated, careless? Um, they work differently. They're actually not a scary to use the little bit nicer. They have a little coil inside. It looks like a sort of a miss kara want and you just put it under and pushed the lashes up and they call that way those ones you can do once you've got my scar on, I will do it before and after they just called a hated our lish philip. Quite easy to find cool question about mascara from gabe there photography do ever you use brown eyeliner, our mascara's a black only now a deuce brown and gray if I've got someone that's very, very fair. Um, black might be too hard and if they're not used to wearing too much, make up old tiffany's brown yet, but a lot of the times for the full on smokey obviously it's usually black, so I'm just gonna use, um, I'm noticing a little bit of creasing in the foundation, so I'm just going to buffing a bit of pad around susan's come from okay, now I'm gonna go. Do have us on susan now, his brows. The way you work out, where brow should start, you go about halfway through the nostril and that's, where I should start corner of the eye, corner off the nose and that's. What should it should end? So stop pretty perfect eyebrows. And I don't pencil them riding. I brushed them across in the direction that they naturally grows. And then see if there's. Any little gaps missing that just need a little bit of penciling in. So I want to make them a little bit more prominent at the start. He and then just emphasized that end in thailand. Now, for generally I follow the natural art. You know, if they've got a brown and for women with mature eyes, if they don't have much of a brown, because it's fallen out, you don't want to draw them to to art, because it just makes that area that's already puffy and hooded even more prominent, you bring in more attention to that by really arching overacting. The browser for those women. Keep the brow a little bit strong, straighter, with just a soft lift. It's. True. Natural or in death, I would probably just pencil in the end there, because they're already clocked out for her blonde hair. So we'll keep it quite natural and maybe just brushed them. See, sometimes brass it in all different directions, and you need to brush them and spread them into place. Actually, go ahead and other user brow jill, or just a little bit of hair spray on one of these once and then brush them to stay there. Now, the color that using the brows, you don't try and really match it to the hey, you always go a little bit lighter. So this is just a really, really soft off blond color that's creating a soft shadow in susan's brows. I just wanted mike that start he a little slow. Okay, now would you like some nice lashes today? Yes. Okay, I'm going to use. Now, a lot of the times when you get this is a full s that longer through the middle here and that's, the one I want to use on susan. Because I just want the less to be quite natural and not to kick you out. E on this side. But that's probably too long for the size of her eye. So if you just look down for me before I put any glue on, I just popped a lashawn. And that he's too long. So what I do is I want to keep that in a corner short, I'm gonna cut that part. So then I'll have the longer part on the outside of the eye. And while I'm doing that great mother life straight away and just measure the length. I don't need to do it twice. Cut that off a swell. So then I've got two lashes. That a shorter inside and longer on the outside and actually even longer through the center of the state. I'm just a bit of a clue. What brand of goodies? This's, jure. Well, brando eyelashes do use. I always come the hardest time picking out the ones I want, um, for individuals. I used the flash and these, um, I'll buy these big packs of them that I found. Actually, I don't know what brand. Now, um, I get them from chinatown. I'll go through so many lashes. Um, so that they really economical. That run the glue on, sort of on the spine of the lash. You can use an orange stick or a magic. This is kind of a sculpting, too, and I just get it a little bit tacky food. Chin up for me a little bit, so you don't always do. Just the half flash kill does depends on the eye. Yeah, how do you decide? If they're quite hood it through, he I don't really want to put a big, long lesh over that. Unless I'm doing a really smoky eye. So then I want to open that up. I sort of up through that way. Depends how big the eyes are, a swell. It's for you. So then I just slide collection. I might need to refer every little sorry. Yeah, there we go. And just push it in. At this point, you ask, inclined to keep the eyes close. So the left doesn't come and stop. Stay closed, and I'm gonna go ahead and get the other one now, are you when you're attaching it, is it right at the lash? Or is it because it's on the base where you wanted to go is where your lashes grow out? Okay? Just like the last. Yeah, yes, right. If you stick it on the lid, chances are when they're open, it pulls the lead in a strange way. I noticed that some lashes uh, some woman don't grow all the way to the edge of the lid. Some lashes stopped just short of where the lid your natural lashes that girl do you mean? So would you apply all the way to the end of the lid or just where naturally they stopped? It depends if they've got it and I that maybe he's a little bit droopy and I would stop because I want the lift off the left. Let's create a list for the ice. I wouldn't follow that natural sort of downturn off the irish celeste and that's. Another case where you would use a less that's longer in the middle rather than on the outside because you want to create lift rather than continue that sort of downtown. Stay close for me. Question from christa elsie. How do you decide when to use individual lash or full falsies? Um, most of the time for the glamour shoots are useful sex, unless they've got really long lashes already, but maybe not thick enough. And I don't really want another four lesh on there. So then I slot in individual actions, and I'll do a mixture of, uh, you know, short and medium or medium in long, just so it looks natural. A question from bb eight sixty eight do always use fake eyelashes even for a natural look. Most of the time, um, most women can't put lashes on themselves. So I think it's also part of the nice experience in process that you get in the studio, you know, you get your hair and makeup down, you get your lashes put on and they get to wear them home. You connects you to remove these and reuse them again. They don't have to get bean straight away so quick question on that is, how do you remove them? You just grab the lash itself and pull, but they're quite easy to remove. So while that's trying keep your eyes closed for me, we're just gonna do a little bit of blush. Did you sit, dude, did you set the foundation? No way. Do you just want to do a very light step forward for you? Do you blush? Okay, so I just want to really soft color on the cheek for this. I gotta hear they're sorry. My brush was clean off, just dusting away from here. Do you ever have to touch up the island or after you get the lashes on? Yes, yeah, have a look, and then if I need to, uh, go over it, usually at that point, I'll bring in liquid because it's easier to sort of dotting, I'm gonna use this nice bright pink color and flash is to go on the actual cheek, not anywhere where the contour goes. Um, a lot of the times people get their clients to smile, but that's not really. Truly, you know, for some people, when you smile, your chick goes right up. But then when you stop, it ends up right down here so you can do that and just see how their face moves. Um, but then I actually like to put the blush sort of on this high apart, off the chain, sort of on the air, full of the cheek and just riding. Question from emily home. A waterproof mascara or not there's. A huge debate over which is best, and what do you prefer in the studio for parachute? I use normal when I do brought a work so friends on the situation. Um, if I have a climb that says are nothing stays on my eyes, everything seems to move south. Then I might use waterproof from them as well. See how those lectures are open for me stuck. Look up, can we go? So sometimes when your client opens their lashes, the bottom lash gets caught in the top, so you just get them to look up and gently push their bottom island down. So they said, right, how did that feel? Little clump of blue? What is that that you're doing? Some of it. So when susan open her eyes, her eyes were glued together, not completely, just in two points, and that often quite happens. The bottom lash might poke up and stick in the glue, so I just get them to look up and then gently pull that are down, and that breaks the globe on thinking, and then it's fine. You come for me. So I'm going to leave the eyes like so on. Susan. We'll just do a bit of a scar on the bottom if you don't put in the sky. I use this little right for the bottom lashes. Look up for me. And susan's got actually really long. Bottom lashes. So I don't want to emphasize the whole lash. I'm just going to go on the part right near the route. It's all wrapped up. A little bit of citizens, make up on the nose. So go ahead and touch it up with a pressed powder foundation. What are you putting, right? Just a press powder foundation. I rubbed off a little bit there. So to finish these, and I'm just gonna put a little bit of soft lipstick on. So go ahead and do some lips for me, girls. So you never used lipstick straight on. Of course. I just take a bit off with the end of my smile for me. I don't always usually plan if I want to. Really. Naturally. I used the edge of my brush to create that beautiful straight line. And this is quite a sheer lipstick it's. Almost like a gloss, but without the stickiness. So when it comes to the keep its boat, you just used your brush flat. Good that way where you can go in this way and then down. So I'm using the whole flat side of the brush that way and that way to apply it. Okay, there we go.
Class Materials
bonus material
Ratings and Reviews
a Creativelive Student
This is a great course, Simona is very good explaining the techniques. The only thing I really wish was the video could zoom in when she is talking about different makeup brushes. It's a bit too broad for me that has little knowledge of the appropriate makeup tools and brands, a list of good makeup brands for concealers and even a good starter/ essential eye shadows kit would have been very nice. The class is great, just need more material on how to put together your own kit to support it. Thanks CL and Simona, as always very nice, I'm glad I bought the course!
a Creativelive Student
I love this course and came to it because I saw Sue's Glamour Photography course. I learned so much. The BIGGEST missing piece from this course is a handout that lists Simona's kit contents! There was a hair product that I wanted so bad, but had to stop the video ten times to try to see what it was! So a list of Simona's must haves would have really rounded out this course nicely. I was so happy to see a photo of her key brushes in the slides, so I can fill in my kit with what is essential. I loved the self esteem discussion at the end, because I find Sue Bryce just so compelling and inspiring. Beautiful. Just a few picky things to make the next one even better...I would have liked the camera on the face of the subject more during Simona's demos because it seemed to show Simona talking (which is nice) but then I couldn't see the make up process. The demo with Ms. Lobdell, was great, except the side of her face that Simona was doing her makeup on was the furthest from the camera. BTW, her make up was so pretty.. Thank you so much for this wonderful series! Hope you keep having them!
Student Work
Related Classes
Portrait Photography