Lessons
Lesson Info
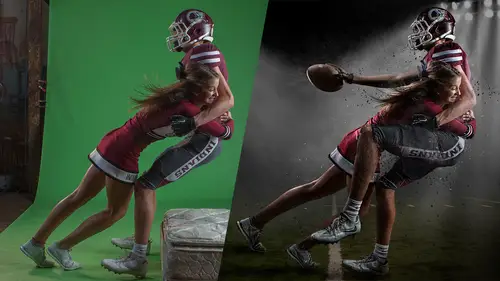
Shoot: Light & Pose for Composite
So we're gonna try that now. We have our green screen vinyl set up and I might pull it out a little bit further so we can get the full shot here, so let's see if we can get that out just a little bit, so she can stand on it and move her a distance away from that background. With that first shot, we have a large softbox that I'm gonna utilize over there, but maybe I will skip to the second shot, where I don't have to have the locker room template or the scoreboard background and then we'll switch out to that. So, we're gonna do the locker room background first, which with the locker room background, I added that in because I want to show that you don't always have to have your subject standing, you can have them sitting and they can slide right onto a bench or something like that, too. I'll probably do two shots for that one. Thanks guys for. What have we got for distance? I'll pull it out and you guys keep going. So, I want to get them, again, at least four foot away if possible. This ...
is a vinyl green screen. It is eight foot across by 16 foot long, so we should have plenty, because we have eight foot high, about, is the background, or nine, but they're cramping up on their wrists because they're. That should be close to okay, there. At least the subject, now, can come a little bit distance from the background and I'm not gonna have as much green spill hitting her from behind, as if I were to pose her right up against the green screen. Let me go back to that one. I'm just gonna get it back so it's showing here. This is the one we're gonna start off with. We have a hair light and that's gonna hit her from above and just kind of come past her, again. I'm gonna move her right out to the edge, so again, I don't have a lot of extra green in front and so it doesn't have less likelihood of coming and hitting her in the face. We'll start off standing up and then do one of her sitting down here too. Sophie can come on out. This is our beautiful model, Sophie. Yay! (studio applause) And, I'm gonna slide this just off to the side, here, and I'm shooting with a Sony a7R III and shooting into Capture One today, so my lighting, as far as the powers on my light are going on this. The light is coming from the left, so I'm gonna move this one back a little bit so it doesn't affect her as much and still lights the green screen, so I'm gonna have to turn this one down a little bit and turn this one up a little bit, because this one was down previously, and this way, the light will be coming from the side and still also lighting her. So, it's getting her, and hitting this background. This light is capturing her hair, which I might pull this out just a little bit, if we can, without knocking everything over. I'm gonna get this off. There we go! I'm gonna pull this out just a little bit here. We're gonna try that, and have it not fall over on you. And so, let's see. I'm gonna give you a basketball and so you get to hold the basketball and pretend you're there. So, I'm going to pose her. Go ahead and put it on your hip, and let's turn you just a little bit like that way and then I'm gonna turn your chin back towards the light. Why I'm turning her chin, it's just proper posing for a girl as far as posing her body away from the light, kind of flat or short lighting her, then turning her chin back into it is very flattering. Girls can pose about either way. I can't get away with this pose with a guy though. He would not, I would not look as good as her, doing this. (studio laughter) So, yes. Girls can do that, guys can't. But, we have her chin turned back into the light so if she happens to have eye contact with me, I'm gonna have the sparkly eyes, and the eyes with some nice highlights in 'em. Otherwise, she doesn't even have to be looking. She can just be looking down, towards her basketball or something like that, too. So, yeah, perfect! All right, and again, I gotta change a couple settings here. So, my light on my right, I want to go down in power a little bit, to about a 1/16 power there, and a little bit hotter, my main light 1/8 power, and my hair light is just a little bit off to the side but I should be able to, we'll see if I need to move it in closer or not, I'm gonna go about the same power as my main light, so about 1/8 power on my main light, here. So, let me take this shot here, and as far as heightwise, typically I like to photograph at a little bit lower angle for my athletes, it's gonna make her look taller and more powerful, so I'm gonna go just a little bit lower on my heightwise. I typically shoot on a tripod in studio but I'm gonna take this here, and that looks pretty dang good right away. Does that show up in there? Yep. All right!. We're gonna see if this pops up. Not back there but maybe the studio. Oh! There it is over here. So, nice even lighting. I have a little bit of dark spot just right above where I can, again, raise that up just a little bit more. You can kind of see how the shadow from my hair light came into here a little bit, but for the most part, very even lighting on the background yet the subject has dynamic lighting on her just by adjusting which light is closer and which light is further back. I might want just a little bit more light sneaking onto this far shoulder here, too, so I'm gonna pull this up. I'm gonna lower this, raise it up. Ready? I'm making our great assistant work hard today. Got it? Nice and heavy. There, we're gonna get up just a little bit higher, and then it's out of the scene here. And, if I wasn't quite at that lower angle, if I wasn't so low on my angle for my camera, I probably could just crop it off and just shoot high enough so that her head didn't show behind that spot and it would be easier. Yep, that's good. We're gonna slide it in just a tad bit if we can, just to get it on that far side of the subject. I could always move her just a tad bit to this way, too. Let's move you just a slight bit to the left, there we go, and that, hopefully, catches that left shoulder. So, let's try it one more time. Turn in that way. There you go. And, one, two, three. (click) Awesome! That looks great. Again, we still have that little, there it goes. So, the shadow is not there anymore from behind her head. I got some little bit of light on that shoulder there from above, and she'll fit into that scene there, if I just have her standing there. I'm gonna try a sitting one though, too. Get a little bit more complicated and why not see how many times I can mess up in front of the live studio audience, right? With her sitting, I want to kind of replicate the same height as that bench. That bench is approximately a cinder block which is 16 inches plus a 2 1/2 inch or a two inch board, so something about that height, is what I'm gonna say. And so, with this, if I had a longer bench I could throw a foot up on it. I think we're just gonna pretend like if you were a baseball player or something, kind of watching the game, so you kind of like lean out onto your, yep, just like that. Just, yep, intense. Let's go a almost like a little bit of pigeon toe there, just to kind of give you a cute little. Yep, perfect! Love it! Now, she's a little bit lower. This light should probably go a little bit lower to be able to capture and get in her eyes, otherwise it's just gonna miss her completely, so I'm gonna lower this down so that I still get a little bit of light in her face. And, as far as modifiers, I haven't really talked about this and I kind of skipped over it, I am using two umbrellas. They are soft white inside and it's bouncing back. I like the soft white a little bit better than the silver for a green screen, because silver adds a little bit of specularity and highlights on the background, so instead, I'm going with a soft white. I will often use a softbox in Studio Two as long as, again, you're having the same power hit the background. It doesn't matter what modifiers, as long as that background, and the subject, is being lit. So, we're using two modifiers today, and I'm gonna try that and see if it's low enough. A lot of times, in studio, I have lights that will just drop all the way to the ground and all the way up. They're on Studio Titan stands. They're very nice as fact as I don't have to screw stuff down and stuff. It's just a pistol grip and it drops all the way down to the ground. It's very, very nice. Let's turn your chin just a little bit towards that light, and I'll have to bring your chin up, there you go, just to be able to capture, get some light in your eyes here. And, (click) Nice! So, one thing I didn't think about as I was setting up or kind of skipped over, is the fact that she's sitting on a black box. This is not going to automatically extract, right? That's gonna take a little bit longer. Typically, I have my cloth green screen, right there, that I can drape over top of it. I don't have that today, so I would just have to take some time extracting that. I might try seeing if this, just for quickness sake. I'm gonna see if I can use this green, a little bit. Again, it won't come out as easy and there's gonna be shadows and wrinkles in it, but if I had some green stool or something, I could put her on that. So, this will be a little bit of help, as far as extracting her there. I'm going to turn her, yep, and I'm gonna move you just a little bit off to the side there, and, what if? You know what? I'm gonna make it even easier, so up one more time. I'm gonna move this to the other side and have you barely sit on the edge of it so I have less to go with here. I'm gonna have you kind of right here sitting off this way and then hopefully I can just kind of grab that and easily extract that. There you go. That'll be perfect. And then, we'll have your eye contact on this one here. Perfect, you look great! (click) Awesome! Let's bring that hand up a little bit, yep. Hold that up on but kind of balance it on one hand a little bit. There you go. Tilt your head into it, but not too close, just a little bit. There you go. Let's make sure that light sneaks by that ball, too. (click) Cool! I'm gonna brighten my back, my light from above so that she's a little bit lower. I want to get that a little bit brighter, too. Just kind of tweaking what I see in there. One, two, three. (click) There we go. All right. So, I shot a little bit wider on that, I'll crop in later, but you can kind of see how I shot edges, but again, I'll crop in because I wanted to make sure I had head to toe there, and this should be fairly easy to extract right here, even though there are some nice dark shadows, and it's a different color green screen, I'll just spend the extra second or two telling the computer that I don't want that part. So, we'll do all the insertions into these backgrounds in a minute. We'll continue rolling through the different poses that I want to photograph her for. So next, let's do something with some extra lights from the back, so I'm gonna turn on some strip lights and utilize those. So the strip lights and the hair light, I'm probably for ease, I'm just gonna have the same power, that way I can just crank 'em up and that lights her from behind, a whole bunch. And, this is gonna be for that scoreboard template. Actually, she's gonna be down low, so I'm gonna rotate these, I can rotate it like that and maybe get lower this way, if I can get it up, flip it over and see what happens. Something like that, goes a little bit lower then. I'm gonna try not to direct it too much straight down at the floor, because again, this is gonna add a lot of bounce to the floor and get a lot of bounce back up at her, but if I can just lower the light and then angle it back up at her, that'll be better. Ope! Maybe What if it flips upside down? There! That works even better. So, we'll let him there, and I'll get you positioned while he's working on that light. So, for this one, let's do something where you're squatting down. Something more like that, where, yep! Perfect! And so, If you remember, there's gonna be light coming in on this background. I don't know if I flip over there. Let's see. This background, here. There's gonna be a lot of light from behind her, so that's why I'm getting some nice power coming out of those, and then this light, we're gonna keep the light on the left side for this one, anyway. It can either come from the left or right, but we're gonna keep it up high, kind of like we're just coming over if there's a scoreboard wall right here, it comes slightly over top of that. And, if you want to get even more accurate, I could add like a gobo in between here, like if there was an actual wall, so that light snuck over top of her. What goes up? There we go. We're gonna try this. And, hmm. Let's just pose back on that ball and then lean forward onto your elbow. Let's try that. Do this one, and it looks like those are on, that's on. I'm gonna turn these back lights way higher now. I'm gonna go up to half power on those back lights so I have a whole lot of light outputting from those. And, crop in tight. (click) A little bit tighter on this one. So, I didn't quite get enough light in her face there. If she's looking at me, I don't quite have any sparkles in her eyes, which I certainly want, but I've got some nice bright highlights from behind on her. For this, I could either do a bunch of adjustings to that light, to get it angled and her chin up to the top or I don't even have to have her looking at me, so let's try another one, that's not looking at me, again. Maybe looking down at the ball, here, so it's out here. Something like that, yep! Thinking about that last game you played in your last ballet dance with that basketball. That looks great! That'll be a cool shot for that background, there. And now, we're gonna switch out this modifier to get a nice soft light for that first loft template and then you'll see how fast and easy it is to extract her and put her in. And these are, again, about the most challenging things I can think of. I could do a close up headshot and just say, "Tada, it's done," but I want to show you that, maybe I should just do one to show you how easy it is. Let's do one closeup headshot, to show you how easy this is. We're gonna leave these on and he's gonna get that modifier down and ready, and raise that up. We're gonna have some nice bright light coming from behind. Something closer to that way, anyway. Making these guys work today. Bring this out just a little bit, so again, if she's looking at me, it gets some sparkles in her eyes. Let's just do something with it, like maybe even like here. There you go. Yep, turn that chin just a little bit towards that light but eyes still here, and I like to do it pretty close up, here. (click) Let's see what that looks like on the screen, here. There! She has some nice kind of Rembrandt lighting, there, some highlights in her cheekbones, sparkles in her eyes, nice highlights going on in the back of their hair, so that will be something pretty cool, there. Now let's get that softbox down. We are gonna switch these lights out, here. Turn that off so I don't shock myself. Any questions, as were setting this up? We do have questions, and from the folks at home, but keep setting that up. We did have a question, whether you can do this whole thing with green screen with speed lights, and this was from Vision of Legacy. Sure, as long as you might not be able to have quite as far a distance available, but I have used, I believe, the one time I did try it, this is a pop up green screen, so let me show you what it actually is. Throw it here as he's getting that ready. This is a pop up green screen, and I most of the time, 99.9% I photograph in the studio, but here's, for on locations, I bought this to try it out, so it's a big pop up green screen. It has a floor that kind of folds out, cloth. Again, you lean this against your background stands or a building, and crop it up there, but you can do it with speed lights. I did it with speed lights, once. I used speed lights from behind. It's just, as long as you can get enough power and it depends on the scene you're putting them in, and your camera settings, too, what you increase the ISO to get a little bit more brightness out of it, different things like that. But, it is possible with speed lights. Just, some kind of lights, off camera, are important. All right! So, throw this back here. All right. Hmm. No, it's not locking, so. These are lights I use a lot at my studio. I have a slightly different modifier at my studio. Maybe if we set it all the way down. What if we just go with what we had, or make do. One more trial here. Of course, this is a presentation I'm giving, so not everything runs smoothly, but why not? Well, no. We're going back to the other light and we're just gonna make do with it. I just wanted to be able to show you that you can use different modifiers in that large softbox. It helps replicate that nice, large, soft light that's coming in, but we can get away with the umbrella. So, back to that. Where'd you put the umbrella? Hiding over here? (laughs) umbrella thief. All right, well this happens a lot in my studio, too. Hid it underneath the other green screen. Yeah, it was just right off to the side there. You can tilt it down. Oh, got it upside down. There! All right, other questions. Anyone got one more question? Yeah, can you tell us again, this is from Nidea, about using the color of green. You talked about why, but is there ever any reflection of the green onto the subject? Sure, there is going to be green on the reflection of the subject, occasionally, so the more light you have, like for example, if I have too much light hitting this background, it's going to bounce off and come there, so I'm, again, looking for a nice, even light, but not too powerful where I blow something out, and that green that's going to be too much highlighted, is going to come back and bounce onto her and give her some more green cast, however, with most good actions or presets or plugins or whatever you're using, it will help remove that, but if she turns completely green, then she's gonna be extracted, too, so you can't have too much. She does have some nice dark shoes on. That makes it a little bit simpler for me, too. With athletes with white shoes, you are gonna get white right on top of green. As it's touching green, it's going to get some spill. If you're doing a volume job, I just suggest cropping knee up or closeups. That makes it super easy. If you're doing some kind of fine art, it might take you 10 more seconds to go in and say, "Don't grab that shoe." It's pretty simple still. It doesn't make it impossible, but it's just a few more seconds you're gonna have to add, grabbing that white from that green and telling it, "Don't select this." We are shooting this scene with, I'll go back just to reiterate which scene we're showing. Oops, back this way. So we're, again, shooting this scene, so this light, I cannot have her being lit from this direction because there's no light in the scene coming from that direction, right? So, I'm gonna shut that off. This light is not affecting her really, or shouldn't be. It's pretty much past her. I can move her right up to the edge if I need to, and I'll probably scoot this out of there, just so I don't have any shadows coming from this one, here. It didn't happen before, but who knows. My hair light, I don't really have any light coming from above, either, so I'm gonna unplug my hair light and make that go away so I don't have to reach up there. So, no hair light. This is kind of the light that's supposed to replicate that window, and there's a little light sneaking behind, just to kind of give it that expanse of the window. Let's see if we can keep that nice and dark on her right side. Actually, we could try the tutu. We're gonna have her throw on a tutu, too. Tutu, also. Who said tutus too many times? She is a dancer. I just had her hold the basketball because that worked with a couple of those scenes, but she's going to throw this on and do something fun with that. (laughs) A little one! It's probably meant for a little child or something like that, but it still looks cute. So, dance moves. Let's just do something where you're just kind of faded off to the side, again, thinking about your dance moves and routine and all your past amazing dance performances that you've put on for Broadway. (Sophie laughs) Yep, so there you go. Just like that. And so, we're just gonna get a nice shot of her looking into that light, here, with most of the light coming from the side, here. This light, I'm not sure if it went off, so I'm just gonna trigger my main light one more time, test it out, here. I'm gonna blind you. It should be at 1/8 power. 1/16 Okay, let's see. We can test it. Okay, go to 1/8. Yeah. All right. No, it didn't go. Sorry, it's on channel B. Channel B, oh, that's why. We've got them switched. So, I had this one set to that, so I'm gonna go to, it should go to eight, there, and channel A back down. There we go. That one, previously, if I go back to it, if I can go back one step, here, the one I shot. I don't know. Do I have to hit arrow? I noticed that there was no light from my main light. It was all from this hot light from behind, my very strong back light, so I needed to turn that down maybe a little bit and get just a little bit more light coming across from this light here because there should have been some wrapping around her stomach and stuff like that, too. So, C is gonna go down a little bit, too. Let's try this. And, one, two, three. (click) That's a nice little softer light, there. Not quite as harsh of shadows. A little bit light in her face. That's fantastic! That'll work great. We're just gonna use those and put her in a background. We have about 15, 20 minutes left, I think, so we're gonna bring up Photoshop. Or actually we're going to bring up, tie a couple of these, highlight a couple of these, in Capture One, and then export 'em and put 'em in Photoshop and show you how easy it is to put them into scenes, since we thought about lighting and how fast extractions are in action with green screen. Do you want TIFFs or PSDs? Just JPEGs. JPEG? So, a lot of times, in my studio, I'm using Lightroom, but today, to tether, we're using Capture One. It's another great tool. Both of 'em work awesome. I'm just not quite as familiar with Capture One, so I'm getting a little bit of a hand, here, but we'll tag a couple of 'em and what I'd typically do for our clients is I'd have a couple hundred images. I just quickly go through and tag which my favorites are, export 'em, and my client would see these on green screen, and if you were listening to my sales presentation, earlier today, I would have already created the desire for specific products, talk to 'em about 'em, maybe show them different backgrounds, so my client visualized what they wanted already and so when they come in, they're like, "Oh, I really like that pose "and that background that you mentioned with the loft. "It sounds really cool," so they would know I wouldn't have to put in any extra work before I actually did the compositing. And, one the client orders it, we invest a bunch of time and make these great composites. And, other questions as he's setting this up? Yeah, so a question from Tahanya, who's saying, "What if you're photographing a sports team "who happens to have green uniforms, "or green in their uniforms, how would you go about that?" There are some, and it's getting more popular. That color is certainly getting to be a popular color, for, especially, little league teams. I have a blue screen, then, that I pull down and use the blue screen. A blue screen is a secondary option, and it's great to have, just in case your client has that. If they're just a fine art or a senior or something, maybe just you plan on using other outfits. Just give them some tips of, "Maybe green won't work the best for this outfit. "Bring in a different outfit or different outfit options." But, blue is definitely a viable one and you can always rely on white, if you have to. I've had a motocross guy that came in that had bright neon and bright blue in his whole uniform and on the pegs of his bike, and stuff like that, that's almost impossible. each one is alternating, so I couldn't really photograph him on both, so I photographed him on white and I still just had to spend a lot of time extracting him, but it wasn't impossible. It was just a lot of time.
Class Materials
Bonus Materials with Purchase
Ratings and Reviews
a Creativelive Student
In this class I teach the first and most important thing when it comes to making good composites - lighting (both subject and green screen). This is not a photoshop class although I do give a quick demo at the end to illustrate my purpose of using green screen and the ease of adding a subject to a scene if they are lit correctly. The main purpose of using a green screen is because there are actions and plug-ins that make extracting super fast and easy. If you enjoy spending time manually extracting your subject then you can ignore the green screen part and shoot on any background as long as you remember the tips I give you for lighting your subject properly. Hope you enjoy!
a Creativelive Student
Ben is an amazing photographer that is highly creative. Not sure this course fully reflects what his images convey to his clients. The course seemed rushed but did get to key basics for green screening. While typically I don't like when instructors promote their products, his extraction action is solid. Definitely worth the discount if you want to be able to systematically process volume. I think if you are beginning in composite photography that Joel Grimes and Ben Shirk can definitely give you the knowledge needed to be successful.
Luc Hourriez
Ben Shirk is for me the best in his field, a source of inspiration for years besides for 2 years I come to the WPPI to see it A mentor for me and these techniques are just magical and bluffing! Many thanks to him and creatrivelive for this course I had already buy his action PS for a few years :) and fully satisfied, this course is perfect to understand and master the technique
Student Work
Related Classes
Studio Lighting