Lessons
Lesson Info
Lighting The Subject
Now let's talk about lighting the subject. So, how to photograph and light your subject. A few things before the model actually comes out here. Sophie is our beautiful model and has agreed to do some awesome stuff for us today. You'll see her very soon. The average settings for my camera, and these are very average. It doesn't mean every time. This doesn't mean lock your camera in on this as soon as you think green screen. It means these are your average settings. My lens is gonna be a 24 to 70 averagely. A lot of my subjects are doing something dynamic and some kind of motion, so I shoot very wide to make sure I'll capture whatever they're gonna do, and then crop in later. I have used my 70 to 200. I've used an 85 1.2. I've used a 16mm wide angle. I've photographed every type of lens on a green screen. It can be done. It's just average you'll start off with 24 to 70. My aperture is around 6.3 to F/8, but it kind of depends on the image I'm creating. If I have a very sharp background, ...
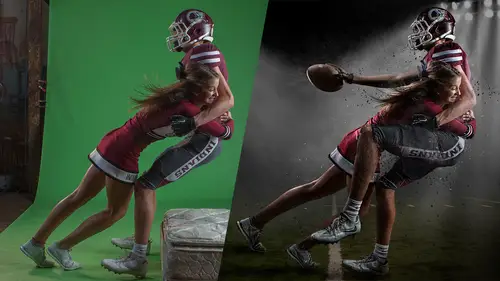
it's gonna be around F/8. If I have a very bokeh background, say some soft Christmas lights, out-of-focus Christmas lights, I'm gonna shoot my subject appropriately and go to a F/2.8 or a F/1.4 or whatever I can get out of my camera and lens. My shutter speed is typically around 1/200th of a second. Again, this is because a lot of times my athletes are moving, or my subjects are moving. To be able to freeze my subject appropriately, and most camera flashes, studio strobes, the sync speed is 1/200th of a second. After you go to 250 or 300, you're gonna start seeing a black bar in there, so typically 200th is the fastest most people can push it. These do have the high-speed sync, so I can go faster, but for the most part I'm at 200th. I'm shooting at a raw format with my camera. Why? Because unless you're the most perfect photographer ever and never make mistakes, raw is great. It's gonna allow you to adjust any mess-ups that you make. If you have too hot of highlights or too dark of shadows, you can bring that detail back without getting a lot of pixelation and losing a lot of data, so raw is amazing to be able to fluctuate and give you forgiveness on things. And I am also shooting at a kelvin for my white balance. I'm shooting 6500 kelvin. I like to see my images a little bit warmer especially on green screen. Otherwise, if you have an auto white balance, it's going to turn all your images a bluish, soft cool color and I want to see an actual green screen behind them. So, I'm locking in at a specific kelvin. Some tips, so I kinda mentioned as far as distance away from the background, a subject needs to be four foot or more away from the background for almost every circumstance. I won't say for every one, but for almost every circumstance move the subject away from that background. Two lights, evenly placed at an even distance apart will give the background nice even lighting and the subject, so if you're doing a volume job and you have a hundred little kids coming in and don't want to have to pose, turn each nose the perfect direction to get the perfect light in their eyes this is a great setup, because there's light coming from both sides and they can do whatever they want and you're gonna get them lit in their face and the parents are gonna happy. However, if you can add another light, if you happen to have a third light, adding a hair light will help with the separation from the background. By having a hair light in the scene it will help define the subject's hair and make any action or preset more easily and readily able to find the subject and extract them. If you notice on my hair light here, this one is not pointing straight down. If you have it pointing straight down, it's going to bounce right off the ground and all the light's gonna come back up underneath the subject's nose and the bottoms of their ears, or if their hand's out, this whole part's gonna be green. So, you can't direct light straight at the green screen but instead, point it past the subject. So, if I have the subject standing here and I had the edge of my green screen right in front of the subject, that light coming past is not going to be able to bounce and come back into the subject's face and turn them green, right? Cause there won't be any green, so if I pull this forward here or something like that, subject's standing right at the edge, that hair light is gonna go past the subject, hit the floor, and not catch any green to bounce back up in the subject's face. So, direct the hair light past the subject's head, but past the green screen also and not straight down. I can have you probably switch out to the vinyl green screen and so then we can photograph the subject on the vinyl green screen here real quick. Proper lighting is going to be the most important thing when it comes to creating a composite. A lot of people try different techniques of compositing and just say they're bad compositors. But the most part, they're not bad compositors, they're bad at lighting, so lighting is the most important thing. When you're photographing someone and creating a composite, the first thing is find a scene, the very, very first thing you wanna do is figure out what you're gonna put them in. And then, you photograph your subject to fit that scene. By first finding the background and then photographing your subject, you can more easily account for the different variables that are going to happen in that scene. For example, where is the main light coming from? Is it coming from the left or the right? Move your main light there. Is there a really bright source of light or are there multiple sources of light around the subject? Do you have car headlights coming from behind and a streetlight off to the side? So, then you can move your lights to those same locations. How strong is the light? Is the light very, very strong? Is it gonna highlight your subject all and rim your subject in a bunch of light? Or is it going to be a soft, fire-lit glow from behind? So, here's an example of a background. This is a template I have. But I see a lot of people, when they photograph the subject, not really pay attention, they're flat-lighting their subject and just lighting it however. A lot of people I feel are like, "Hey, I have my kid, "I want to photograph him "and then put him in something", and they just take and cut out their picture from anything and try to put him into a scene. If I try to put her into the scene, she does have some backlight on her hair, but she's flatly lit, she does not have any dynamics, it doesn't look like she should be in a night scene. Instead, I would photograph a subject more like this and take into account the lights that were going on or what's happening in the background. So, with this setup, I have two striplights from behind to help replicate those stadium lights that are going on in that scene. My main light is off to the side but almost parallel with the subject so as the subject turns into it her cheekbones have some nice dark shadows that kinda give it that depth and that drama that's going on in her face. It also happens to light the things that I want the viewer to look at. It lights her face and her team name or jersey number or whatever it would be. So here, putting her into that scene, it's almost easy, all I did was extract her, set her in the scene and she fits because the lighting, I took into account what was happening in the scene. Here's another example, this is a team. There was a little kid that the parents wanted their son in a locker room. And so, if I go back here a step, on this locker room, I had lit it specifically so I could set a subject in that exact spot and still have some highlights coming around that edges the subject. So, when I lit him, again I had those highlights in his hair and around the sides just like would be happening if there was a bright light from behind him. Put a little light in his face so the parents could see his face, but he still has those nice darker shadows and put him in a scene, and there's not a whole lot of difference between what I photographed and what I did besides scaling him, maybe. To set him in there. So again, it's just thinking about where that light is coming from and what you need to do to replicate that. It's the most important thing when you're creating a composite. And, as you photograph on green screen if you get that lighting right, it's gonna be super easy for you. Here's another example. So, this is a team, kid came in and I had made this background up for him. Again, my lighting is replicating what's happening in the scene, so I have these streetlights going on in the background and I have my striplights replicating that exact light that would be hitting them if the team was standing in there. And then, that light from the left there, is just lighting mostly the green screen but does have a little bit of fill light hitting them just so they don't go completely dark with a bunch of athletes, I didn't want parents complaining about too many shadows or anything like that. And then I have my main light just off to the right there to kinda create a little bit of shadows in their cheekbones. As I was setting up, this is my fantastic stick drawing to figure out where everybody goes. So, I drew up a stick figure so I could just kinda easily run through where people are gonna go. And then I photographed them for that. So, I photographed her for that specific spot. I said, "You're gonna be in the middle, "holding your arms out," put my lights around her, she works out perfectly. I had this girl, was supposed to be on a trash can. I didn't have a trash can sitting there in my fantastic stick figure of a trash can. So, I photographed her on a box and then I put a trash can in later. Then I had another one kneeling over here. But, as soon as I extracted them, the fit into the scene because they were lit for it. It's easy, there's not a whole lot of extra work I have to do when I do that. I see a lot of people where they again, if they take a picture of their kid, and try to put him in the scene, they're like, "Ta-da, lookit! "He's in a cool, rugged scene." Well, he doesn't look like he belongs there. So, instead, move that lighting around, give him some nice dramatic shadows. So, a lot of times in these again, I'm looking for those nice, dramatic shadows and a cheekbone or two. Have those lights coming from behind to give him some drama there and he fits. So next, we are actually gonna photograph our model Sophie for I have this background I call my loft template. It has a bunch of different options with it but I'm going to put her in this. So, as we photograph her, what do I have to think about? Where's that lighting coming from? What side is the main light coming from? The left side, right? It's a big, soft light so I'm gonna probably use a big soft box for that to get a big, soft light on the subject that way. If I have her more towards the camera or more towards the edge of the scene, I can add some dark shadows in her, as I move her that way, I would have a little bit softer lighting. But there's no light coming from behind her, either. There's no light coming from that far right side of the scene because it gets darker. So, I'm just gonna have one main light off to the side, maybe a little bit of backlight cause this light could be kinda hitting her from that way far back corner. But that's it. So, two lights hitting the subject there. We're also gonna try for this locker room background. So, this locker room background, my main light it's a little bit tricky here, but my main light you can kinda see the shadows on the lockers here so the main light is coming this way again, from the left. And then, I do have some kind of light flare coming down here and highlighting here on the bench, so I'm gonna have a hair light coming in from above on the subject there. And then, if we have time, we are also gonna put her in the scoreboard template. I'd have a whole lot of light coming from behind her. So, lots of light, bright light coming from behind. And then the scoreboards are kinda blocking off a little bit of light, so my main light is probably that light that would light her eyes if there's any. I don't have to have her staring back at the camera either that's not a requirement when taking pictures. I could have her looking at the ball or thinking about her game or something like that. But I can sneak a light from above, technically, there could be a light coming from above and giving a little light in her face there. So, most of the light coming from behind, a little light coming from a top side one of the sides.
Class Materials
Bonus Materials with Purchase
Ratings and Reviews
a Creativelive Student
In this class I teach the first and most important thing when it comes to making good composites - lighting (both subject and green screen). This is not a photoshop class although I do give a quick demo at the end to illustrate my purpose of using green screen and the ease of adding a subject to a scene if they are lit correctly. The main purpose of using a green screen is because there are actions and plug-ins that make extracting super fast and easy. If you enjoy spending time manually extracting your subject then you can ignore the green screen part and shoot on any background as long as you remember the tips I give you for lighting your subject properly. Hope you enjoy!
a Creativelive Student
Ben is an amazing photographer that is highly creative. Not sure this course fully reflects what his images convey to his clients. The course seemed rushed but did get to key basics for green screening. While typically I don't like when instructors promote their products, his extraction action is solid. Definitely worth the discount if you want to be able to systematically process volume. I think if you are beginning in composite photography that Joel Grimes and Ben Shirk can definitely give you the knowledge needed to be successful.
Luc Hourriez
Ben Shirk is for me the best in his field, a source of inspiration for years besides for 2 years I come to the WPPI to see it A mentor for me and these techniques are just magical and bluffing! Many thanks to him and creatrivelive for this course I had already buy his action PS for a few years :) and fully satisfied, this course is perfect to understand and master the technique
Student Work
Related Classes
Studio Lighting