Lesson Info
13. Simply Stunning Beauty
Lessons
Course Introduction
03:20 2Understanding Lighting Diagrams
12:11 3High Contrast Portrait
12:43 4Finding The Light
12:02 5Subtle Beauty
06:10 6Soft Fine Art
10:46 7Color on White
08:33 8Catalog Shots
06:00Light From Below
07:38 10Fresnel Beauty
05:58 11Old-Time Fashion
11:31 12Superhero Light
09:11 13Simply Stunning Beauty
11:10 14Controlling Shadows
13:20 15Soft Fine Art
04:51 16Front Bokeh
08:28 17Large Soft Light, the Easy Way
06:51 18Creating Motion
07:28 19Dramatic Light Using White Balance Shifts
05:47 20Simple Soft Light
05:50 21Grinder Girl
10:28 22Large Soft Light
07:30 23Vertical Contrast
07:17 24Light Rays
10:57 25Wide Angle Texture
05:08 26Closing
06:08Lesson Info
Simply Stunning Beauty
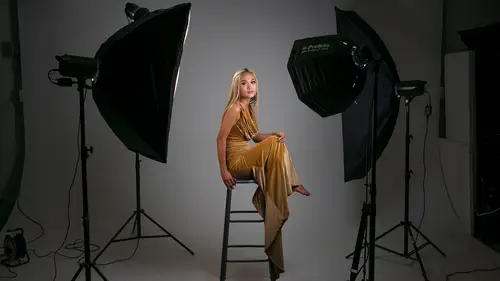
This is my go-to lighting setup for simply stunning beauty shots, it's a very simple clamshell light with some kickers, but it works every single time, so let me show you how all of these lights are setup, we're gonna take our studio lights down because you can really clearly see this with just our modeling lights on. So, one of the things that's really important is these two strip lights here, these are kickers, what we need those to do is they need to come in equal distance and give a highlight to the outside of our model, and so these guys, because they're coming straight at my camera, I've added a grid to both of these, so those grids will keep light from spilling into my lens and it'll make sure that I don't have lens flare from these, so those guys, we'll meter them in a second, but they should be exactly the same distance from either side of our model and then they come in at a pretty wide angle to highlight the outside shape, cheeks, all that kind of stuff. The other thing we h...
ave is we have traditional clamshell lighting on the front, so I have a beauty dish at the top and this is illuminating Theresa, and it's gonna be causing some shadows, and stuff here, and so we're going to fill in those shadows with this small octabox here and then that is just gonna fill in all the shadows underneath her chin, so we are just wrapping light around our model and we're doing that in a way that the light is shaping her face, it's really sort of an amazing shot, you'll see when we start shooting. So, let me meter each one of these and show you sort of how we do this. So, the first thing we need to do is meter just the key light, so what I'm gonna do here is I'm gonna go in, I've turned my light meter, so it's only gonna trigger my key light, when I meter that, that is metering at F and so what I'm also going to do is make sure I don't have anything in memory, so make sure I clear out my memory and it is clear. Okay, so I'm gonna meter that again, it is at F9 is what we were just at and I meter that a couple of times outside of her chin, underneath her chin, so it's metering about F10 right on her face there, even F11 at her forehead, so yeah about F11 at her nose and so let me just show you this on my meter cam here, exactly what I'm doing to trigger these different things, you can see that this has, I'll turn that back on, you can see that this has functionality for the different groups, one, two, three and four or all and so I can turn these lights on, and off individually, so that's what I'm doing to make just one light fire and the other one not fire, so we're at about F11 here for this guy, let me meter the second, this guy right here, this is the lower little octabox, that is metering right at F and F8, yeah, so it's F and so if we do our Delta EV metering, first I'll meter up here and so we'll have to turn on the first group, that's metering F11, I'll put that in memory and then what I'll do is I'm gonna go down to the second light, I'll do my Delta EV, meter that and it's metering at -1.2, so it's about one stop difference, that's about where you wanna be, one stop difference between the key light, which is the beauty dish and the fill light, which is the octabox, so about one stop difference is where you want to be. Now, what we wanna do is we wanna meter these guys back here, now these have grids and so they're gonna be tricky when we meter them, so I'm gonna clear out my memory, just really quickly and so, what we're gonna do is, I'm gonna meter those and if we look top down, you can see that I am pointing my meter, ah, we can't see it from there, so I'm pointing, I'll do it in this side, I'm pointing my meter right at this softbox here and I also have to make sure I've turned on everything, there we go, I turned on group three, so when I meter that, it's metering right about 5.6, I'll meter the other side 5. and so you can tell, one of the things you can do is you can tell if the lights are at the same position if they're both at the same power, so these are both ELC500's, if I both have them on a power setting of like let's say four and I meter one side and the other, and one of them is brighter than the others, that means they're not the same distance, so you wanna make sure that those meter at the exact same rate, which they do and so now what I can do is I can go in, I can put the stuff in memory, so what I'll do is, I'm gonna go in and make sure my memory is as set, so I'm gonna meter just this light, that meters at F11, I put that in memory, then what I'm going to do is I'm going to meter these back lights with my Delta EV, just to see what that is and it's -1.9, so a -2 is about where you want that, -2. So, we had our key light was at zero nominal, this one was -1EV value and then our kicker lights -2, so if you're using the Delta EV metering, it makes it super, super, super simple to make sure that you have everything set. So, the last thing I'm gonna do is I'm gonna get an overall meter reading and then once I have that, I can set my camera and we can take a couple of shots, so that overall meter reading was F and so what I'm going to do here is I'm going to make sure that my Lightroom is all ready to go, there we go and then we'll take a shot here. Do-do, do-do, do. Let me take a quick shot here and we'll show you what everything looks like. (camera beeping) Beautiful, so when that comes up here, this is the shot with everything turned on, you can see it gives Theresa this warm glowing look, it's almost like she has, she's applied some kind of lotion or something to her skin to make her skin glow, but she hasn't, this is all the lighting, it's the position of our lighting. So, let me show you these one zone at a time, So Theresa, I'm going to take a shot, a series of shots, so I want you to look straight ahead, so here is the first shot, the second shot, the third shot and then the overall photo, and then what I'm gonna do is I'm going to take these four photos that we just shot and I'll show them to you side-by-side, so the first shot on the upper left, that's just the beauty dish, you can see there's lots of shadows under her chin, the second shot, that's just the fill light, that octabox below, the third shot, here are our highlights on the side and then the fourth shot, that is everything altogether, so once again, this is just the key light, this is just the fill light, this is just the kicker lights and then that's everything altogether, which is really, really wonderful, it's a very, very simple lighting setup and you get just dramatic results, so what I wanna do is now that we have everything setup, we have all of our ratios set, so again it was zero nominal and then -1, and then -2 for the kicker lights, and we have all those setup, what we can do now is we can take a few photos and see what is great, and so Theresa, we're gonna do a mini photo shoot here, so look straight at me just like that, now I want you to turn your head just a little bit this way and yes, keep looking at me, excellent and look down toward this, and then straighten your head, and look down, so like go ahead and put your there, look straight into that, perfect, hold that right there, excellent. And then I want you to look up to the beauty dish, yeah, perfect, just like that and then just lower your eyes, not your head, lower your eyes toward me, there you go and then split the difference, look maybe up, come down with your eyes, just come down, come down, there you go, that's it. Okay and then I want you to turn, so we have sort of a profile shot, so turn about, there you go, there you go and then turn your shoulders, just your shoulders back toward me just a little bit, a little bit more, stop right there, stop right there. And then once again full, just straight at me, just like we started with, just like that, excellent. Okay, let's see how this light works with these different poses, because what you'll see is that not everything works, that works pretty good, it works pretty good, so we're seeing how those two kicker lights, they just accentuate, see how this really soft light here just comes across and just grazes across her cheek? That is just wonderful, when she's looking down, we're getting a different catch light in her eye, that is wonderful, when she's looking straight down, that low-light is giving us some highlights on her cheeks, above we're getting some shadows on top of her collarbone right here, just slight shadows, that's from the light coming from below. We have, oh look at this on her neck, how we have this sort of sculpted look, it's so cool and then we've got these great catch lights in her eyes coming from the beauty dish and then we've got two catch lights when she's doing this, so if you get her eye sort of in the middle, we're seeing these two lights, which I don't really like, this looks like an anime kind of a shot because we have these two different lights here, so it looks like a cartoonish kind of thing and then we have our last look, which I think is really, really beautiful. So, for you to see exactly what's going on, what we're going to do, is we're gonna lower the video lights, so you can clearly see everything, we're gonna widen out the main camera, so you can see the entire lighting setup and then, we are going to go to our last looks. (calm music)
Class Materials
Bonus Materials with Purchase
Ratings and Reviews
LeCompte
The class is comprehensive without being too complex! An all around 'how-to' guide with examples in real time with real people doing it for real. Showing 'What If' structured classes and showing 'Here is Why' Does not drag along but quick and concise. AND brought the support staff for deserved bow at the end. Nice Guy & Nice class 4 Stars at least!
Student Work
Related Classes
Lighting