Lessons
Class Introduction
06:06 2Colors of Oil Paints
15:16 3Solvents and Varnishes For Oil Paints
06:19 4Demo: Oil Paint Glazing Techniques
16:05 5Oil Painting Brushes & Palette Knives
08:01 6Demo: Oil Painting Brushes
14:34 7Demo: Oil Painting Palette Knives
08:15 8Oil Paints Tools and Supplies Q&A
04:22Lesson Info
Demo: Oil Painting Brushes
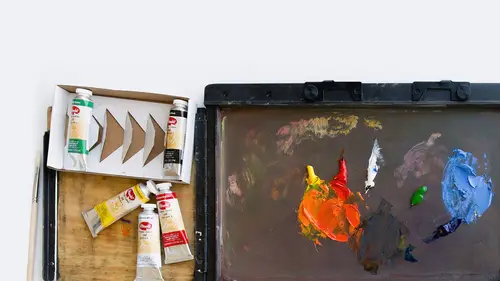
What I did do with the testing here is I used an orange with a number 10 round. And I just want to show you this before we test it, the size of the mark changes depending on the size of the brush, obviously. The flat makes a really different kind of shape than your round tip brush. And you can get tiny marks with your oils. This is a number four sable brush, so it's actually, this is a number two, but it's a tiny brush like this. So we're gonna test a variety of marks on the canvas and what I want you to also note, is the surface is going to react differently than the surface we worked on before. And that's because it's gessoed and it has what's called a tooth. We'll talk more about the surfaces later, but, I just want you to see that, as you're looking at this color. It's gonna react differently. It's gonna grab that color more distinctly. It's gonna hold on to it like fingers because there's that tooth or texture. You can hear it (scratching) if I do this. You can hear the sound of t...
hat texture. So there's something I think really nice about the canvas that's covered in gesso for oil painting and it's why it's been, you know, used, I think toward the greatest degree, people work on canvases. It also has a little push back, which is nice. Okay, so I'm gonna test with a square tip, and I'm gonna use my sort of in between, and what did you say, kind of orange? Orange. All right. So we'll do orange. Oh, that's white. Here's my orange. I'm not gonna put too much linseed oil on this 'cause I want you to see the thickness of the paint now. And what oils can do in terms of very, what's called impasto or thick painting. So this is a square tip, and basically, you know, your square tip is meant to create edge marks and square-like shapes. You're utilizing this to make something that has a clean edge. Think architecture, think boxes. That's really its purpose, so the square tip is a beautiful brush for that. You're not gonna try to make a circular mark with a square-tip brush. It's not what it's meant to do. You can try to, but it's gonna be tricky. So what you can do, let me just grab one of the round tips, this is the brush. This round is what you're using to make a round shape. Let me just show you. And again, I'm not adding linseed oil. I'm not thinning this color out. I'm just using it straight out of the tube. So you lay the color down, and think about it. You can just spin that shape around and you've got a circular mark. And that's because the brush itself, you know, is a round tip. So what you're trying to figure out and what I'm trying to demonstrate here for you is why you would want to have a different type of brush. Why would you want both a square tip and a round tip? And why would you want different sizes? Well, the shape is part of it. You're able to move that color along. Let's combine a little bit of these two colors. Let's see what happens when we put a little orange and a little bit of this cobalt blue. You know, you're able to move that paint. It's undulating because this is a round shape brush. It's gonna make a really different mark. If I thin it out now with a little bit of linseed oil, you can see you can make more of a line. It can get fairly thin. You can probably also see that there's a texture if I do this, let the brush kind of dry out a little bit. Do a little dry brush here. Look at that texture that's coming from the gesso surface, the gessoed canvas. It's really kind of beautiful. And you can feel a resist that I could not, you know, I can't show this through the camera, but literally this feels like it's holding onto the color. It's pulling back the color, whereas that other surface, it like (imitates whoosh) slid right across. I actually, you know, I see why painters prefer people who do a lot of oil painting, why they prefer canvas. It's holding onto the surface in a beautiful way. But it doesn't, it's just preference. That's really all it is. So there's my sort of dry brush with my round, but let's go back to the square tip. Let's just see what that square tip can do in terms of making a mark. Now, just think about this. Make sure there's no big, thick wad of paint. I can create a really nice, clean line because I'm utilizing the edge of this brush. I could even use the point, if I choose. But notice how I'm holding it, too. You sort of whole brushes like a pencil, and you know, some people hold pencils in different ways. Generally speaking, you're not gonna hold your brush down here in this metal part, and you wouldn't typically hold it up here. You could, but you have a little less control, so I feel like the sweet spot's right around here, and they actually fatten up that part of the brush so that it's a little easier to grip. So that's, as you can see, that's where I'm trying to hold this brush. I can put it on an angle, and I can make a fairly thin mark. I can also feather color. Like, make it softer, softer, softer. So this is the joy of oils. I can move this color around for the next probably couple of days. Like if I want to make changes, so that's a really delightful and lovely thing. And look at how thin I can make a stroke with this. This is a pretty good size brush, but I'm utilizing the edge of that square tip. I cannot do that with this. I don't have that control. It just makes a much fatter mark, which is fine, but this is a brush that I can use to create an edge. The other brush, and I'll wash these after, I know I'm just putting them here with color on them, but I'll wash them after. If I use a round tip that's much smaller, I'll put a little linseed oil on the tip, and I'll grab, we need a new color. What do you think, Kenna? Let's see. Can we do some kind of violet? We can, and we'd like that color. So you see my water's kind of getting blue, and it's still okay. There's still enough water in there for the color, and I'm just making sure the brush has no pigment in it, but before long, that's gonna have to be, that'll have to be changed, but not just yet. So I'm gonna use a little bit of linseed oil. I'm thinning out the color just a little bit so that you can see the fluidity and the mark that I can make with this type of brush, which is called a round, and it's a smaller tip. I have a certain amount of control. I can turn it to its edge. I can make a thick mark, I can move it thin, and it almost feels like and looks like watercolor because of that transparency of color. Thick here, very densely colored. This is really thin. And this brush has a fair amount of control. The square tips tend to have a cleaner edge with oils just because of the thickness of the paint, but I'm able to get a pretty small mark with this number two round tip brush. Now the filbert, which is a really interesting brush, I think, of all the colors that you can use. With oil painting, the filbert is utilized in a way, much like acrylics, to create this kind of swirl and mush. Now we're gonna do this with the violet. I might even add a little white. So the filbert, it's all, so if you see the shape of the brush, it's meant to go around a curve. I mean, it's just designed for that. Unlike the square tip brush, you're not trying to make a little fine, you can make some fine marks with this, but what you're really trying to do is utilize that beautiful, round tip. And it's not called a round, it's called a filbert, but that round tip lets you turn and move around a curve, a curved shape. It could be a face, it could be any kind of form that's organic, but that's really what the filbert is for. And again, it comes in different sizes because it depends on the size of the shape in your painting that you want to make. I think the biggest mistake that people make is that they grab a brush, just any old brush, and start painting. And then they're not thinking about what that brush is really intended to do. So I just wanna make you mindful of what the brushes can do, what they're best used for, so that you work smart instead of hard. If you're fighting against the shape of the brush to make the mark on the surface, it's not gonna make it enjoyable to paint, so I just think, you know, knowing what each of these brushes do is important and knowing that you have a couple different sizes to work with is also a really great thing. So I wanna show you some of the softer tip brushes and show the difference in how the color functions. So I won't use the water. I'm gonna try to use just solvent instead of the water to see what happens there. A little bit of linseed oil. Again, this solvent is not necessarily used to clean the brush. It's just used to thin the color like water would, but without breaking the pigment down quite as much. Okay, we need a new color. All right, how about a green? Maybe a blue green? We could do, we have here a premixed green, and this is permanent green light. And again, you can't go wrong. If you have a palette that has at least, you know, a yellow, red, a blue, a couple secondaries and some tertiary brown colors, just get started with that because you know, I think sometimes even feeling like, oh, I have to have a couple of, you know, yellows, couple of reds, couple of blues. That's ideal for a nice, big color chart, but if that intimidates you, don't let it. Get a kit, make it simple, and just, you put your toe in, and I don't mean literally put your toe in. Use a brush, but get yourself familiar with it and then expand, expand, expand on your palette. Because I think sometimes, people are afraid to jump in because they're like (gasps) there's so many colors I have to have, and all those brushes. Start simple, get one of each brush. Test them if you're nervous about it. I want people to test this stuff, and I have to say I don't typically use oils. I use acrylics and watercolor more standardly because of the solvent factor. My studio's not that big, and the factor of the ventilation's an issue. So I don't usually use oils, but when I tested these water soluble oils, they are delicious. They're so rich and vibrant, and I can clean them with water. So water and soap, you're good to go. All right, so here is a soft tip. This is actually a red sable filbert brush, so this is a little more expensive, but it has a kind of pressure sensitive, like it's, as I push down, it's not resisting the surface. Like, the stiff bristle, where's that? This filbert reacts differently. It creates a thicker batch of color. The filbert that's made of sable, it's almost like, it's the pressure. A gentle, soft touch versus a pushback, and it just literally feels different. It also lets you mush that color around in a slightly more actually easy way. I'm able to move this around with a sort of gentleness. The mark-making is also just a little more delicate as I move that color around. So I kind of feel like these soft bristle brushes, even though you might have more of the stiff bristle brushes, these are just a nice addition to have in your palette. And I can get a pretty fine mark with that, but I can't go super thin. And you can see that. That's about as thin as I can go with this filbert, and this is a soft bristle brush. Okay. Let me show you. This is actually a synthetic. It's a soft bristle, but it's a synthetic, and it's an angular brush. So this is a great brush, like the square tips, to get a clean, beautiful edge. Let's try it with the green. And here I'm not using linseed oil. I'm just using pigment on the end of this brush. And you can see, you can make a really clean, beautiful shape. I use this brush to make my actually, to make the oil chart, I used a combination of a square tip and this angular brush because look, you can make a square easily. Try doing that with a round or a filbert. Not gonna be so easy. So again, I'm trying to get you to know how to use this stuff in the simplest fashion without fighting the materials. Now this is a really thin application. Even though I've got no linseed oil to thin it out, this is just not a lot of pigment on the end of this brush. Now I'm gonna use it more thickly. I'm literally going to pile this on and show you a more impasto kind of shape of color. And that's just to show the variation with oils. Now like I said before, this patch of color right here is gonna take a fair amount of time to dry. Even water soluble oils, they don't dry any faster than traditional oils. There is a kind of oil that dries within a day. It's called an alkyd, A-L-K-Y-D. An alkyd color, it's oil, so it blends with any of these other things, and even the traditional blends with the water soluble. They're all oil-based, but the alkyds are chemically made to dry faster. So that might be a solution for people who are impatient, who don't want to wait for the dry time. And the color is also equally lovely. But you can see, and if I add a little of the red to that, you know, just like with acrylics, you can make really impasto color, and it's quite delightful because there's a physical mass to this color. Here, let me add a little of this, yeah. So I mean, look at how that blends, and you might say to yourself, okay. What if I don't like the color that I made? And I'm also doing just a little, you know, tap, tap, tap with this. But if I don't like it, I can move it around. This stuff's gonna move for hours and hours and potentially days, so this is really what oils loves to do, and this is a nice brush because it has a clean edge. I can also create with that beautiful, thin line. So great brush to have, square tip. I generally have like, one angular brush, but you could have multiple sizes.
Class Materials
Bonus Materials with Purchase
Ratings and Reviews
CG
I've been a silk painter for decades and am just starting out with oils. This course was extremely helpful, especially the demos. One thing--at the very end she says that with traditional oils you'll need to clean your hands with a solvent before washing with soap. Not a great idea if you want to be healthy. I remove pigment on my hands by rubbing a clean oil on them, then washing it all away with soap.