Demo: Explore With Oil Paints and Solvents on Canvas
Lesson 11 from: Getting Started with Oil PaintsMary Jane Begin
Demo: Explore With Oil Paints and Solvents on Canvas
Lesson 11 from: Getting Started with Oil PaintsMary Jane Begin
Lesson Info
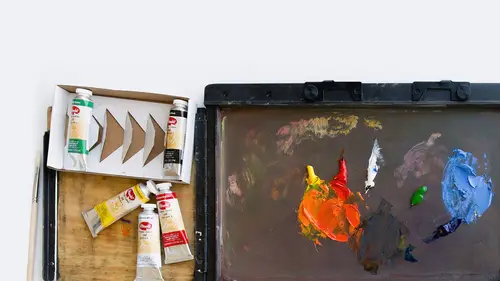
11. Demo: Explore With Oil Paints and Solvents on Canvas
Lessons
Class Introduction
06:06 2Colors of Oil Paints
15:16 3Solvents and Varnishes For Oil Paints
06:19 4Demo: Oil Paint Glazing Techniques
16:05 5Oil Painting Brushes & Palette Knives
08:01 6Demo: Oil Painting Brushes
14:34 7Demo: Oil Painting Palette Knives
08:15 8Oil Paints Tools and Supplies Q&A
04:22Lesson Info
Demo: Explore With Oil Paints and Solvents on Canvas
We'll go back to the cube, and we will decide what color it's gonna be. What if we do, some kind of purpley color? You've read my mind! All right! You're getting this thing. (laughs) You're my best student. So, yeah, that's exactly the right twist, because it's a color opposite. Now what I'm gonna do is I'm gonna flip this, this way, again, I'm left handed, if I try to work across this ball, it's gonna be a smear, and it's gonna be all over my shirt, so I'm gonna work on this side to make this cube. Now, if we're gonna make a purple, Kenna, what colors would be used to make a purple? That would be the blues and the reds. Yeah, and I'm gonna make this, not the blue I used before, which is very light, and which is there already, I'ma use a different blue so it reacts to the green-blue that I have there. This is, I believe this is, ultra marine, cobalt and ultra marine are your purpley blues, and they make beautiful purples when used with any kind of rose color. This is, it's ...
called pyrrole red, this batch of paints are slightly different names than we typically have, but basically it's a pretty warm red, but has enough rose tone in it, to make a beautiful purple. We can also move to, here's permanent red-violet, which is really more of a purple, but we can use it as a substitute for what would be a more rosy tone of red. There, so I'm gonna mix that and that, and we'll get a little more white onto the surface when we need it. And I'm gonna mix that color with a brush I'm not really using, which in this case I'm just gonna use a filbert to mix it. I know I'm not gonna use a filbert to make this cube. So let's get a purple going. Let's see if we can come up with a purple that we like. And again, you know, you're mixing this color ahead of time on the palette, I'm mixing it really thickly because I'm painting this in a more impasto fashion, I'm not gonna paint it thinly, like the application over here. And you can see initially, when you start to mix the color, it streaks of blue, streaks of red, but as I keep blending, it's almost like you know, if you had an eggbeater. You're blending it, you're making it a more homogenous tone of color. Oh, that's a yummy color. I can make it a little more purple. It's making it a little bit deeper. OK. So here's our purple, and what you can do, too, if you're not sure if you've made a color that you really like, you can just have, what I call, like a spare surface, and test, to be like, is that the color I want. Maybe it's a little too neutral, I think I want it to be more purple, and I know that now, because I've just looked at it, so I am going to grab the actual purple, and make it slightly more of a pink-purple, as opposed to that plummy tone that I just made. Here, I'll pull it back so you can see it. There's the plum tone that I made, but I think I want it to be, I don't wanna use water, my natural inclination is to go to the water, to thin it out, but with oils, not a great idea. It just, as you saw, it really disintegrates the color. OK, this is a nice purple. Let's take a look. Thin it out a little. Yeah, that's yummy. It's kinda like what you were wearing yesterday. So that's a nice purple, it's almost like a rose purple. OK, so I'm not gonna use this brush to apply the paint, I'm gonna try to release some of this color by pressing on it, to get rid of the paint that's on there, so I can use it. And I think I've mentioned this, but I'll mention it again, we have glass palette, and we have this metal palette, having more than one palette at your disposal is ideal, because once you start painting, you wanna have surfaces to make new fresh colors on, you don't wanna have to get up and wash the color you have there, because you might need it again. So, I like to have as many palettes as I can fit on my desk. So let's just play with, I think I want a smaller square tip brush, I had the soft bristle brush, maybe I'll try, 'cause I'm doing impasto, when you're doing impasto painting, you want a stiffer bristle brush, because you're trying, like with a palette knife, we'll use that as well, this is gonna push the color around, rather than glazing it with a soft bristle brush. So, I'm just gonna take a thick quantity of color, and I'm gonna apply it right to this surface here. But I'm gonna add some white to it. Instead of using, what I used here on the other side, initially which was sort of a transparent color, I'm gonna make some really thick application to create that sense of light. And just like with the palette knife, I mean, it's like this square tip brush is leaving these square little marks, it's creating a very distinct texture, so if you want to remove the texture, you use the softer bristle brushes, and you glaze thinly. Thin, over thin, over thin layers of color. If you want texture of brush, you work in a more impasto fashion, you use stiff bristle brushes, you really, it's like decorating a cake, you're letting that color sit on the surface, and in some cases that call it peaking, or pulling, like it's pulling together into a firm chunk of color. And it's undeniably really fun to do. This is traditionally the way I work, I don't traditionally use thick quantities of color like I'm doing on this side, but it's so much fun, that I think I'm gonna try this now, and do some more paintings with thick impasto oil paint. So this is the thing I do wanna mention, you know, you may say to yourself, and a lot of people are intimidated of all the media, oils is the one, and I don't know if the audience feels this way, you know, but I feel like it's commonly something that people are like, I avoid it, because they're afraid of the cleanup or they're afraid of the complexity of oils. As you can see, just like with watercolor and acrylics, there's all these basic things about the brushes, the paints, that you need to know, and the properties of the paint, but essentially, you know, it's just as easy to play with oil paints as it is with any other media, and there is a visceral feeling when you're moving color across a surface, and it has oils in it, that is just so delightful, it almost feels decadent. That's the truth. It's like the tiramisu that's sitting in the other room that I just had a little bit of, that was so yummy, it's decadent and delightful. This feels that way. So, I would really encourage you, if you have interest, start simple, you know, try playing with the stuff, and try it both in this impasto fashion I'm using here, and thinly with glazed layers. OK, so that's one side of the cube. Now maybe we wanna make a cube that actually has dimensionality. I'm gonna rinse my brush. The water's starting to get a little cloudy, so if you can, clean that water, that would be awesome. Because it's getting full of pigment. And, I know that I say this, every time I say, make sure your water's clean. The reason why is that water's getting pretty purple, as soon as I shift to another color, that purple's gonna mix in with a color I'm using, and it's gonna create neutrality. And that's what people refer to as mud, and we don't want to create, I'm not gonna call it mud, because there's nothing wrong with neutral colors, browns and grays are important, but you don't necessarily wanna make all your colors brown and gray. So, keep cleaning that water, keep emptying it out, and refreshing it. So what I'm gonna do here is a nice, thick impasto, I'm going to make a thick impasto color on this side, but it's gonna be a more neutralized version of the color, simply because I want it to feel more like a shadow. Now this color is actually blending with the green that's underneath, because it's wet. It did not blend here. That green is on top of that, burnt sienna, here they are mixing on the surface because both are very, very wet. So it's two different ways of working, they're both equally good, but they do create a different kind of feel, mixed versus layered. I also have to be careful, if I push too hard with this stiff bristle brush, I am lifting the color off the surface, and I don't wanna do that. I kinda wanna graze, just like before, graze pretty gently. I do wanna show you the palette knife, too. So let me just get to that in a minute. Again, this is a beautiful combination of colors. If I put a green paint on top of this green ground, you wouldn't see too much, and it wouldn't be very interesting. So try to create contrast, when you are creating your, if you do this, if you create a cube or a ball, and it's the simplest shape to make, you do want to use a color cube that's the opposite, thank you, of what's on the ground color. You also will notice that I love a ground. I don't wanna work against the white of the page. And that's because I'm trying to create a, what I call, family blood. I'm trying to create something that will connect everything you put on top of it, and white is neutral, it doesn't do that. But if you put a color or tonality, even a neutral brown, it will help connect everything, all the colors that sit on top, and that's just a wonderful thing. Of course, here I am talking about color and color theory, but that's if you wonder, why isn't she working against the white of the canvas. That's why. It's instantly connecting whatever's put on top of it. OK, so this top one, I think I wanna do, maybe make it the lightest thing, and I'm gonna try using, these tools are a little big for this area, I'm gonna use this one because it's got an edge, I'm gonna flip it upside down so I don't smear 'em with a ball, but I'm gonna use this very carefully, there's not a lot of room to make that cube, but it's the clearest, shortest edge that I have up there. I'm gonna make this the whitest part of this cube. I'm gonna mix some of this color into it, I'm gonna just kinda blend it on the surface of the palette, make sure that it's pretty homogenous as a color. It almost looks like bubblegum. Not that that has any meaning, but it just does. OK, lift some of that color off the surface, like you're picking it up on your utensil. I'm gonna turn this, this way, so it's easier, again I'm trying to go in the direction, that, being a lefty makes more sense to me. I'm gonna use that edge, kind of apply, and I'm not pressing too hard, because if I press too hard, I'm just gonna mush that color right off the surface. I need a little more, I need to mix more of the color. Where's my white? 'Cause if you're doing impasto, you cannot be, how I should I say, stingy about the color, you have to be perfectly comfortable using a lot of pigment. Because if I don't, it won't look like much, and I won't have enough to pick up, which is what I'm doing right here. Look at how much pigment I have right there. I'm trying to show you, like really impasto style painting. Look at the thickness of this. Oh my God. It literally is creating a physical surface to this paint. And I might say, well maybe that's too much. Well, lift it off, put it over to the side, and remove it. So, part of this is about the control of the tool. And again, this is a big tool for the size of my little cube here, but that's OK. That'll make me work harder, to create a certain amount of control. Now, if I want texture, you know, I can do this, but if I want it to be smooth, I'm just gonna drag it right across the top of this cube, and I'm spinning the cube so that I can get to the edges without much trouble. I'm taking a little more of this paint off. Because I want this thick impasto top surface that's lit, to still make sense with what's around it, which is a little, this is thin, and this is semi-impasto, it's created with a brush stroke. So, you can see, I'm trying to remove some of the paint, keep it moving across the surface, drag it around, also kind of peak the color, those little peaks of color, I can use the front of this tool, or I can use the back of the tool. I can drag it, I'm trying to get right to the edge of this cube. I can drag it straight across, if I want to utilize the flat of the shape of this palette knife. Again, I can pull off a little more color. I started with a really thick patch of color, so now I'm just kinda reducing that amount of color. And it's pretty easy to do. This is not complex, it's just, you do have to be careful, and I think it's one of the reasons why when you're using the palette knife, having doing it on a easel than a flat surface, because you're holding your hand like this, and you're not likely to smear what you have underneath. I wanna get, I'm determined to get into that corner, to make this cube look like a cube. And take a little more of this color off. And I can also use, you know this is almost the right size, I'm gonna do this, it's almost the right size to fit on the top of this box in terms of the size of this tool. And it's interesting 'cause it creates this, kind of cool ridge shape, it's just a ridge of paint. So I went from a really thick patch of impasto paint, to a much thinner surface. And I can still quiet down some of those textures, so it's not quite so, textural. OK, so that's the palette knife. Go right to the corner. And it's kinda cool. So, impasto, thin transparent layers, I have texturized this with my paper towel and my rag, and that's very much just to get a different kind of texture that you might paint into or paint over. If I'm gonna do this, I would probably glaze on top of this as opposed to just mixing some other color in. But for now we'll just do it this way. And the reason why I would do that is because as soon as I put a brush on top of this, I'm gonna move all this color around, and the texture I just made is gonna disappear. So I would let this dry, and then glaze over it, so that texture I just made I still really apparent. But it's kind of a fun texture. I can't do that here, it's dry. That's not going anywhere.
Class Materials
Bonus Materials with Purchase
Ratings and Reviews
CG
I've been a silk painter for decades and am just starting out with oils. This course was extremely helpful, especially the demos. One thing--at the very end she says that with traditional oils you'll need to clean your hands with a solvent before washing with soap. Not a great idea if you want to be healthy. I remove pigment on my hands by rubbing a clean oil on them, then washing it all away with soap.