Lessons
Class Introduction
06:11 2Types of Charcoals
07:44 3Demo: Stumps for Charcoal
05:48 4Demo: Erasers to Create Lines in Charcoal
05:48 5Demo: Add Chalk to Charcoal
06:10 6Surfaces for Charcoals & Chalks
11:42 7Demo: Tonality on Spray Fixed Surface
07:01 8Demo: Pull Pigment From Non Spray Fixed Surface
06:22Lesson Info
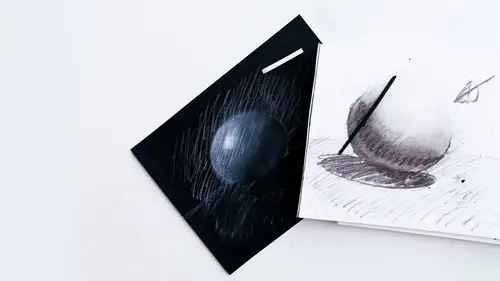
Demo: Stumps for Charcoal
Whether it's the charcoal, vine charcoal, the pencil. Here's the vine charcoal. There's another tool you can use besides your finger. And some people don't like to use their hands because they don't want to get their hands dirty. I'm not one of those people obviously. But these things are called stumps. And they come in a variety of sizes. This is probably the largest. This is a medium. And the smallest one is this little tiny one. So what do you do with these things? These are blending tools. And they're meant for moving that tone across the surface. And what I'm going to do is I'm going to show you, this is something that I did previously that I want to show you. I have the pencil, the stick, and the vine. So let's replicate that. Again this is just sketch paper. It's really inexpensive, really thin. First we'll start with the pencil. This is what it looks when you just lay it on the surface. I'm also showing you the difference between the texture of the mark when it hasn't been push...
ed into the paper versus when it has. This is the stick. You can see it really covers. It's a lot of coverage, very, very quickly. And then the vine. The vine has the least amount of tooth or texture to it. It's really quite smooth, even when it hasn't been rubbed into the surface. But let's try to make these similar tones here. But we're gonna use a stump instead of my finger. And I want you to see the difference. It's really meant to be a gradiation tool. And it's beautiful for that. Where's that pencil? Here it is. Now again, takes longer to cover this than this when you want to use a larger area. But let's just take, I'm gonna use the largest stump because the smallest one is used for really noodley, tiny areas. (blowing) I did mention a mask. Which I'm not going to wear right now. But as you can see, I'm blowing the powder which is literally sitting on the surface, away from my picture. Because if I don't, it's going to smear all over the place. This is kind of a standard mask. You can get very fancy ones. But this is something you can get at a hardware store. It basically, the mask is helping keep the powder that gets into the air, to get into your lungs. And it's true for pastels and for charcoals and chalk. You want to be mindful of that. I'm just demoing this now. So I'm not going to spend a huge amount of time in this room doing this. But if you were spending days working on different projects, you would want to use a mask. Because you don't want to be breathing in all of this powder, this pigment. Okay, so the stump. Now you can see, unlike the finger, the mark makes a really sort of refined kind of tonality. So you can get a beautiful gradient (blowing) with this tool. Really beautiful gradient. And so that's the pencil. The pencil moves a little less than the vine, charcoal, or the stick charcoal. And it's a little less black. You can see, I can create circular marks. Like this. I can go in this direction. It really all depends on how you want to move that tonality, that pigment cross the surface. I have always the greatest temptation when I'm using a stump to just use my finger. But the stump is really nice because it also gives you this opportunity to kind of make little tiny lines and feathery marks. And very, very gentle transitions of tonality. Here's the vine charcoal. It moves across the surface with the stump but it's a little less effective because it's such a light color as I press this in. It's not working as effectively as my finger. I'm going to use a clean finger. And I think it's primarily because vine charcoal is such a powdery and light pigment, that this tool kind of runs through it as opposed to moving around and pressing it in to the surface. So those are the three different tools blended with stump, a little bit with finger, and stump again here. Pushed into the paper here, here, and here. Sitting on top of the paper here, here, and here. You know that's the kind of difference and variation of texture that you can make in a charcoal drawing. And it's a really nice thing to have that variation. So I'm just gonna put those aside. Now the other thing that you can do which I think is kind of interesting. And we'll in a minute about our erasers. We've got the stumps over here, I'll put it back. Again, you only need one or two or each of them if you're using charcoals and chalks. Because you're not really dealing with anything but black and white. When we talk about pastels, you want a variety, you want a bunch of these. Because you're going to use one stump to mix one color. You don't try to mix a red, a blue, and an orange all with the same stump. You want a variety. But for charcoals, you're good with just a couple of small, medium. Small, and medium, and large, put them right here, stumps. And they're made of paper. So it's paper on paper. Some people have an issue with the sound of that kind of reaction of paper stump on a paper surface. I'm not bothered by it but some people are.
Class Materials
Bonus Materials with Purchase
Ratings and Reviews
Student Work
Related Classes
Illustration