Additional Shoot Considerations
Lesson 23 from: Get Started with Lifestyle Family PhotographyElena S Blair
Additional Shoot Considerations
Lesson 23 from: Get Started with Lifestyle Family PhotographyElena S Blair
Lessons
Class Introduction
10:48 2What is Meaningful Lifestyle Family Photography?
15:37 3Settings for Shoots
10:50 4Light, Composition & Location
10:47 5Settings Q&A
08:54 6Why Connection is Important
15:11 7Connection Q&A
09:36 8Session Experience
10:43Marketing Strategy for Lifestyle Family Photography
09:34 10Family Preparation
14:11 11How to Get to Know Families Fast
12:22 12The Actual Shoot
08:10 13Considerations for a Photograph
11:43 14The Family Session Workflow
07:38 15Shoot: Start Standing
05:49 16Shoot: Money Shot & Siblings
05:08 17Shoot: Time to be Seated
06:41 18Shoot: Portrait of Each Child
02:09 19Shoot: Laying Down
04:25 20Shoot: Mom & Dad Alone with Child
06:50 21Shoot: Movement Poses & Everyone in The Frame
04:07 22Shoot: Parents Together & Mom Alone
04:40 23Additional Shoot Considerations
04:38 24Review Images from Shoot
07:17 25Shoot Q&A
08:23 26Pricing & Business Strategy
21:15 27My Editing Strategy
04:54 28How to Cull Images
03:44 29Outsourcing Post Production
12:53 30Image Gallery Delivery
08:42 31Pricing & Business Q&A
11:00 32Finalize The Client Experience
05:20Lesson Info
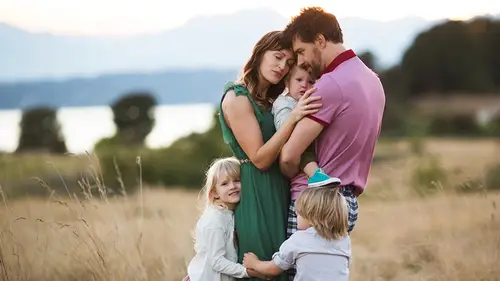
Additional Shoot Considerations
As you can see, like, that actually was a pretty, I mean, normally, we'd be outside and moving around, but that's how I interact with my families. I am super open; I'm joking. We're, like, just being together, having fun. We're actually having a good time together. This is not a torturous situation. This is fun. So, try to just relax and enjoy it. It's really, and I, like, this is actually the first time that I've met these people. We have some mutual friends. But now, I'm like, we know each other now, right? So, it's just a fun experience. Okay, so a few things to keep in mind. Don't forget the details. So in, this is a sitting pose. The little boy is sitting in his mom's lap. There are so many opportunities within every pose to capture all of these magical details that are present in a family. But, in little kids, you can get their eyelashes, their wisps of hair, his little hand. You could've got his, I could've got his hand on that stick. So, so many details. So, you have to be aler...
t to them and ready for that, okay. And, you have to work kind of fast. But, don't forget the details. You really want to make sure that you're getting variety in each pose, that you're offering many different perspectives. So, you probably notice that I would pose them, and I would get the whole picture. And then, I would go in and just take pictures of all the different things that were happening within the pose. This is really, really important for a lot of reasons. One, it helps to get variety in your gallery. But two, what if the family isn't so cooperative, and you only get, like, two or three really good poses in? You want to make sure to maximize each one of those poses so that you're getting lots of different shots. So, this is, you saw me do this pose. I love it. So, you'll see me do it all the time. And then, I just got in there and got all the different details. There's his little hand, touching her necklace. And this is, just essentially, a different perspective, you know, coming from above and then, getting mom, holding him like that. Okay, never put your camera away. Like I said, I am the Sherpa. I will carry it, and I will carry everyone's things. And, I want to capture all of the moments because you just don't know when something awesome is gonna happen. So, you have to be ready. Sometimes, as we're transitioning or as you're posing, like, I wasn't doing that as much, here, 'cause I couldn't hang it on my neck because they told me I had to stop. But, normally, I hang my camera on my neck, and I'll be posing. And then, I notice that, like, over here, the little one's giggling or doing something amazing. And, I'll go over really quick and shoot that and then continue to pose. So, you never want to put your camera away. You always have to be ready for these really great moments. And, every moment in-between. They're always happening, always, always. This is family. There is not another dynamic that is more connected, that is more complicated, that has more opportunities for this kind of photo. So, you just have your eyes open, okay. Capture what you feel. This is like, for me, this is something that I feel. I know exactly what that feels like, to have my hand on my little one's head. So, that's just me. You may not have felt that. But, whatever it is that you feel, capture it, every moment in-between. Do you know what type of backpack that you use? Yes, that is an Amazon backpack. I think it was, like, 35 dollars. I have a really expensive camera bag that I spent way too much money on that I never use because this thing is so darn practical and so easy to take around, yeah. Awesome. I'm a casual person. (laughing) Now, once again, this is from Arianne, who says, "How do you do this at your focal point at 2.8?" And, I know we talked about it earlier, but we just saw you in action. And, I know especially for beginners, just understanding that you can get people in focus. Yeah, and let's see what actually happens, 'cause this was-- Or, or if not, that that's okay, too. Talk us through that again. Right, okay. That's one that always, really, is mystifying for people. And, I think it's because what we were trained to believe is that, and it's true, I mean, that when you're closed down like that, you have a, or when you're wide open like that, you have a more shallow depth of field. So, it's true. But, if you have everybody really close together, they're all gonna be on the same focal plane. If you're using your really fast shutter speed, then you're gonna be freezing that motion. So, that helps with focus as well. And, if you're further away from them, like when I'm getting the whole group shot, then that gives you some forgiveness in the depth of field. So, in all honesty, my reason for shooting wide open is very much a stylistic choice. I really like the softness that it yields. I like to tell my viewer where I want them to look by only focusing on part of the image. So, it's okay if you don't want to shoot that way. That's just what I like to do.
Class Materials
Bonus Materials with Purchase
Ratings and Reviews
Armstrong Su
is super knowledgable, yet down-to-earth and relatable. I love how he explains the exact gear he uses but also describes ways to accomplish the same look using DIY and less expensive alternatives. The segment where he demos a live shoot in multiple, difficult lighting situations is worth the cost of the class alone! Bonus: He's super funny. He could probably double as a comedian on the side, but I digress. This class was informative, funny, and very practical for any photographer that wants to increase their profit and expand their business into the professional world. He gives all his prices and workflows so you can get up and running in 2 days! :) Awesome class overall, and it's a great sequel to his professional headshot class (which I also bought and loved.)
Sandra Kay Hayes
I am totally in tears watching this, and think that every person going into Photography should watch these. She is a great teacher, and helps us to understand our "why" so much better. I also LOVE that she helps one feel confident with the non-perfect, (or so called) shots, Thank you so much for giving me more confidence to shot what I love and not worry about "rules!!". Best class I've taken I will recommend her to every group I am in!!!
Julia Khris
Elena is a great presenter. Delivers information in a very fun and engaging way. This course would be good for a beginner photographer. She shares the basics, but unfortunately doesn't quite provide advice on the more tricky questions. She shares a lot about her current state of business (10 years in and making enough profit to afford hiring staff). This is great to know what to aim for, however, it would be more beneficial to hear more about HOW to get to this stage. The main idea that I took from this course is: outsource as many processes as you can. Elena doesn't have a very distinctive style (no offence, but there is a huge competition in the style and editing that she works with), I would love to hear her advice on how to win in such high competition, how to convince clients to choose you and pay higher price tag for an equal quality of work. This is a fairly inexpensive class, so I would recommend it to the beginners, but not to the more experienced photographers.