Lessons
Lesson Info
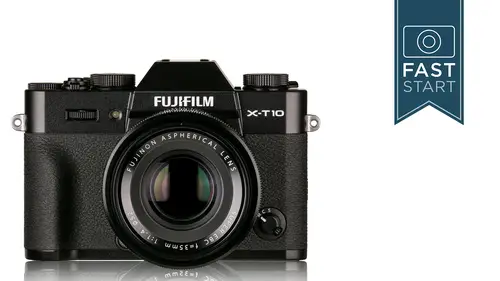
Top Deck: Exposure
So we're gonna start with the top deck, because that's where they put all the major most important controls. The shutter release on this camera is a two stage device. So by pressing halfway down, you're gonna wake the camera up. It will also activate the metering system and activate the autofocus system before you press all the way down when you would actually take the photo then. So be very used to that secondary kind of half light press on the shutter release, because that's gonna keep the camera awake, focused, and ready to go for the next shot. So one of the things that's unique about Fuji that not many cameras have done recently is they put in a standard threaded cable release right into the shutter unit, so that if you want to get a remote shutter for this, you can get this cable. And these cables are incredibly cheap. I've seen them for three or four dollars, some of the cheap ones. Some of the really good ones are around 50 bucks, but it's no electronics, it's mechanical. This ...
is the way cameras were triggered back in the 70s and 80s, and we do have a more modern electronic system that you'll see later on, but if you want to keep it really dead simple. I've got one of these that I've had for years because I bought kind of a nice little cable release, and it's great for this just because it's fancy and the batteries never wear out, and it's just a really solid connection. All right let's talk about exposure control on the top deck here. Very rarely do you see on modern cameras a shutter speed dial, and I grew up with cameras with shutter speed dials on them, and I like them because they're tactile. You can just look down whether the camera is turned on or off, and you can see where things are set. And so there are some things that for nostalgia reasons I very much like. However, the problem with these is that they don't allow you all the shutter speeds. So, as you'll see on this, we have a collection of shutter speeds from 1/4000 of a second, which is just listed as 4000 of course, down to one for one full second, and then there is an A for automatic, where the camera will take care of the aperture for you. So that would essentially be an aperture priority mode, or a program mode if you want to put the shutter speed in the A dial. Now some things you'll notice about this list of shutter speeds is the 180 has an x by it, and this is the top flash sync speed that you can use on the camera. And we'll talk a little bit about flash as we go along the way here, but when you do fire the flash, that is the maximum shutter speed that you can use. And a word of warning. This is the only camera that I know of in recent memory that will allow you to exceed that shutter speed and take a picture that doesn't look good. You can set your shutter speed at whatever you want, and the flash will fire, and you're gonna have some potential exposure problems, and so you want to be very aware if you are firing flash, what your shutter speed is. That is the maximum sync. With a small little notation, I'm gonna say stay tuned in, because I'm going to elaborate on this a little bit further down the road. Now, we also have a T. T stands for Time, and time, in some of the earlier Fujis allowed us to set slower shutter speeds like two, four, eight, down to 30 full seconds, and it does that on this camera as well. So if you put it in the T, you can then adjust the front dial on the camera to adjust the shutter speeds. But one of the downsides of having an actual shutter speed dial on the camera is that there's just not enough room for all of the other shutter speeds. And so, we have to go to T to get down to these longer shutter speeds. And we also have some electronic faster shutter speeds all the way up to 32,000th of a second, and in order to get to those, first off we're gonna have to turn something on in the menu system that we're gonna do a little bit later on in this class. But then we could use the T setting on this and dial up to 1/32,000th of a second. And I think for most people, if you want to set shutter speeds yourself on this camera, you're better off just leaving it in the T mode, because you can go to the slower shutter speeds, the faster shutter speeds, as well as the third stops in between these whole shutter speeds. So you'll have access to many more of the shutter speeds. Third stops are these smaller increments between the numbers that we see here, and in order to get to these, you can adjust those with the front dial on the camera. And so, just as an example, let's do a quick little live demo here, because this is something that sometimes newcomers aren't really sure of on this particular camera. I'm gonna set my camera to 1/60th of a second. So on the back of the camera I have 1/60th of a second down here, and if I turn the front dial I can get down to 1/50th and 1/40th but I can't go any further. So I can go 40, 50, 60, 80, 100, and I can just move a little bit around that range of 1/60th of a second. If I wanted to go a little further down, I could turn it down to 30, and now I can go down to 20, 25, 30, 40, 50, and so there's a couple different ways to get 50, and I think for me I'm just gonna leave it in the T setting, and adjust the shutter speed in the front because then I can go through the full range of shutter speeds. And so, little bit more complicated on the shutter speeds but I think it gives a lot of different types of photographers different ways of setting them. All right, and if you do want to get in and adjust the shutter type as far as the electronic shutter, one of the things that I'll be doing in this class is giving you some shortcuts for those of you who are quick on the take, and you kind of already know most of the stuff, but you're just trying to pick off the more complicated stuff. If you do want to turn on those electronic shutter speeds, you can go into shooting menu number five, into Shutter Type, and you can select the electronic shutter speeds, and turn them on in that area. And so throughout this class, as we pass by information where you have to dive into the menu, I'm gonna quickly tell you where you need to go in the menu. But if you don't want to jump in there right now, that's perfectly fine because we're gonna cover that in the second half of the class. We're gonna go through the entire menu. All right, below the T is a B setting for bulb, and bulb is if you wanted to leave the shutter open for even longer than 30 seconds. Bulb is as long as you want to leave it open. So what you could do is you could take the mechanical cable release we just talked about in the previous slide, you could lock it open and leave your camera on for five minutes for instance. I probably wouldn't leave it on for much more than five minutes. The sensor does not do well when leaving it on for long periods of time. But, if you want to do a one minute, two minute, four minute, five minute exposure, you'll be able to electronically or mechanically leave it open by using that bulb setting. Now I like to do a lot of night time photography, and I rarely go beyond 30 seconds, and so it's pretty rare that you're likely to need that B setting. All right, next aspect in exposure control is the aperture, and the Fuji system, they really like to give you a lot of mechanical feel on the cameras, and so because of that, we have a variety of lenses that have different mechanical ways of controlling the aperture. And so the lens that you see on the screen right now is the one standard of lens where it actually has an aperture ring on the lens, as well as a listing of the exact apertures that you're setting, but not all lenses are like this. Some lenses will have a little aperture automated switch on it, so that if you want automated apertures you have to flip a little switch. On other lenses, there is a setting at the end of the ring, after F22. So these are on lenses that are known as R lenses, which means they have an aperture ring that you can physically turn on them. There is another style of lenses. There's not too many of these. XC lenses, which have no aperture control on the lens itself. And with those lenses, you will control the aperture on the back dial, the rear dial of the camera. There's only about three or four of those that I can think of off the top of my head. Most of the lenses are gonna have an aperture ring on them, but there are two different styles for those lenses that do have aperture rings. But they all have the option of setting a specific aperture, or letting the camera figure out the aperture for you. If you want to put your camera in what is generally know as a program mode, which is where the camera takes control of the shutter speeds and the apertures, you'll need to do two things. One is you'll need to put the aperture into the automated setting, and as I mentioned before that may vary where that setting is on the lens depending on the lens. Then the second step you'll do is you'll take the shutter speed dial and you will put it into the A setting. When you do that, the camera will be in a program mode, and you can just kind of point the camera at just about anything, and the camera is gonna work out the shutter speeds and apertures for you. Now one of the things that you can do is something called program shift, which is have a little bit of control over where those shutter speeds and apertures end up. Even though the camera is in control of them, you can kind of direct it to be in one area or the other. And you will see this information in the viewfinder or on the back of the camera. So let me do a little live demo here, and make sure that my camera, first off I'm gonna make sure that my lens is gonna be in the A setting. So this lens has a little switch over on the A setting, and for the shutter speed dial I'm gonna turn it around so that it's in the A setting up here. And turn my camera on. And so, right now I'm having a shutter speed of 1/40th of a second at F 2.8. So to do program shift, I can either turn the back dial or the front dial. I'm gonna turn the back dial, and one of the things you'll notice about the numbers is that they've changed color. And there is a method to the madness in the colors I'll share with you in just a moment. But the yellow right here indicates I've changed it from the default settings. If I turn the camera off, and I turn it back on it's still in the program mode. You see the numbers are white, and as soon as I change them they go to yellow. It just means you've changed it from what the camera recommended. And so if I wanted more depth of field I might turn this to F 11 or F 16. If I said, oh I need a faster shutter speed, I'd look over at the shutter speeds and I would adjust that to the fastest shutter speed I could get to perhaps. And as we move the camera around, it's gonna come up with new numbers according to whatever the light source is. So, one of the things is is that this is gonna change a lot as you move around. But that's how you can adjust and have a little bit of say even though the camera is mostly in control of the exposure, you get kind of the final say as to the direction that it's at. Now as I mentioned those colors, there's a method to the madness. White is kind of your normal preset default setting. Yellow means you've altered it in some ways. It's blue if you've locked it in, like you've pressed exposure lock on the camera. And red is a warning that something is not going well. Might be for instance, you've chosen too fast a shutter speed in a shutter priority mode, or you have an aperture chosen where there is no shutter speed that you can get to. So be careful of anything that's turned red on that. But yellow is very normal, so is blue. All right so this camera has a Full Auto mode, and this overrides wherever the shutter speed may happen to be, or wherever the aperture setting happens to be. And so if you want just a quick automated mode, for instance you're gonna hand your camera to somebody else to take your photo, and you want to make sure that they don't bump a dial or do anything to mess the camera up. You can just flip this switch down to the auto mode, and it will automatically take care of shutter speeds and apertures, and it doesn't matter where those dials get bumped to. So it's the ultimate easy mode on the camera. Now one of the things that you can do in this mode is you can change the scene modes. So you can set this up for different types of scenarios, and so let me show you on my camera. So I've got my camera and I just flip the switch into the auto mode back here, and simply by turning the dial you can see on the back of the camera, you'll see a bunch of different settings. And by changing these settings, the camera is gonna go in and it's going to change shutter speeds, apertures, the metering system, the focusing system. A variety of different things, but it's not gonna give you too much information about what it's doing. But it will be slightly better than the very first one, which is kind of your generic all around everything, the advanced SR auto. And so if you're not sure what you're gonna be shooting, or it's just real simple basic stuff, that's probably where I would leave it at. But if you know you're doing something very specific, kind of the next level on complexity is choosing one of the scene modes. But that's something that they've added, and it's kind of unique to this camera compared to some of the other Fuji cameras just to make it a little bit more user friendly and easy to use. So that's the Full Auto section. All right so when you have the camera in Full Auto in the program mode or in shutter priority, or aperture priority, so any of the auto modes are turned on on the camera, you have the option of making your pictures brighter or darker with the exposure compensation dial. So let's just talk about that for a moment. I love these tactile dials right on the camera that you can see where they're set at. So, settings to the minus mean your picture will be darker, by one, two, or three stops, or they'll be brighter by one, two, or three stops. This is a dial that, it is fairly well exposed, and so you do need to be a little bit careful that it doesn't get bumped into a position that you don't want, but it does have a very nice solid turn to it, so I don't think it's likely to get bumped, but it is possible. So you do have to kind of keep your eye on that, and normally keep it at zero unless you really intend it to be someplace else. So it's a quick way to make your pictures a little brighter or a little darker. All right, so if you want to do manual exposure, which I hope you do, because you're taking a class. You want to learn how to do photography. You're gonna want to do manual exposure. So you're gonna be changing apertures on most lenses, because as I say, most lenses do have an aperture ring on them, and you'll be changing your shutter speeds as well. What you'll be doing is you'll be looking at the light meter, and you'll be wanting to get the indicator towards the middle of the light meter. If it is in a position like this it means it is one stop under exposed. The little marks in between, that is one and 1/3 stop underexposed. And then that would be two and 2/3 stops overexposed. And so generally you want to get it towards the middle and adjust it as need be for that particular type of scene. So let me go ahead and show you on my camera. And I need to get my camera in a full manual mode, so let's go ahead and flip the switch down into the aperture setting, so I'm gonna set apertures by turning the ring on the camera. And I'm gonna turn my shutter speed dial just to a shutter speed. Clearly it's very dark right now, and so I'm at 1/2,000th of a second, F 4, so I'm going to bring my, I want a little bit of depth of field so I'm gonna go with F 5.6. I'm gonna set it to 5.6, and now I'm just gonna turn my shutter speed dial, and I'm looking at my light meter, and I'm getting closer, pretty close. Okay that one is over, that one's under. How do I get between the two to get it exactly spot on? Well I could go with either one, but I'm gonna go with the one that's just 1/3 of a stop over, and then I'm going to go to my shutter speeds and I can adjust that shutter speed by 2/3 of a stop up or down. And I can get it set right there. Now the other option for all of this is I can put the camera in the T mode, time mode, and I can change from 1/4000th of a second with one dial, all the way down to the full 30 seconds. And now I don't have to worry about going back and forth from the top dial to the front dial, and that's why I say I think maybe using the T setting is just a little bit quicker for a lot of people. Unless you're trying to do something very specific and you really like that dial on the top. And I do like the dial, but it's just faster to turn that front dial to get it exactly where you want it without going back and forth. So, that's the idea, and some areas if you have a lot of light, like if I point it over here, you might want to have the exposure indicator a little bit off to the right-hand side because that matches the actual brightness here in the room a little bit better. But that's the basics on how you set manual exposure.
Class Materials
Bonus Materials with Purchase
Ratings and Reviews
Dan Meylor
I purchased my Fujifilm X-T10 over a year ago and recently realized that I wasn't using it to its fullest extent. John's Greengo's video on its use opened me to a wider use. The information is clear, well organized, sequential, and helpful. I don't have the time to read a small print booklet and found the visual presentation useful because I could go through the steps on my Fuji. I'm still a little unclear on the seven custom setting and think Fuji should explain what each does. Thanks, John, for your work and encouragement.
user-98aab8
John Greengo's approach to teaching is the best. Each visual, each explanation and each example he demonstrated touched every sensory way of learning. The PDF print outs are a great bonus. Thank you for doing this video.
honolulube
I'm thinking about purchasing an XT-20, this course was very helpful to understand the camera beforehand. note: the opening slide in John's (excellent) presentation, shows an XT-1 not an XT-10... but I'm buying an XT-20, I think I got that right. - perhaps just an Easter Egg hahaha
Student Work
Related Classes
Camera Guides