Compositing High Key Image with Flower Head Piece
Lesson 9 from: From Shoot Through Photo Editing: Fashion RetouchLindsay Adler
Compositing High Key Image with Flower Head Piece
Lesson 9 from: From Shoot Through Photo Editing: Fashion RetouchLindsay Adler
Lesson Info
9. Compositing High Key Image with Flower Head Piece
Lessons
Class Introduction
03:14 2Three Reasons to Shoot for Photoshop
16:00 3Shoot: Working with Dress Length and Color
12:53 4Shoot: High Key Image with Flowers
28:01 5Shoot: Dance Pose with Water Splash
27:51 6Creating and Installing Brush Presets
12:36 7Compositing Dance Image with Water Brushes
27:46 8Toning and Retouching High Key Image
12:02Lesson Info
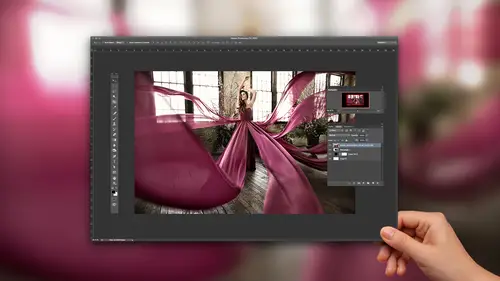
Compositing High Key Image with Flower Head Piece
All right, so now let's get to the creative Photoshop part. So, what we're going to do is we're going to add some flowers around her head. So I need to go back into Lightroom and I need to select some flowers. So a couple things that I'm thinking of already that I need to keep in mind is, some of the things I need to be aware of is where these petals were a little bit more translucent. If that's directly against her hair, it won't make sense because it wasn't translucent behind her head. So these are just considerations of, okay, what makes sense and what doesn't. Maybe what was against her head would have to be where her arm was. Or maybe it would've been better if she was sitting there, and I just kinda moved them around so that it wouldn't have that translucency. But this should be pretty easy to cut out because it's on white, and the yellow is a stark contrast. Now while I'm in Lightroom, I did wanna show you again, if I go over into the develop module. And we go back down to where...
we were finding hue and saturation again. Hue, saturation, luminance. If I go over to the left-hand side to hue, and I drag, I take that little adjustment brush, that little targeted adjustment, and I click on it. And I click on the yellow. I can change the color of the flowers. And some of the colors work, some of 'em don't, but I could adjust the hues right there. And since I don't care, I'm not going to be including her hands, I'm not worried about that color shift, so I could change them to any hue that I wanted. But if I pop over to, so this flower does have some color to it, so this one's not too bad. But if I pop over to a flower without that much color and I try the same thing, it's not quite as much. This one was a little bit green, so it was okay, but when it's white, there's no color to change. It has to grab on, so notice here, when I click and drag, it's moving the yellow and green sliders. It's changing their hues because that was the color that was there. If it's white there's nothing to move. All right, so let me go back and open some flowers here. I'm just gonna open... Several.... Okay. I'm gonna open a bunch of these and we'll see what works. And it definitely will be easier to cut these particular ones out because they are against the lighter background, or, if they were against a darker background. All right. Perfect, okay. I am going to grab, on the left hand side here, my quick selection tool. And this is one way that i could make a selection, by clicking and dragging around, because it is so different than the background, it should be pretty close. The places that it would struggle would be edges that were going to near white. But that actually is pretty good. Another way that I could make this selection as well, I'm just gonna undo that. Another way I could make this selection as well would be to go up to select, color range, and it allows you to make a selection based on colors. So if I come in here and I hold shift, everywhere I click, it gives me a, see where it gives me the plus sign? It's adding that color, saying include this color in the selection. So I can click around and then this fuzziness determines how far it reaches into other colors. So I could kind of click and select the flowers and then I could try to get it close to the edges of the flowers and then use refine edge to cut it out. I think that the other way worked much better, so let me do that one more time. And I would, of course, spend more time cutting things out. Let's just do this. Okay. And I am going to cut these and let's open up my, oh, yeah, that would be helpful if I knew what the name of the file was. There ya go. Okay. So I'm gonna hit, I hit cut, and then I hit command V for paste. So if I want now, I can do the exact same thing as before to kinda rotate this around and give me a headpiece. So I could do something like this. So looking for the flowers on the edge here. Exactly the same way as before, as well. I can use my warp tool. So I could grab warp, and try to bend it a little bit more, maybe around the shape of her head or if she had a bun to make a little bit more sense there. What I need to be careful of is when I zoom in, is I just wanna be careful of my edges, because obviously that wouldn't be realistic to have the white and so what I'm gonna do is, same thing we talked about before, add a layer mask, and I can grab a black brush, and there are a variety of ways you could do this as well. I could give myself a harder brush. I could make a selection and go in there, but again, I'm a fan of as long as it looks good enough, then I'm happy. So let's just clean this up a little bit. The reason that this flat light is really nice is, normally, what I would have to do a lot of, is figuring out, and I have to do it a little bit here, where there should be shadows and where there should be highlights. So in my head, for example, I know that this highlight right here doesn't make sense because if the flowers were there, that highlight would've been blocked. So, I've either got to move the flowers, and then it fixes a lot of my problem because the highlight is hidden, or I have to go in and darken around that area. It's just kind of making it work for you. So, I'm thinking something around there. Let me grab a couple other flowers. Let's see this one. All right, that's close enough for now. And I'm cutting and pasting again and I'm going to cover most of her hair so I don't even have to worry about it. But this is what I see that I go, oh, it's a problem, because it's a little bit too translucent, and it wouldn't be translucent that much around her head there. So I'd either have to darken it down, try a different angle, and I could see if there's enough information there to darken it down. For now, let's see what I can do. I'm gonna test something real quick, because I have not tested this. Let's do darken. Okay. So, one of the things I recommend you do is learn about blend modes because they make your job so much easier when you're trying to stick stuff together. So I was checking a blend mode to see if I could make things blend a little bit better with Photoshop helping me out. It did kind of okay. Let's try a little bit of burning and dodging here. So I'm gonna put the flowers on her head here, and then I am going to take a curves layer, half-moon, cookie, grab curves, and I'm gonna darken down on this flower. And right now, because it's an adjustment layer, it's on the top of everything, and it's applying it to absolutely everything below. But what I really want to do is I only really want to affect those flowers that I just placed. I don't want to affect everything. So what you wanna do is you wanna hit this icon, the square with the down arrow. What it does is it clips, that's what it's called, it's called clipping. It clips that curves, it attaches it so it only affects those flowers. So, if you notice, when I hit that button it's only affecting the ones directly below it. So it's gonna make it look a little bit more realistic and save me time. I'm going to fill in this mask black, aka, hide the darkness. I just darkened everything down, but I don't wanna see it, so I'm gonna hit command I. Okay. Now what we're gonna do is, we're gonna go in and selectively try to darken down some of those flowers. So someplace around here, oops, let's do a lower flow. I'm just gonna build slowly and just slowly painting to try to darken those down just a little bit. And so it should help me blend it a little bit better. Okay. All right. So spend time on that. Your other solution, if you look at that, and you decide that you still don't like, you still think they're too light, is you can mask out the lighter petals. So I could take this layer mask and paint black and it will erase that petal and so I can get in real close and just, you know, if I had more time, we'll go a little slower. But I could get rid of the lighter petals that kind of give away my composite. All right. And obviously, this edge is not what it would be. What you would probably ideally wanna do is come in with, if you're comfortable or familiar with, you'd come in with a pen tool and trace around the edge of the petal. And then you can soften the edge so it's not so abrupt and so crisp, so you feather it just a couple pixels to be more believable, so maybe this particular cut was a little bit better. Okay. And so you know, you can give yourself a headpiece even if you don't have a headpiece. So that's probably the extent for this time. Only thing I wanna do is try one more, oh yeah, and I wanna get rid of the thumb. It's gonna drive me crazy. And so again, it's kinda, I think a hardness around there, that would look believable to me. Whereas this hardness is too soft and it's obvious that you're compositing. So all I'm doing is I'm erasing my masking and I'm trying to figure out what the right hardness of the brush is to not give away my secrets. Okay. Let me get rid of this thumb. I have to go softer in there, okay. So the last thing that we're going to do is we're gonna play with color in the other images and we're gonna play around a little bit more with brushes, so let's see. Something like that. 'Kay, that works for me.
Class Materials
Bonus Materials with Purchase
Ratings and Reviews
Avril McPherson
Yet another fantastic course from Lindsay. She is by far my favourite photographer as well as a brilliant teacher. We are so lucky she is willing to share her brilliance )
Phyo wai Moe
Lindsay is awesome as always . I should have bought this course long ago . Its well worth of money and i recommend to people who like to start fashion shoot with cheaper option . Thank you Lindsay . As for Creative Live group , please fix the " Purple Skirt Picture " as crush or corrupted . Thanks .
user-f37802
I love Lindsay's tutorials. She speaks "our" language. She has very simple, but highly effective approach to studio set ups as well as post-processing. She is very (very) creative photographer. Highly recommend.