Compositing Dance Image with Water Brushes
Lesson 7 from: From Shoot Through Photo Editing: Fashion RetouchLindsay Adler
Compositing Dance Image with Water Brushes
Lesson 7 from: From Shoot Through Photo Editing: Fashion RetouchLindsay Adler
Lesson Info
7. Compositing Dance Image with Water Brushes
Lessons
Class Introduction
03:14 2Three Reasons to Shoot for Photoshop
16:00 3Shoot: Working with Dress Length and Color
12:53 4Shoot: High Key Image with Flowers
28:01 5Shoot: Dance Pose with Water Splash
27:51 6Creating and Installing Brush Presets
12:36 7Compositing Dance Image with Water Brushes
27:46 8Toning and Retouching High Key Image
12:02Lesson Info
Compositing Dance Image with Water Brushes
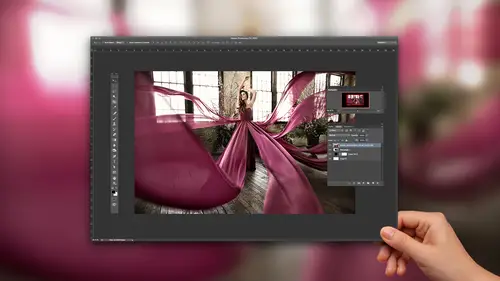
So now what we're gonna do is we're going to take a look at some options for the water brushes. So just so you know as you can see these ones in particular it's crisp but it's not sharp but it would still be completely fine for what we're doing here. So what I can do is I'm gonna open up this particular splash in Photoshop and I'm going to go to Photo, edit in Adobe Photoshop CC 'cause that's what I'm using. And we are going to go through, and I have to isolate this again, I gotta figure out what I want my splash to be. So I already know a lot of this stuff is extra so I'm just gonna select the part that I like. So what I did is I marquee tooled, sorry, I'm gonna do that again, I'm gonna marquee tool top left. If you look right here it's going to give me a rectangle so I'm roughly selecting the part of the splash I like and then I'm hitting command J. And that puts just that part I selected in a new layer. And I'm going to delete my background. I'm gonna click and drag to delete it. S...
o it's gonna give me, make it a little easier for me to knock things out. So what I want to do is I want to try to get rid of this black. I want to try to isolate some of this splash here. So I'm going to use my magic wand tool again and I clicked on it and it selected roughly what it think is the background which should be knocked out. So I am going to go back up to refine edge and just see if I can trace around the edge a little bit more. But it did a pretty decent job for me I think for a splash. I'm pretty okay with it. I would spend more time but we can't so, you guys'll get the idea here. So I'm going to delete the black. So here's kind of what it gives me, something like that. I know that some of this black I don't necessarily want so I could keep going in and being a little bit more precise I could soften the edge of it, I could use refine edge as well. I also could come in here and increase my contrast a little bit, try to knock out some of that black. Alright, so when I'm all happy I'm gonna crop so that I just have the edges of that splash. Then I'm gonna crop right up to the edge of that and this is going to be my brush. So we do the same thing as last time. Gonna crop it and then edit, define brush preset and I'm gonna save this as CL_Splash. Okay, and now if I go ahead and grab a brush I've got that splash and so I can then add it wherever I want to another photograph. I'm gonna switch it to white so that you can see this real quick. Let's do, I'm gonna grab a photo so that you can see what this will look like. Let me just open this one. Okay so I am going to need a white brush and I could maybe have it splash off her stomach for example. I mean obviously we need to be a little bit more precise but that is how we just created a splash brush. That works pretty cool. And we are going to morph and warp it so that it fits the body. Alright so all we talked about so far is creating brushes. I'm gonna start from the very beginning now for how I would turn this into something more exciting and give her a dress made out of water and use the brushes we just created and use some of the brushes I've downloaded. So I'm just gonna close this all out and we're gonna start nice and slow from the very beginning of that. And I also now have that brush available to me. Okay so I am currently in Lightroom and I think I decided I liked this one, let me see, that one I like but I like her knee up more here. We're gonna go with that one. I don't love the hand but I can always composite the hand in from a different one. So in Lightroom the things that I want to get right are the white balance roughly, the exposure roughly, because if anything loses detail in the highlights or shadows once I open up in Photoshop I can't get it back. Or I could do smart objects but we're not gonna mess with that tonight. So let's just do something around here. I'm gonna bring back a little bit of detail in the shadows and I'm gonna pump up my exposure a little bit. I think there it is, good. So this is the file I'm going to be working with in Photoshop. So photo edit in Photoshop CC 2015. And what I'm going to be looking for now is something that makes sense. I want to be able to use the brushes in a way that would actually make sense with the body in this scene. I'm gonna start by cleaning up that background and just make it smoother black. So I'm just gonna grab a regular brush and I'm just gonna paint it black for the time's sake. So we're just gonna clean this up so we don't have all this distraction. We can focus on the brushes. Alright and of course if I wanted to I can extract her and I can put a solid black background behind her. So I'm just painting black behind her. This is not anything important for this particular process. Okay so I've got her standing there. First thing that I could do is I could go and find that brush that we just created to show you how I would try to make something like that work. So I'm gonna grab my brush on the left hand side and come up here and I'm going to scroll down to the bottom because when you create a new brush that's where it loads automatically is down here on the bottom. Anytime I paint with a new brush I want to do so in a new layer because I want to be able, for this project, because I want to be able to change the shape and the exposure and move it around and if you put a bunch of brushes all in one layer, if you change your mind and you want to move one, you can't. So that's why each one is going to get its own. So you might end up with quite a few. Alright so let's say in this instance I want there to be a splash off of her thigh here. I know that I want the splash to be white, clear because the water is clear. And so I am going to just on a new layer paint this brush but I don't want it to be at 100% white because later on if I decide I want to darken it down white already has no detail, it's already pure white so I can't bring it back. So what I do when I paint is instead 100% opacity or 100% flow just do a little bit less 'cause then later on if it looks too bright you can darken it. If something's pure black and you want to lighten it up there's no detail to do it. If something's pure white and you want to darken it down there's no detail to do it. So if you're painting with black or white just back it off a tiny bit. So I'm gonna do my flow at like 88%. Flow and opacity I'm going to be talking about in another class that I do. For these purposes we'll use them interchangeably. So I'm gonna just paint this splash here. Now notice that it's in a completely random place. The reason that I didn't do it over here is if you paint a brush where it hangs off of the canvas it cuts it off at the end of the canvas so if I want to move it this little flail off the end won't be there anymore. So that's why I just put it in the middle. So what I'm gonna do is I am going to select on the top left here on my move tool so that I can then click and drag and move this around. So I want it to look like maybe it's hitting her stomach or her thigh. Now when I'm on the move tool here I want to make sure that I'm clicked to show transform controls because that's what gives this bounding box that'll allow me to rotate this. So I can start to rotate it so I could maybe sit it to the angle of her thigh there. If I hold the shift key and grab one of the edges of the box I can resize it and place it on her thigh there. But one of my favorite tools to make things look more realistic is the work tool. So as I am selected here with my transformer control if I hit one of these little bounding boxes, little squares on the side, you'll see in the top right that I have the work icon. That's what that is right there. It switched between free transform and work modes. So when I hit work what it does is it brings up a grid for me where I can squish and move different parts of that layer in order to wrap better around my subject which will look more realistic. So if I needed it to better fit to look like it was bending around her thigh, see how I just kind of pushed up that corner and now where the water's hitting her matches the curve of her thigh so it's a lot more believable than it was. And so now it actually kind of looks realistic. So most of the time for using these water brushes is it's just changing the size and the direction and warp and then maybe the brightness so that it kind of makes more sense. Alright, so this was the brush that we made. I want to show you now how you can load brushes into Photoshop. So you can go online and download them. The one that I again recommend and that I'm gonna be using for this project was the one my friend Ben Shirk, I'll put his link up on my Facebook page and then I think they also put it in the chat rooms as well. What you're gonna do is you're gonna click on your brush tool and then you are going to click up where your brushes are and on the right hand side where you see that gear. It's a fly out menu. You want to click on that and you are going to scroll to load brushes. So this is if you've already gone and downloaded brushes from somewhere online. And when you download brushes they're given to you in a .abr file, Adobe brush file. So this is what we have to do, we have to go find those brushes and we hit load brushes and I already have one here. This one's water splash brush. The one that Ben that I have from Ben is pretty extensive. He has tons of them. There's water brushes, water splashes, ground splashes, he's got a whole bunch of 'em. He put a lot of effort into it. So we're gonna do this water brushes and I'm gonna hit open. And so what those will do is if I go back over here they load into the bottom of your brush pallet. So now if you look I've got tons to chose from. He has dozens and dozens of these. So for example, I'm gonna create a brand new, another layer and we are going to grab, let's see, I like, maybe I want one looking like it's coming off the side of her arm. So I'm gonna maybe have this one come off the side of the arm and so I'm gonna resize it to fit within my canvas. I'm gonna click and I can then go up to my move tool and I can try to rotate it to figure out what way it would make sense coming off the arm. So this to me, see if I can resize it. So I'm holding shift and dragging the edges and when I drag it in I'm resizing it, I'm scaling it. And to fit the arm I can rotate so when I mouse over the side I get this little rotation icon. So I'm basically just trying to make it look like it was coming off of her arm and her shoulder. Now that's kind of close. I hit enter. When I hit the return or the enter key it locks those in place and it's pretty close but this right here doesn't make sense, that little space. I want it kind of brushing down her arm. So we have the warp tool. So I can use the shortcut, command T to bring up transform controls and I can click on the warp icon up here again and then I can just click to bend it so that it fits her arm. And so it starts to make sense. So let me just zoom in so you guys can see kind of what we have going on here, both examples, cool? So you're kind of building this to look realistic. Anytime something doesn't fit, for example, this right here, this highlight doesn't make sense to me between her fingers because even if the water was there the way that it's placed it wouldn't be catching that highlight. To me it just looks out of place. You can always erase or you can also use masking. And this isn't a beginner Photoshop class but I do, I would feel remiss if I didn't touch on masking a bit. So what I'm going to do is I know that I change my mind a lot, I just do and I've accepted it about myself, but in accepting this about myself I know I have to behave in Photoshop a certain way so I can undo things later on and change my mind. So if I just go ahead and erase this 50 steps down the line if I change my mind I can't go back. So what we're going to do is we're going to add a layer mask and I'll explain what this is. So to add a layer mask, if you're in the bottom right hand corner here let me just close my library, okay, if you're in the bottom right hand corner this is the icon you're looking for. It's a rectangle with a circle in it. And when you click on it what it does is it adds this little box to the right hand side. What this lets me do is it lets me selectively hide parts of that brush stroke and it basically erases it without erasing. It just hides it. So if later on I changed my mind and I want to unhide, I can. So here's how it works. Wherever you see white, the brush or the effect next to it is visible. White means you can see it, it is revealed. But whatever I want to hide, if I grab a black brush wherever I paint with that black brush on the map, it's blacking it out, it's masking it out, it's hiding it. So wherever I paint black I can get rid of the things that don't make sense. And then maybe later on I can change my mind and say, you know what, I want a little bit of water here on the wrist so I can switch back to a white brush and wherever I paint white it'll bring that effect back. So it's just a nondestructive way so you can always change your mind. I paint with the brushes each one in its own layer so I can move it, manipulate it, change my mind and each one with its own mask so I can erase or bring it back without doing it in a destructive way. Okay, so this is the step-by-step part but for times sake I gotta go a little bit faster. So let me show you one of the other cool things that Ben has. So he has, we've got these million brushes down here. I've got water speckles. So if, maybe it would make sense if there was water maybe a little bit in the background and if you masked her out I could just have it in the background behind her, that's cool, but one of my favorite things that he has which I think is awesome, aren't actually brushes. He made dresses out of water which I think are pretty epic. So let me just show you what these kind of look like, okay? So he put the time and the effort into making these awesome templates for us to use. So I think, I think I'm gonna use this one 'cause it looks pretty awesome and pretty intense, and it's a .psd file so I'm gonna open this up in Photoshop. I'm gonna drag and drop into Photoshop. Okay, so just to look at what he gave us. This is not a brush but it doesn't mean we can't integrate it into our photograph which is what we're going to do here. So he has a couple different parts and I'm going to turn off the eyes so you can see the parts that he's got. First of all, he did a belt so that you could kind of wrap more around the subject which I thought was cool. He's got the front of the dress, this is the front of the dress, and also the back of the dress. So if you knock the subject out of the background you can actually give it depth. So I think that's pretty fantastic. Okay, so here's what we're gonna do. I've opened this up and I'm going to select these layers and I'm going to hold shift and drag and drop them onto my photograph. Okay, so this is what it's given me here. I dragged and dropped it in. And I can resize this, start to fit a little bit better. So I've got my command T or my transform controls and I can hold the corners and I can start to move it around. But what's cool is, this doesn't even remotely have to stay the same shape. I can completely change it, I can twist it. For example, I know that where the belt is I need to kind of fit around her waist so I'm kind of place it there and kind of angle it. And I also know that I don't want the blue for these. If you actually look in the groups down on the right hand side here he's got a few saturation layers so I can just turn those off. Let me just turn those off real quick. Okay, and I'm actually gonna turn off the back of the dress so I can show you what it's looking like and I'm gonna turn off the layers that I did before, so that little flash. Okay so now what I can do since this is on its own layer, this is the front of the dress here, is I can go ahead and warp this to fit perfectly. So it's the exact same thing as we did with the brush before. I've got my warp tool up here. I click on it and now I can start to bend it and fit it exactly to the thigh and I can rotate it, I can change the shape of the dress. So let's do something, I'll go like that. I might keep tweaking it a little bit. I want that line to fit perfectly on the thigh. Right there. So now it looks like it may be kind of kicked off of her foot a little bit. It fits to a line. I noticed that the belt isn't fitting correctly so let me go back up to the belt layer. I'm gonna rotate that. I've got my warp tool so I'm gonna fit that to her a little bit better. Okay, that looks cool. And then let's turn on the back of the dress 'cause I turned that off before. So what you I can do is I can mask out her legs. So we talked about layer masks. I can do the same thing. I can go ahead and add a mask, this the right one, oh no the other one. Let's add a mask here and now wherever I paint black I'm gonna grab a regular brush, I can get rid of that effect. So I could selectively paint it off to look a little more realistic. I kind of painted off her leg and I would obviously be much more precise but you guys will see what I mean. Okay so let's see the couple of changes I want to make here. And then we'll finish up this particular shot. Alright, I want to get rid of some of the dark that I put on her forehead here. Let's erase that. Okay so let me zoom out. Alright so I'm just gonna kind of cycle through and figure out what I want to fix. Okay, that background the one behind her I think needs to be shrunken just a little bit so I'm gonna bend it and shrink it in and fit it back to the leg there, okay. So looking at this there a couple things that I could do to make this look more realistic. I could go back and grab a whole bunch of his brushes and I think it would make sense to maybe have a little bit coming off the arm up here maybe, maybe a little bit coming off the shoulder. Also he's got ground splashes so it would make sense to have a little bit of water hitting the floor for a little bit of context. The other thing that I think that you'll notice is I think that the white looks too white. I think that the highlights aren't quite as bright on her as they look on the dresses so this is where you selectively lighten and darken things to try to look a little bit more realistic. So I could just grab a curve, do it a little bit darker and this is, again, since this is not a beginner I can't go through everything but I'm going through curves, I'm gonna invert it and we are going to selectively paint this darker area on. So let's just selectively darken down a few of these areas that just look a little bit too bright. I'm gonna paint that in. And of course I could lighten up some areas on her that maybe look a little bit too dark. Okay so I could keep going. My other recommendation if you are going to do something like this is there's twofold, I recommend putting a little bit of something in the background, maybe a little bit of a haze or a little bit of a splash but it looks like it's coming from behind her so it looks a little bit less like a cutout. If you add maybe a textured background it looks more like she was there instead of like it was brushes. It just tricks the mind a little bit. And the other thing that I think tricks the mind is also messing with the color a little bit. So what I'm going to do is I'm going to add a little bit of color tone to this whole photo. This is a trick for compositing is there's a bunch of different ways to trick the mind. One of them would be exposure. So for example, the whites here are a little bit too bright. Maybe way to trick it would be on her to lighten them up to match, trying to get a middle ground here. So let me lighten them up on her a little bit to match. And then of course masking it off down here. So one of the ways is exposure. One of the ways to trick the mind is contrast and another way to trick the mind is also color. So what I'm going to do is I'm gonna go down to my half moon cookie here and I'm going to go to selective color. So this is an adjustment layer that is going to allow me to add color tones to the shadows and to the highlights. And so what'll do is if your brain sees, okay, the shadows on her cheek have the same tones as the shadows in the background which have the same tones as the shadows in the splashes. Oh, it must have all been shot together. Your brain just kind of puts it together like that. So I'm gonna hit selective color and what selective color is is it allows you to go into each and every color in the photograph and then decide the distribution of color within each of those. So what I want to do is I want to go to black and I want to give a color hue, like a color shift to my black. And so if you look at this what it's saying is right now everything's zeroed out, it's all nice and even, but what I want to do is I think I want to add, I want to subtract out a little bit of yellow in the shadows so what it does is it gives you blue, the opposite of yellow here. So I could go really extreme, this is what it looks like extreme obviously, but I could just add just that little bit and then I could flip over and go to the white and maybe add a little bit of yellow. So what your brain does is it just sees this kind of color cast but it's over everything so it unifies it. I'm gonna probably go a little bit more subtle, something like that. So let's real quick just take a look at everything. I'm gonna hold the altar option key and click on the bottom layer so it'll just show you the before and after. And so this is obviously my, I don't know, 20 minute like if 20 minute version of it. You would spend more time. I'd probably fill in a little bit here, add some water on the floor, have it falling off of her arms as well. I am going to give you guys, or whoever wants this, this file, Creative Live will put up this file, if you want to experiment with this one. I'll have the links for Ben's brushes but I'll also give you the file that I created as a brush as well, a couple of those to play with and then of course you can look online and find some other water brushes as well. So that time, that's kind of the look and feel. Okay, so I'm going to save this 'cause I didn't do that yet, and we're gonna jump onto the next one. It's fun, that's super cool. I'm definitely going to work on this later and make it into something so you guys'll have to watch 'cause you know I would spend more time on it.
Class Materials
Bonus Materials with Purchase
Ratings and Reviews
Avril McPherson
Yet another fantastic course from Lindsay. She is by far my favourite photographer as well as a brilliant teacher. We are so lucky she is willing to share her brilliance )
Phyo wai Moe
Lindsay is awesome as always . I should have bought this course long ago . Its well worth of money and i recommend to people who like to start fashion shoot with cheaper option . Thank you Lindsay . As for Creative Live group , please fix the " Purple Skirt Picture " as crush or corrupted . Thanks .
user-f37802
I love Lindsay's tutorials. She speaks "our" language. She has very simple, but highly effective approach to studio set ups as well as post-processing. She is very (very) creative photographer. Highly recommend.