Finishing Your Metal: Filing the Edges
Lesson 12 from: Foundations in Metalsmithing: Statement EarringsMegan Auman
Finishing Your Metal: Filing the Edges
Lesson 12 from: Foundations in Metalsmithing: Statement EarringsMegan Auman
Lesson Info
12. Finishing Your Metal: Filing the Edges
Lessons
Prerequisite #1: Basic Metalsmithing Tools
18:10 2Project Overview: Statement Earrings
07:55 3Designing Your Statement Earrings
24:03 4Choosing the Right Metal for Your Statement Earrings
16:12 5Transferring Your Earring Design to Your Metal
10:39 6Sawing Basics: Putting the Blade in the Saw Frame
10:54 7Sawing Basics: Bench Pin Setup and Hand/Body Position when Sawing
13:04 8Troubleshooting & Student Hot Seat
10:18Drilling Holes and Cutting Interior Shapes
09:11 10Drilling Holes for Jump Rings and Ear Wires
04:22 11Proper Workflow for Cutting Out Your Statement Earrings
30:02 12Finishing Your Metal: Filing the Edges
09:46 13Finishing Your Metal: Sanding the Surface
18:40 14Finishing Your Metal: Choosing a Finish and Polishing
08:23 15Finishing Your Metal: Sealing Brass and Copper to Prevent Tarnish
05:27 16Making Jump Rings to Connect Your Metal
06:31 17Making Ear Wires
09:05 18Assembling and Evaluating Your Statement Earrings
13:34 19Alternative Step: Soldering a Post onto Your Statement Earrings
14:16 20Adjusting your Workflow for Soldering & Hot Seat
08:46 21Taking Your Earring Design to the Next Level
06:13Lesson Info
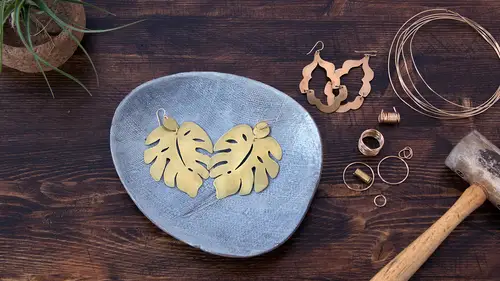
Finishing Your Metal: Filing the Edges
So, what we've covered so far is we talked about the design of your earrings, and hopefully now you've got something that you cut out, right. So, we learned how to saw, we learned how to work our jeweler's saws, we did a little troubleshooting if people were breaking a lot of blades, and now we've got something cut out, but it's still pretty rough and funky. So, now we want to actually take our metal that we've cut out and finish it and make it look like nice, pretty earrings. So, after sawing, our next step is actually going to be filing the edges. And as I mentioned in our last segment, it's really good to get as good at sawing as possible so that you can do as little filing as possible. So that means, when I say good at sawing, following your lines to the best of your ability. Someone asked me over break, do I cut right down the center of my line, generally yes, but really it doesn't matter as long as you're staying consistent. So, we just want to make sure we're following our lines...
, but inevitably you're going to have some little funky bits. There's always, usually like little, maybe little burrs where you met between two points in sawing, so you were cutting from one direction and came in from the other. You'll get little burrs, and just little kind of general irregularities in your edge. So, what we want to do is actually file to clean this up. Now, there are a lot of different types of files, but what's going to get you the most bang for your buck are to get a set of needle files. And what's great about these is that needle files come in all different shapes, so this set of 10 has a round one, a half-round one, a couple flat ones, a little triangle guy. And the reason that this is great is because it allows us to match the shape of the file to the shape of your edge. So, I'm going to show you guys what I mean just by actually coming in here and starting to file. Now, you can also get larger flat files, and larger what are called half-round files, because one side is flat and one side is round, so they're half-round. I didn't bring any of those here, because I find for something like statement earrings really your needle files are going to get you everything that you want, but I wanted to kind of mention the bigger files, because there is an important distinction. So, if you have a bigger file they are one-directional, they actually only work in kind of a pushing motion. Your needle files are actually multi-directional, so you can use these in a couple of different directions. So, what I'm going to do is I usually like to sit down first with something that's flat. And so, as a I mentioned you want to match your file shape to the curve of your metal, but if you have an exterior curve, so something that curves out, you're actually just going to use a flat file. And so, I like to just start by literally putting it on my bench pin. So, one of my biggest pet peeves when I was teaching at the university level was people would air file. They would sit out here and be like, look I'm filing. No, you're not, you're not doing anything there, because our goal is actually to remove metal to get it to be smooth, so we always want to file at our bench pin. So I'm going to sit here and even though you don't really need them, I would stick these guys on, because I've found sometimes you like lean a little close, we don't want to poke ourselves in the eye. So, what I'm going to do is I'm just going to look for any spots where my edge seems to have any kind of irregularity that I need to smooth out. And I'm just going to come in here, and even though my needles files work in both directions I generally, when I'm using this kind of outside edge, I'm going to treat this like a bigger file, where I'm just going to kind of go along, push in a nice smooth motion. And so, I'm just looking to take off any unevenness of my edge, smooth out any kind of wonkyness in my lines, and just any little burrs or points. Now, when you're doing this, what you'll notice is that even though you're smoothing out the shape of your material you're going to end up creating a little lip. So, if I run my finger over the surface there's a little lip that's happening, that's okay, that's going to happen in your filing, we're going to take that out later with sanding, but so I'm just going to come in here I'm going to kind of go around. You can see where I got this really little funky bit here. So, I'm just going to go around and clean up any imperfections. You can see I did a pretty good job of sawing this, so it's not so bad, but then I'll come in and I want to do the same thing with my interior shapes. And so, here's where I might have to get a little bit creative in finding a shape that matches. So, since I've got some points I'm going to look for say my needle file, and this is where, again, we can use these multi-directionally. So, if I've got a corner that I need to clean out I might come in here with my needle file and just sort of clean these out, mine actually look pretty good. So I'm going to do a little bit of cleaning here. And again, these are actually exterior curves, so I can come back in here with my flat file. And my goal here, again, is really just to like clean everything up. This is why it's a good idea to wear your safety glasses, because I've seen people who will like, I'm gonna lean over here real good, right, so this way we're nice and safe. So, I'm just gonna get any kind of edges, any curves. If I had something that was an interior curve, which of course I have no shape that has that here. Let me pull out our little sample here. So, if I have something where it's got an interior shape, like this circle here that I need to clean up, or even this little arc that we created, that's where I would go in with say a round file, or this is always the trick is which one is my half-round, there it is. So, I could go in here with, again, my half-round. I'm looking for something that closely matches the shape. So, I could come in here with this little round guy, and clean up my circle, and you want to try to avoid doing what I just did there, which was drag the tip across and create a scratch, because now I have to sand that out. (filing) So, I'll just clean up my circle, sometimes it can be really helpful too, to flip it over and look at it from the backside, especially if you've still got like Sharpie markings on here. Because I'm like, oh that looks fine, and then you flip it over, and you're like, that's not really a circle. So, get in there, and kind of clean that up. Megan, quick question. Yes. What's your goal on the, aesthetically on the edges, like how round do you go. So we are not doing any kind of rounding of the edge with our file, so if you notice when I'm holding this here, this is completely parallel to this edge. I'm not doing this motion, I'm just doing this motion. So, my goal is not to round this way, it's actually just to take out any like wonkyness in the shape of that. That's a good question. So yeah, I'm not trying to kind of do any rounding or anything like that, I'm just trying to kind of clean that up. So, I'll just go through look for any kind of irregularities, imperfections, things like that and file, and again if you have gotten your cuts in there nice and even this process of filing should not take you very long. So that's our first step, is that we'll go ahead and file. Now, we can start to smooth edges and remove burrs, and like I said I don't like to file around my edge, to do that, because I find that generally what happens is people don't end up getting like a nice edge. They kind of end up chewing up their edge when they're trying to round it. So, what I'll do in order to take off now this burr that I have along my edge, is I'm going to switch to some sandpaper. So, sandpaper comes in a bunch of different grits, and we're going to talk more about that in a minute, but just to kind of smooth my edges I'm going to pick a pretty rough grit, this is 150. And I'm just going to take a little piece of sandpaper here, and I'm just going to go ahead, and so I'll do two things now. I'm just going to go across my edge in kind of the same way I did with the file, just to sort of smooth that out and take out file marks. (sanding) So, I'm just going to go around my edges, and just give that a nice little thing, and now I want to go ahead and just take that burr off. Just by hitting this on here, and this is literally one of those things that you're going to end up doing by feel, right, so it's pretty hard to see like burr, no burr, there's really not much difference, right. This has got a burr, this doesn't, its' really all about how you can feel it, because you want to be able to run your finger over, so I would say, in kind of answer to that question, it's not actually an aesthetic thing, its really more of a tactile thing that you're looking for. In terms of just kind of getting your edges, and some of this will also come out in our next step, which is really sanding our surface. But if you know you've got a pretty good burr on here, I'll just kind of hit that. The same thing if you've got any kind of burr from your drill holes for your jump rings or ear wires, you can just kind of hit that with a little bit of sandpaper that way as well. So, really our goal here is just to take that burr down, and usually in doing this step, so I'll file, I'll take my burr down, and then you can kind of hold it up and see did you miss anything in the shape. Is there any kind of irregularity in here. And if there is then you can go back with the file and sort of repeat that process.
Class Materials
Free Bonus Material
Bonus Materials with Purchase
Ratings and Reviews
user 1398976626171314
One of the most special things about Megan, is that though she is a creative, she is extremely good at business. Her organized way of thinking and presenting material, and her genuine joy when empowering her students with the tools needed to be successful, is charming and so much fun. Somehow there is such seamlessness and flow to her class structure and explanations, that I can absorb what she says and easily retain it. I really can start a jewelry line just with this class. She is amazing and LOVE her style!!!
user-172aa6
I really enjoyed this class! Megan provides a great foundation for using metal sheets to design/make jewelry and using wire to make unique findings. This was a great class for learning the fundamentals and sparking inspiration for new projects
Vernell Bevelander
I LOVED this class! Megan is such a detailed teacher. She leaves no stone unturned. So much fun! Can't wait for my next class!