Drilling Holes Cutting Interior Shapes And Finishing Your Clasp
Lesson 13 from: Foundations in Metalsmithing: BraceletsMegan Auman
Drilling Holes Cutting Interior Shapes And Finishing Your Clasp
Lesson 13 from: Foundations in Metalsmithing: BraceletsMegan Auman
Lesson Info
13. Drilling Holes Cutting Interior Shapes And Finishing Your Clasp
Lessons
Prerequisite #1: Basic Metalsmithing Tools
18:08 2Prerequisite #2: Tools for Soldering
14:21 3Prerequisite #3: Soldering Basics
21:14 4Class Introduction
09:39 5Design Considerations for Bracelets
10:33 6Choosing Your Materials
16:12 7Sawing Bracelet Blanks
26:47 8Forming Cuff Bracelets in Wire and Sheet
21:41Determining the Length of a Riveted Bangle
08:11 10Creating a Standard Rivet
16:26 11Creating a Tube Rivet
09:25 12Making a Hinged Bracelet
21:02 13Drilling Holes Cutting Interior Shapes And Finishing Your Clasp
10:33 14Soldering A Basic Round Or Oval Wire Bangle
28:56 15Soldering Other Shaped Wire Bangles
35:17 16Soldering Wire to Sheet to Create Bangles
08:44 17Soldering a Basic Round or Oval Bangle from Sheet
14:09 18Soldering Other Shaped Sheet Bangles
05:59 19Pickling Metal After Soldering
05:42 20Filing, Sanding, and Basic Finishing of Bracelets
11:50 21Patinas: Achieving a Dark Finish with Liver of Sulfur
08:37 22Patinas: Creating a Heat Patina
05:21 23Patinas: Green and Blue Liquid Patinas
08:56 24Sealing and Finishing Patinas
08:35 25Taking Your Bracelet Designs to the Next Level
03:45Lesson Info
Drilling Holes Cutting Interior Shapes And Finishing Your Clasp
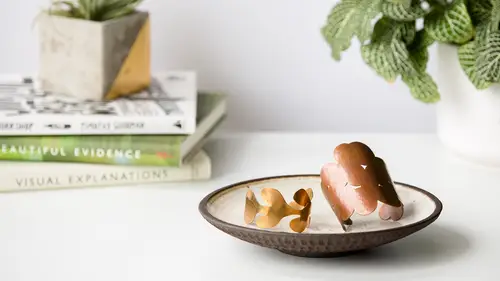
The thing that we haven't talked about yet in terms of you actually making this is cutting out interior shapes. So obviously part of this requires that we cut out the slots that our tabs for our hinges are gonna get folded into. So the exterior shapes, whether you're doing this, or whether you're doing the more complicated, you know, Wonder Woman cuff. Those get cut out just the way we talked about in our previous segment. But now we need to cut out these interior shapes. So the way you're gonna cut an interior shape is first we need a pilot hole to put our saw blade through, so same thing as we've been talking about with drilling this whole time, you have two choices. You can use a drill bit and our flex shaft, dremel, rotary tool; anything that you can drill with. Or you can use our hole punch pliers, which I'm gonna use because it's faster. Now, that said, I wanna show you guys kind of where I'm cutting this, so if I'm doing this here, I'm not gonna put the hole like right in the ce...
nter of this, because if this was a bigger shape that I was cutting out, I would have to saw really far to the edge. So I'm gonna put my holes kind of... These are pretty small spaces, but I'm gonna keep them kind of close to an edge so that I don't have to saw so far. So let's just go ahead and put some holes in here. Alright, so now what I'll do is I need to go ahead and actually thread this onto my saw. So you can see I opened up the bottom here, and I'm gonna go ahead and thread this on. The most challenging thing when you're cutting out these interior shapes is getting the tension right. I'm trying to put it in the hole that I actually didn't punch. The most challenging thing is getting the tension right with this on here. So I'm gonna slide it all the way to the end so that it's not, like, pulling down my blade, right? So I've got this on here. Can I have you hold my table again one more time? Which might actually turn into two more times. Alright, so then I'm gonna go ahead, put this back in here, and then just like before, I'm gonna put a little swipe of Bur-Life on here. And now I can come back to my bench pin. And now I can cut out this interior shape. (saw cutting) And then all the rules that we talked about with sawing still apply. I'm still gonna keep my fingers out of the line of my saw blade. If I've got a corner to cut like this I'm gonna keep moving my metal nice and fast while I keep my saw blade nice and steady. And you can see how cutting some of this out, I mean, you do have to be careful with thinking about where you're putting your fingers, that they're always staying behind. And, you know, as it was asked earlier, it is okay to cut slowly while you kind of figure that out. And then eventually you're gonna match back up and it's just gonna fall away. And now just go ahead and unhook the bottom and do that. Alright, I'm gonna cut this other one out really quick, because it's gonna make the next step of our demo really easy. Alright, there we go. So now I'm just gonna go ahead, and you can see as you're looking at this that the side where I'm gonna put the clasp is definitely bigger than the side where I'm gonna put the hinge. Because, again, the hinge, we don't need as much movement, or as the clasp. I want to make it a little bit easier for people to actually put the bracelet on. (saw cutting) Oh, you see what happened there? So we're just gonna finagle that around. I ran out of real estate. Did everyone kinda catch what happened there? Right, I hit the back end and I just freelanced a little. Alright, so now that I've got that cut off, I can go ahead and now I'll take off this, and this is one of those, so, I mentioned this in a previous class. It's ideal that you can get your rubber cemented tracing paper off as soon as possible, because the longer you leave this on here, the more likely it's gonna wanna leave a residue. Luckily I prepped this not too long before here, so it came off fairly easily, but now I'll go ahead and take that off. So then what we're gonna do is actually bend this just like we've been bending everything else. So just bend this around, put that on there. These are basically like child-sized bracelets. I don't know why I made these samples so small. So I've gone ahead got this bend, but now I still have to bend my tabs. Let's see where we are here. Alright, so, first I want to do the one for the hinge, and what I recommend is, I don't actually know if on this one I had a game where I thought one was the hinge and one was the clasp, so I'm just going to make a judgment call on this. What you're gonna do is you're gonna start by bending it back 90 degrees with some flat pliers. So I'm just gonna go ahead and bend this. That way it makes my loop a little crisper instead of just starting with the loop. Then I'll go ahead and take my round nose pliers and actually bend my loop. And then if it turns out this 90 degrees was a little much, I can kind of finagle this whole thing around where I need it. So what I like to do is bend this and get the shape first. Then I'll go ahead, open it back up. Probably have to open it up a little bit more than that and slide this guy on. So obviously, if I were doing something like this cuff bracelet that has three, I would bend all three first, and then put it together and close them. So then I can just go ahead and close that here. So now I've got my hinge side done, and then for the clasp, I don't have to bend that. Let me look at our finished one here. I don't actually have to bend that one up. Instead I'm gonna actually bend it down a little bit more, so I'm gonna start by bending it down. So I'm actually bending it the opposite direction that we bent the hinge, then I'm gonna bend it back up towards itself if I can get my pliers going. So I'm gonna go ahead and bend it up towards itself like this, and then the last thing that I do on this is actually bend the end up a little bit. I give it a little curl. And that is what makes it easier. I'm gonna put that down. See if we can put it under there. So you see how it's got that little shape to it? That little hook up at the end is what makes it easier to actually get it on because it kinda wants to slide in. But then it holds it in place. So if I did this right, and sometimes you do this and then have to finagle, but you guys hear it kind of has that, the satisfying click, right? That's what we want. So you might have to finagle it a little bit to get it work, to get it to go together, but that's basically what you're doing. And then obviously if you've got a longer shape you might need more hinges, more clasps, more tabs. But really what's nice about this is the sky is the limit in terms of what you can create, these shapes, and this is a really nice, simple hinge that's gonna give you a nice wide bracelet that doesn't have to be a bangle or a cuff. And again, as I kind of alluded to, you know, this is a surface that now you can do a lot of things to. So, before you cut out a pattern, you could do some piercing in here, right? So we just learned how to cut out those interior shapes. So you could pierce out anything you wanted in here that you wanna do before you bend, obviously. But now that we've got this bent, we could actually take this. We could put a hammer texture on it. I would just avoid obviously your clasp hinge area, but we could put a hammer texture on this. We could do some cool patinas to it, which we're gonna get to a little later today. So there's a lot of options that you can do with, you know, kind of these big surface areas. Any other questions about that? Question. From the Internet, how do you test the clasp? Like, is there a way to test it? Like, open it up and close it? Do you put it on the mandrel/ So I'm not exactly sure what they mean by test, as in just to see if it's working? Yeah. Yeah. So really, just actually doing what I'm doing, so can you open it and close it easily? And then the best way to test it is just to see if you can put it on. Try it on. Yeah, so in this case, I feel like I could see I'm struggling a little, so I'm just gonna open it up. And now I can pop it on and it's fine. So pretty much, and then the same thing, like, is it easy to get off? Do I have to change the angle a little bit? Like, that seems a little bit funky, so. And that's where the question came from. Like, how you might do some micro-adjustments to sort of fix it a little bit. So in this case, what I think is happening is it needs to actually be angled down just a little bit more so that initial bend where we bent it down, it feels like it has to come down just a little bit more in order to make it easy for it to come off. So I'll just take it off and kind of play with it like that. And while I know the folks out there are encouraged to make their own design choices, do you prefer 22 gauge for this particular type of style? Yeah. So for this, I like something a little bit thinner. Because it's a little bit easier to make these, so I would go probably 20 or 22. I wouldn't go as thin as 24, especially on something this big. It's just a little... I would worry that these hinges are gonna break over time. But I probably wouldn't go anything thicker than 20, so I would do 20 or, I believe this is... I keep saying "I believe" as if I don't have a sheet and wire gauge here. I'll tell you what it is. I'm like, I believe it's... Oh, it's 20 gauge. So I think in this, oh, nope, it's 22. Yeah, it's 22. So I think that's a pretty good gauge for this.
Class Materials
Bonus Materials
Bonus Materials with Purchase
Ratings and Reviews
user-d7f7ae
This is a great addition to Megan's metalsmithing series. She makes the topic really approachable. Bonus that metal patinas were added in to the class. I loved the class!
a Creativelive Student
I really enjoyed this class! It was very informative and gave me a lot of ideas for expanding a jewelry line to include a variety of bracelets and finishes.