Lighting: Low Key Male And Female (contains nudity)
Lesson 9 from: Fine Art Nude PhotographyLindsay Adler
Lighting: Low Key Male And Female (contains nudity)
Lesson 9 from: Fine Art Nude PhotographyLindsay Adler
Lesson Info
9. Lighting: Low Key Male And Female (contains nudity)
Lessons
Class Introduction
14:28 2Etiquette and Preparation
30:21 3Fine Art Nude Posing Essentials
24:44 4Posing to Accentuate Shape (contains nudity)
31:24 5Classic Poses for Nude Male (contains nudity)
15:35 6Classic Poses for Nude Female (contains nudity)
15:12 7Sculpting with Light and Shadow
18:05 8Lighting: Definition and Separation
20:54Lighting: Low Key Male And Female (contains nudity)
28:22 10Lighting: High Key Female (contains nudity)
14:45 11Patterns and Projection (contains nudity)
19:31 12Nude as Fine Art (contains nudity)
24:32 13Nude as Creative Canvas: Male Statue
17:23 14Nude as Creative Canvas: Female Statue
11:25 15Nude as Creative Canvas: Splatter Paint Torso
16:30Lesson Info
Lighting: Low Key Male And Female (contains nudity)
We've already talked about how light is used to shape the nude form. Shadows sculpt and add dimension. Highlights separate and define. Now later on you'll see that posing and lighting work in tandem. But right now what I want to do is run through some of the things we've already talked out. But I want you to see the flow of things. I'm gonna move the lights around, change modifiers, add reflectors, add multiple lights. And so you're gonna see 10 or so different light positions, different light setups that give you drastically different results, but that are fantastic for essential nude photography. So these are the setups that through these I use them over and over again any time I'm photographing a fine-art nude. They're not overly complicated, but they definitely flatter the form. So we're gonna start simple and keep building. I'll show you both high key, low key, single light, and multiple light setup without anything getting too extravagant. The extravagance we're gonna save for ou...
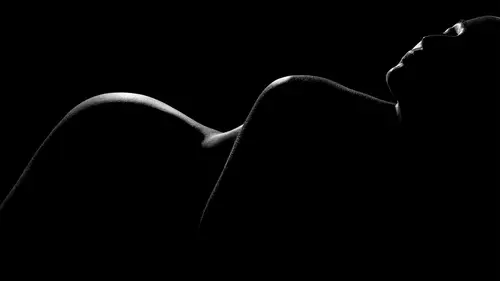
r creative lighting section. All right, would you come up here for me? We're gonna set up the very basic. Thank you Christy. Thank you. All right. Okay, so our very first lighting setup is a single light, and the light that I have here is a three-foot octabox. An octabox would work; you could also use a beauty dish, possibly with diffusion, for something very similar. Or you could use an umbrella. This is going to give you a similar effect, but the three-foot octa here is going to be the softest. Now, just as a note on this, if you have your three-foot octa really far away, the further it is from your subject, it starts to become harder light, not as flattering on the skin. The closer you can bring it, if you bring it about that range, maybe a little bit closer, it's gonna be a little bit more wrapping light. A little bit softer. Now this isn't specifically a lighting class. But if you wanna learn more about this, I have a Studio Lighting 101 class where I talk all about the relative distances and hardness or softness of the light, where I get into this more in depth. So just so you know, something about like this. Maybe take one step closer. About there would be about the distance that I would recommend for this setup. So, let's get started. You're gonna see 10 varieties of ways you can light the fine-art nude. So what I'm gonna have do is real quick let's strike a base pose. Can you tuck that knee over? Perfect. So I'm picking a pose that's just easy for her to hold as I move the lights around, but still creates a nice curve. All right, so the first thing is I have this three-foot octa off to the left-hand side, kind of a front 45. And the reason I have it there is it's raking across her form. So you'll see that it carves across her stomach and makes it look firmer and tighter; It makes her chest look fuller. If I had the light to the front, it is very flat. There isn't a lot of dimension. Remember, shadows create dimension. The further I have the light off to the side, the more shadows there will be. All right, perfect just like that. (shutter snaps) Great, so I love the shape that it gives me. Okay, that's super basic, but guess what? It looks beautiful as just an essential one-light setup. But let's move the light a little bit further behind. If you wanna help me John, because I'm gonna knock something over for sure. Thank you. All right so what we're gonna do is we're gonna move the light to something called a short-light position, moving the light further off to the side even more. What it does is it adds more shadow to the form. More dimension to the form, and more drama. More shadows creates more drama. So that looks beautiful; it's the same pose. And then all I want you to do is just turn your torso back towards the light just a little bit. Beautiful. (shutter snaps) Great. And I'm gonna have you turn your body that way this time. And I'm gonna have you pop up the other knee. Great. So what I'm gonna have her do, is I'm gonna have her turn her body towards the light and then rotate your torso back towards me a little bit. The light will be raking across. Beautiful. And turn your chin towards the light in this instance. And I'm going to have you hide that back right arm. Beautiful, just like that. (shutter snaps) So this is something called short light, meaning the shadow side of the face is towards the camera. And you can see that in this shot. Now, it looks really nice. There's a lot of dimension; it wraps around her body. That's fine; there's nothing wrong with that light. However, I don't see the back curve of her body. So this is an instance where we use shadows to sculpt. But we perhaps need a highlight to separate and define. So there's a couple of different ways we can use highlights to separate and define. First of all let's, can you strike that pose again? I'm just gonna build this real quick. Great (shutter snaps). Let's make sure. All right perfect. So the first thing I'm gonna do is, can we bring that in as fill? Fill light means it's going to catch the light, bounce, and we have a silver reflector, and it's going to fill in the shadow side of her body. So basically it makes the shadows not so dark. That is one way to use that highlight so that you can see the curve of her lower back that you're losing in this short-light shot. All right. (shutter snaps) So you'll see now, I've got a nice bit of separation. And now I'm seeing that front curve of her body and her lower back. That is fill light, so it's filling in the shadows. But, if we take the light around behind, in this case again, it's not a light, this is actually a silver reflector, what we're going to do is we are going to create a rim light. That backward angle, the light is just going to carve out the outside of her body. So it's a little bit different. Instead of filling in the shadows, it creates a little bit more of a separation carving out the shape of her form. So let's test that again. (shutter snaps) Beautiful. So you'll see that the curve on her lower back, on her bottom, on her arm, and so you're not losing that beautiful curve if our shot is based upon curve. All right, so let me get one more shot. Pop that up, perfect. Great, and hide your right arm for me. Beautiful. (shutter snaps) I love that separation, that's beautiful. So, we've created a rim light by using a silver reflector that catches the main light. Which means, it kind of looks like I have a two-light setup, but really I only require that one octabox. I love it because the shadows sculpt in short light, but that back reflector gives me a highlight that separates and defines. Now, if you have other lights, you can actually add another rim. Instead of having to kind of decide the shape and the direction based on the reflector, you can add another light modifier. There are many different light modifiers you could use. Again, in my other studio lighting classes I get into it more in depth. But in this case I'm going to use a gritted strip softbox. And so the strip softbox is going to allow me to control the direction, and the power, and the narrowness of the beam. So if I bring that light further out to the side, the highlight wraps around more. If I have it back at the angle around where John has it there, it's going to give me a nice narrow highlight. Which is great, because if I wanna pump up the power, make it more defined, I can. Or if I want it to be just really, really subtle I can dial the power down. So same pose for me. Great. Beautiful. (shutter snaps) That looks great. I'm gonna compare those two shots. So what's interesting is if I compare the shot with the silver reflector to this shot, which is a gritted strip softbox, really the gritted strip is just a little bit brighter and little bit more focused. But they are quite similar. What I'm gonna do is I'm gonna make that just a little bit narrower. Can you bring it in just a little bit? I'm gonna narrow that beam. By bringing it in and behind her it's going to give that highlight something that's just a little bit more drawn on, like something a little bit narrower. And then angle it back towards me just a bit. I'll test this (shutter snaps). And then angle it back the way you had it. (shutter snaps) Yeah, something like that. So it keeps it really subtle. And in this case, it's bright, but it's just drawing attention where I want it to be. So when I'm looking at these, what I see is the shadow sculpt, those back rim lights, and then either the reflector or the strip softbox, carves out so I can see the curve of her lower back and her bottom, which looks great. But I'm not limited to those ways of adding a highlight. The other solution I have is I can light the background. So instead of having to actually light her, which it's, I mean I love it, but maybe it's a little bit too strong, you want something more subtle. What we're going to do in this instance is we're gonna add a light to the background. And what we have here is a 10-degree grid. A grid is going to focus a beam of light. So I get a little circle. A little halo on the background. Now, if I just take the shot without the grid, what's going to happen, and without any light on, what's going to happen is just, I don't see the curve of her back. So let me do that one more time. Again, everything falls to shadow. (shutter snaps) I don't have my rim light on. I don't have a reflector; I don't have anything. So it falls to black. But, when we add the grid, it's gonna put that little bit of separation. And now that contrast will allow me to see her form. Beautiful. (shutter snaps) Great. So notice how this perhaps is maybe a little bit more subtle. I see the curve of her lower back and her bottom, but it's not like a rim light which is illuminating them, which draws more attention. So this might be for the type of shot you're going for, a little bit more painterly, a little more subtle. Can you angle it down just a little bit? I want that highlight to be just a little bit more on her bottom. Right now it's focused more on her upper back, or her mid back. Great. (shutter snaps) Perfect, perfect. Okay now hide your right arm, great. And turn your torso towards me just a little, great. (shutter snaps) I love that; very elegant, very painterly. So all of those things are ways to create separation and to use shadows to sculpt, highlights to define. Okay, well first of all just so you know, even though we added those rims and all that separation, it's fine if you want the body to disappear into shadow. Sometimes that can be very elegant and very dramatic. So this is what we're going to do in this next shot. We're going to turn on a single rim light, the strip softbox that we have here, and we're just going to use that for a figure study. Just focusing on the shape of her form. Part of her body will fall to shadow, but it's beautiful and it's dramatic. So we're gonna give that a try; I'm gonna turn off our octabox. And I can also move that out if you'd like. Cool. Now what I have here is we have strip softboxes. If you've seen me teach in other studio lighting classes, one of the other tools I use is something called "barn doors." So barn doors allow you to open and close the leaves on it, so that I can have a very, very narrow beam of light. I do this very often. And what's nice, and one of the things you could do at home, is if you don't have multiple strip softboxes, or you don't have strip softboxes at all, You can use something called "Cinefoil," which is black tinfoil. And you could put it on the front of your light to create barn doors. And so if you're looking for just a sliver of light that separates out your subject, highlights that form, creating your own barn doors with Cinefoil might be a great option. And you can get Cinefoil from most camera shops, things like B&H. But you can also get it at theater supply stores, things like that, they're going to have it. Again, it's thick black tinfoil. What's key about it is it doesn't catch things on fire. So using something like gaffer's tape and Cinefoil is the better option than to use something like duct tape and cardboard. That would not be the direction to go. All right so what we're gonna do is we're gonna do a one-light setup here. And I'm going to build. Which side do you want it on? That side's great. So we're gonna turn on this back strip softbox. These ones here I believe are my one by threes right? One by four. That's a one by four, okay. So we have one by fours here. They do make them larger, they have one by sixes. And that gives you a little bit more even illumination head to toe, but it's going to work perfectly for her. So I'm going to have you step up just a little bit farther forward, great. And turn your torso to the side, just like you were doing a second ago. Great. And arch your chest up just a little bit. Perfect. And what I'm having her do is pull up the top of her head. Sometimes when you have people arch, they stick their stomach out. So it's more of a pulling up with the chest instead of sticking out the stomach; you just have to watch for that. She's great, so no further direction needed for her. So what I've got here is extremely short light. Light that's really far from behind. And it's a narrow source of light. So that narrow beam of light, it creates beautiful highlights on her form, which is fantastic for figure study. This is probably my first go-to shot any time I do a fine-art nude, is just this study of the form. So great. (shutter snaps) Oh, it's so pretty. Okay, chin down just a little. (shutter snaps) Great. I'm gonna have you hide your hand. That hand, yeah, just tuck it behind. I won't even see it. Great, beautiful. And turn your body a tiny bit to the right, just a little. Okay, so what I'm doing here, is the reason I'm saying this is I can see how the light is falling on her form. I have to have modeling lights. If you're doing this, use your modeling lights. So if you're in a room with a lot of windows or overhead light turn them off, so you can actually see what's happening. As she turned her torso back to me, bring it back to me, I lost the light on her form. It's completely gone. All I have is the side of her body and just a little bit of her chest. But when I look at my modeling light, can you turn back to the right? I can see right, a little bit more, right there when it catches both sides of her chest, and that beautiful line up her stomach. I love it; such, gorgeous. (shutter snaps) Great. Beautiful. And chin down on this one (shutter snaps). Great. And one more, turn your chest just a little bit to the right. Right there, good. And if I can move around to work with the light, and the form; it's great. (shutter snaps) Okay, so again, this would be like my go-to figure study. I start here, strip softbox. Make sure your light isn't too low. Because if it's low it doesn't carve out and give as much dimension to the form. It needs to be about even with shoulder level. Or a little bit higher. Okay so that's with one strip softbox. But the other thing I like to do is add a second. So if you'll add a second, what we're gonna do is we're gonna put it on the other side, equal distant. So this equidistance on either side, it's going to carve her out. So in this shot I just see the form of her chest. But now I can use a second curve, a second light, so I can see her bottom and her lower back. So, same pose for me. Great. And I'm gonna have you keep your right arm tight to the side. And bring it forward just a little bit. And a little bit more, a little bit more ... Right there; good, perfect. So now ... (shutter snaps) That is beautiful. And I'm gonna have you take your right arm and keep it tight to the side; I'm gonna hide it. Yeah, good, right there. Beautiful. (shutter snaps) I love that. So it looks like she's sketched in light. I can see the curves of her arm, her bottom, her chest, her profile. It looks stunning; I love it. And also, now this is a compliment, if you're looking at her, I'm really short. And she's actually a little shorter than me, but what you'll notice is that my low camera angle, if you see me bending down at this low angle, that lower angle makes her look very tall. It's all part of perspective. Now if I were really really close to her and low, it's gonna make her thigh look bigger. So I've backed up and gotten low, and it makes her look endlessly tall. And beautiful long lines (shutter snaps). And hide that right hand, perfect. (shutter snaps) And turn your chest towards me just a little right there. (shutter snaps) Beautiful. And turn your chin to your right. So want to catch the light on her profile. (shutter snaps) I love it. This would be my second go-to shot, because every form looks beautiful in this. Just two beautiful lines carving out the body. So from there, we're going to build and try adding another main light to the shot. Instead of just the silhouetted double-rim light. All right now, everything I've been showing so far has been on the female nude form which is great; it has a lot of shape. But you absolutely can use all of these lighting setups that I've shown you so far for photographing a male nude form. You're just paying attention to slightly different things. You're looking at the shape of the body, and the musculature instead of looking at curves. It's just where you're placing the attention both in the pose and the placement of light. So I'm gonna bring John out so you can see how these two rim lights can be used to photograph a male form. So again, keep your brain thinking, "Right, I can use these setups, "but I just have to slightly vary the pose "to work with what I have there, "to emphasize something different." All right John, so you want to pop out there for me. Okay. Great, and I'm going to, I think I'm going to have you do the knee-up pose. Okay. Great, all right. And then turn your torso back towards me. Okay, so what I'm going to look for, and it's a little bit challenging here, because we do have the lights on me, so it's making it a little bit difficult for me to see the modeling light. But, I'm looking at that back rim light to carve him out. I may need to raise it; we'll see. Because notice, the heights have gotten different. And so if I want to see that highlight on the top of his shoulder, now the light is a little bit too low. So we may raise that. For the second light, on the right-hand side, what I want, is I want him to turn his torso back to me, and I want that light to rake across his stomach and his chest, because it gives it a little bit more definition and more form. So we're going to give that a test, and see if I need to modify my lights, especially considering I can't totally see the modeling light. Okay, so turn your chest back towards me. Great. (shutter snaps) Let's see; that's looking pretty good. So give me the more triangular shape. Good, perfect. I may have you drop the left arm. Yeah, let's try that. Let's see ... (shutter snaps) (Assistant mumbles) I saw that. Okay good, now turn your head towards your left, good. And bring your shoulders, kind of turn them back like this. Yeah, perfect; right there, good. (shutter snaps) Great, now just a little bit further forward, John. So what I'm looking at is I want the light to wrap across his stomach just a bit more, but I like the pose I had there, because shoulders determine broadness. So when he was turned away, he looked a little bit smaller. I've turned his shoulders back, but when he did so, it turned him out of the light. So we've moved the light up to the side so it wraps around more. It'll be narrower behind, but it'll wrap around his torso more so we bring it to the front. So, same pose ... Exactly (shutter snaps). Great. Okay, can I have it a little bit higher? Yeah. So, same thing, he's a little bit taller, and I am seeing his profile in this, so I do want the light to be coming from a downward angle, slightly. I think that should be great. Okay, perfect. Lean your chest towards me a little. (shutter snaps) Great. And then lean even more, just a little more. Good, and then chin that way. (shutter snaps) I think that's perfect. Great, that looks great. So what I'm seeing (shutter snaps) is I see definition on his lower back, on his arm. I'm also seeing his profile, but then it rakes across his stomach and it gives a lot of nice muscle definition. So we'll shoot two more shots of that, and then we're going to switch this up. One more shot there, great. And hand just a little lower. Perfect, lean your chest forward, great. (shutter snaps) And chin to your left (shutter snaps). And I'm going to try one, hide your hand behind ... Good. And try to put your, up on your toe a little bit, with that front knee. So just kind of pop it up just a little. Yeah, good; and chest towards me a little more, turn, yeah. (shutter snaps) And then bring your arm back out. Great, a little bit further ... Like touch your knee, let's say. (shutter snaps) Good, perfect (shutter snaps). Okay. That looks great (shutter snaps). Perfect, okay. So what we're going to do now, is we are going to add another light. And so this is if you're not just trying to carve out the side of the form, but you also what to show and illuminate the front of the form. So what we're going to do is we're going to add that octabox back in. For the sake of time and ease, we're going to sick with an octabox, but this might be an instance where I add a beauty dish, maybe a beauty dish with a grid so the light falls off dramatically. What this main light's going to do, is we're going to raise it up high and we'll see ... Oh, be happy to help, John. Yeah, where do you want it? I'm going to have it up as high as possible, with a downward angle. So the reason that I'm saying this is, we've already taken a look at how we can move the light from side to side, and also up and down to add more shadows and dimension. So in this case, if I bring the light to the front and raise it up really high, what it does is it carves out the muscles that are there, because it puts shadows underneath them, on the abs, on the chest, on the arms, so it gives a little bit more definition. For a woman, it will make her chest look fuller, so it'll have different effects on a man to a woman, but it's just knowing what that is. So raising that light up really high gives me drama, and then I have those back two rim lights to carve my subject out. Okay, so same pose for me. And let me know ... By the way if you do this, if you are elevating a light up high, you definitely want to have your stands sandbagged, which is what he has here, because you're putting it out on a boom arm, or you're raising it up high and it's unstable and you obviously don't want it to fall on your subject. The boom arm that I use in my studio, I usually have it on a C-stand, and it's called an "Avenger D600." So it's a boom arm, and then you want to make sure you have, probably multiple sandbags if you're doing what we're doing here, kind of booming it straight out over. All right, let me know if I can help at all. I'm more than happy to; do we need more Stinger slack? Figuring out how it was positioned earlier on-- It probably needs a foot and a half this way. So we're going to put it basically right over his head. And what I'm going to do, is I'm going to quicky turn off those back two lights, because I like to be able to see one light at a time, like what is each light doing. You see that when I shoot; I build one then the next and the next. So let me just pop off this backlight (light beeps). Great (shutter snaps). Perfect; it was just a little bit bright, but I'm going to turn it down, it's okay (shutter snaps). Love it, okay great. So pop up your toe just a tiny bit more. Great, turn your torso towards me, just like that; that is fantastic (shutter snaps). So, if I look at this shot, you'll see that it carves out his abs, and it carves out both his shoulders and his biceps. So it adds definition throughout all of the muscles. It looks great, so, if you can do something to get the light from above, that carves out muscles; it looks beautiful. So, that's a shot you can do on its own; it doesn't even need additional lights. But, let's take a look if we add those back two rim lights in. So, same pose for me. Great, turn back this way, hand a little lower. Great, up on toe. Perfect, great (shutter snaps). Perfect, look you chin that way for me. Keep going a little further, a little further ... (shutter snaps) Perfect. So I've got that really nice, dramatic light from above, and those two rim lights that carve him out. I think, I just need those rims to be a teeny bit brighter. I'm going to just test this (shutter snaps). So as I'm looking at it, I want them to pop out a little bit more; I want a little bit more definition. So right now, the overhead light, since it's kind of flat on, even though it's above, it's kind of from the front, it makes it hard to see the rim lights. The reason is, is rim lights are going to show up most against the shadow area. So basically, if I was lit from here, and there's a shadow on this side, when you add a rim on the shadow side, that's when you see it. If I add a rim on the side that already has the light it's hard to see. So what I'm doing is I'm pumping up those two side lights. Same thing for me, and that hand a little lower. Great, and up on toe, lean forward a little. (shutter snaps) Great. Perfect, okay great that looks wonderful (shutter snaps). And chin hard to your left. Great (shutter snaps). And now I'm going to do one where you look your chin this way and kind of up towards the light. Good, beautiful (shutter snaps). Love it (shutter snaps). Great. So, you've seen it here with a male nude form, let's just finish up this lighting setup by taking a look at the female nude form. Okay, so I'm going to invite Christy back on so I can get a shot to show you with the female form what that high light does to carve out the form and those back two rim lights to just give it a little bit more definition to the side of her body. So if you want to come out here. Let me grab this apple box; I don't need it. Thank you. All right, let's do the pose where you're faced slightly away from me with that front knee up; yeah, good. Perfect; and bring the arm down just a little bit. And bend that back arm a tiny bit more. I'm going to go lower the back lights. Oh right, and so, we're lowering the lights because our height has changed. So let me just test this. So turn your shoulders away from me a tiny bit more. Great, give it a test (shutter snaps). Looking good (shutter snaps). Beautiful, perfect. Can you bring in that back rim light just a little bit closer? Because of where I've positioned her, it probably just needs to come a little bit more behind her there, because it's going to give a more crisp rim light. Perfect, so same pose, great. (shutter snaps) And then, what's the power on that? Six-nine. Pump it up a little bit for me. We just want to make it a little brighter. And then angle it this way a little more. Yeah, right there, perfect (shutter snaps). So I'm watching when I could see it on her chest. It's beautiful, perfect. (shutter snaps) And let me do one more shot; face me straight on, and give me the curve with the arm. Perfect; and try standing where your hands are both up, looking at the light. Because the light is so high up, you'll see this in the shot that I did of John ... And take that and scoot it this way. He had dark shadows in his eyes, unless I posed him to turn his chin up to the light. It's the same thing I'm doing with her here. I like that high angle; if you look at these shots, it makes her look much more muscular. Even though she's muscular anyway, but it's more of a focus on the muscles than on curve, but then I get the shadows in the eyes. So I can pose her if I want the light in her eyes by having her reach her face up. Beautiful (shutter snaps). I'm going to have you put, lean your shoulders even more. Perfect, and then your chin up that way. Yeah, beautiful. Great (shutter snaps). Beautiful, so it's giving definition to her chest and to her torso. Can you put this one hand down and just have it loose, kind of like resting on your-- Yeah, beautiful. (shutter snaps) Perfect. And then just give me a little bit of a bend. Right now, if you can bend it, bend it; if you can curve it, curve it. Her arm is very straight; just a little bit of a bend will be more elegant. (shutter snaps) And turn your chin to your left a tiny bit more. Beautiful (shutter snaps). Great. So this lighting setup, although it worked for the male, it absolutely works for the female nude form. If you want to show muscles and carve out, think of this lighting setup, because that high overhead light does that, and then we have separation from our two back rim lights. Okay, so those are 10 different high key, single light, two light, three light setups that will get you to have drastically different results when photographing fine art nudes.
Class Materials
Free Download
Bonus Materials with Purchase
Ratings and Reviews
ccPhotography
Amazing speaker, instructor and great photographer. The lighting and posing technique is imperative but she gives a lot of small tid bits and tricks that have already set me apart from other photographers. I love her work but I love her teaching style more. I recommend all her classes!
user 0256e5
It is a delight to watch someone who has so much passion for her art and Lindsay exudes passion and accompanies that with a great teaching style. She shares her knowledge and has a lot of great tips. I think this class makes a great intro to the subject. For me, this was time well spent.
Flavia
I love Lindsay's teaching style and all the insights she gives. I did my first fineartnude photoshooting applying everything I learned on this course! Thanks Lindsay you are a true inspiration and a great help during my photography journey.