Shoot: Test Shots
Lesson 22 from: Fine Art Conceptual Photography from Shoot through Post-ProcessingBella Kotak, Pratik Naik
Shoot: Test Shots
Lesson 22 from: Fine Art Conceptual Photography from Shoot through Post-ProcessingBella Kotak, Pratik Naik
Lessons
Class Introduction
04:47 2Artistic Vision and Inspiration
17:06 3Personal Projects
18:59 4Creative Motivation and Defining Your Story
15:15 5Organizing Your Inspiration
16:26 6Building A Character
03:19 7Creating Wardrobe and Props
33:59 8Location Scouting
12:55Resourcing a Team
17:52 10Working with Talent
06:39 11Building Community
05:06 12Scouting Location Pros and Cons
11:29 13Camera Gear and Modifiers
10:03 14Shoot Set Up and Styling
11:34 15Test Shots With Model
06:04 16Location Shoot: Model in Red Azaleas
26:04 17Location Shoot: Composite Pieces
16:35 18Plates Extending the Scene
07:11 19Set Concept and Design Overview
08:31 20Demo: Equipment Overview
04:39 21Shoot Set Up
08:12 22Shoot: Test Shots
15:08 23Shoot: Standing Against Flower Wall
06:47 24Composite Pieces: Hair
05:31 25Shoot: Overhead on Flower Wall
22:22 26Adjusting Images With Composite Shots
07:25 27Color Theory
11:40 28Capture One: Image Selection and Color Toning
19:42 29Moving from Capture One to Photoshop
17:01 30Compositing Hair
15:52 31Healing Brush Tool
06:42 32Dodge and Burn Tool
08:14 33Liquify Tool
12:01 34Adjustment Layers of Color Toning
35:05 35Blending Modes
10:44 36Channels and Channel Mixer
05:16 37Selects for In Studio Image
08:57 38Compositing Background
13:58 39Compositing Additional Elements
09:49 40Gradient Maps
15:51 41Color Toning with Controlled Light
21:32 42Adjust Skin Tones
17:27 43Retouching Skin
17:12 44Spot Healing Brush
06:11 45Clone Brush
03:47 46Dodge and Burn
18:49 47Sharpening
10:42 48Critique
15:40Lesson Info
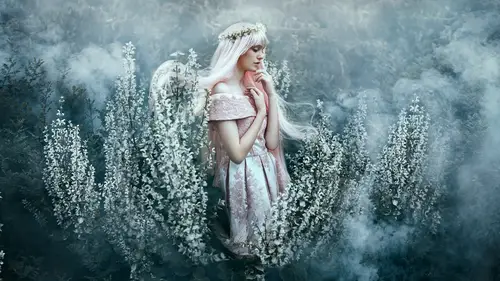
Shoot: Test Shots
When it comes to lighting, what we're actually gonna start doing is start in that location over there. Normally, we have a general idea of where it's gonna be placed. When we take a few test shots, we're gonna dial in what are our F-stops gonna be, our shutter speed, as well as ISO and all that. But normally, we'll keep it at either 50 ISO or 100 ISO. Usually we'll do 100 ISO or if we want to increase the recycle time of the flash. If we don't have a really powerful flash, we'll increase the ISO as well. When it comes to the shutter speed, normally if you have an SLR, you know that there's a sync limit, right? If you don't have high speed sync, you are normally capped. With these, because these are leaf shutter lenses, you can go quite high, so you can go 300, 400, 500, and so forth. I don't know what the exact limit is, maybe million. It's not a million. But I mean, you can go quite high. And so that's what our goal is because we don't have to really worry about the lights over here ...
because we can really bump up the shutter speed, it won't really affect anything. So that makes it wonderful that we don't have to worry about any of this. We keep all the studio lights on and still operate perfectly because it's about your F-stop that really matters 'cause the flash durations are so short that the shutter speed's irrelevant for the camera, it's only relevant for the ambient light. So we'll keep it really high, we'll start it on 250 or so and then we'll adjust our aperture. We'll probably be at nine and 11. When you work with medium format, you want a little bit higher F-stop as well. So just because there's a shallower depth of field at the same F-stop as an SLR camera. Okay, so I'm gonna take the camera off the tripod and we are gonna see what happens. So, do you want to grab the tripod? Yeah. Fantastic. Do you usually know how close you want to start with? Yeah, I do, actually, in this case. (laughter) I know everything. Me too. No, no, I don't know everything. Right, but I do know. (laughter) I'm gonna give you this. I do know that this is the frame that I want from here. Yeah? There's still a few details, but this always is the way, you can tweak and tweak until you're happy, but there's always something. Alright. The more I can capture in camera, the less work I do in post. That's pretty much it. So right now, the lighting isn't ideal, but what we're gonna do is take a photo, adjust it, take a photo, adjust it. So let's see. So right now we're at F9. Mm-hmm. At 250. Yep. And ISO 100. Yep. So I'm just gonna get that shot. What does it look like? Perfect, we're done. (laughter) You're so awesome. Well, thank you, you know. I'm gonna drop. Oh, what did you do there? Increased the power. Oh, you did? I'll leave the power. I'll leave the F9 here, then. Also, over here, as you see in capture one, I'm able to also change her settings if I want to, so in case she's too busy shooting and I see that and she's really involved with the shoot, sometimes it happens, you'd be surprised, I can just change really quickly from here and adjust it accordingly. Actually, I think that's really good to know. Did you know that you can do that, you can change the settings? Yeah, so he can change the settings. I can also fire for her, so there. (laughter) That looks great. You can't do my job for me. Oh, look at that, awesome. Imagine. Okay, so what we're gonna have you do, Madeline, is turn your body a bit more towards the light. Just a tiny bit. Yeah, whatever you can manage. There you go. And we're gonna have you put your weight of your body on your back leg as much as possible. Great. And what that does, essentially, is it puts all the weight behind her, essentially, and it gives you this beautiful curve. So whenever you're shooting ladies, yeah, remember that trick. If you want to slim a lady down very quick in a photo shoot, have her stand three-quarters, have her weight on her back leg, and suddenly that front leg will appear taller and it's a beautiful line over here, as well. So that's what we just did with you. Can you get rid of the time of day? Yeah. Yeah, great. Are you comfortable, or as comfortable as you can be? (Madeline mumbles) (laughs) Oh, bless. All right, we're gonna have some of this just come over just a little bit. I don't know how we're gonna make it stay, but we shall see what happens. Maybe you can hold it, actually. Yeah. You mean that, and then? Yeah, you can hold it any way you want. That's lovely. Yeah, something. You can reach it with your hand down here. There you go. Yeah, something like that. We'll just see. Okay, and this one, (man mumbles) we're really just testing, so. One, two, three. I'm focusing on her eye and I'll move back a bit as well. There you go. So because this file is quite massive, Ooh! I can crop and still have a really beautiful study in high res, high photo that I can blow up fairly big. What do you think? Let's see. I think the exposure's perfect. Let's have a look. Yeah, can you look into that and tell us? How far do we go (laughs)? So that's 100%. I want to see. Yeah, yeah. Do you think we can go sharper? Now that's in focus. It's pretty sharp, yeah. I think the exposure's perfect as well. Right. Yeah, have we got all the details in the shadow down there below? Yeah, so for example, let me show you real quick. Over here you have your high dynamic range. In case we want to rescue that detail later, we can do so if we needed to. Also, you see here that we have all the detail there if we need to come, bring it back in certain locations. Okay. Okay? Mm-hmm. What I will do, Ken, is have you bring this light a little bit closer to me and just turn it just a tiny bit just so I can show you guys the difference in light. So this is a really small change. What we had before was the light was coming this way and actually, I really liked it. Yeah, so you knew. He knew exactly when I needed it. But I want to show you what it looks like right now, so. I think I cut her crown off. Oh no, there it is! Yeah. So you can see how the light tapers in more. Yeah. This is the before. This is the next lighting setup. Yeah. So especially on her face you can see the light wrapping. Yeah, so you can see it (mumbles), but I still think it's a little bit too strong and not soft enough. Right. So if I wanted to make this light softer, I would use the edge of the light that's falling off the edge of the softbox. So if you leave it where it is and just turn it a bit. So what's happening is, and (mumbles) hold this. So basically, when you're shooting with a softbox like this, the closer you are to it and the closer you are to the center of it, that's where most of the light is coming from and the softer that light's gonna be. If you move away, that light's going to be harder. So you have more contrast on the face. My favorite setup, and this is from trial and error, has been having the light facing this way and using this light that falls off edges, which is a very soft, feathered light hit the model. And what it does is it wraps around her face beautifully, so it hits one side and then it hits a little bit more on the other side and that wraparound effect is something that I feel sits very beautifully in my portfolio with all the other pictures that I have taken. So yeah, it's the same sort of that I keep coming off and then coming up to often whenever it comes to shooting portraits. And for example, if you're in a situation where right now we have, we actually have, we don't have too much contrast on the left, the left? Yeah, the right side of her. We can always throw a V-flat in there if we wanted to add a bit more spill and fill backlight that fill lights back into that scene. So yeah, I want to just turn it a little bit like this and have whatever light is falling off the edges, this beautiful feather light hit her and we're gonna take that photo and see what that looks like, okay? Yeah, you can actually let go of that if you wanted to. Yeah, and then just bring your hands in. A bit more feather. Have one of them like, up here a little bit. Great. And something that I always like as well is having the fingers tucked in just a little bit like that, and what that does is just make the hands a little bit more smaller, more delicate looking, and a bit more considered because when the hand is flat and facing the camera, it also looks a little bit big. So you just want it turning away just a tiny bit so that it looks a bit smaller and a little bit more prettier as well. Okay, so one, two, three. Great. Was that the new picture that just came in? Mm-hmm. So what's happening is basically the area here on the face, it's less of a. See? The quality of light. So you still want some contrast. The reason why we're not using a V-flat right now is that if we did, there'd be no contrast there. Right. It would just be flat and that doesn't make an interesting photo. Or maybe it does for you, but I personally like to have a little bit of contrast because I feel like it just adds a bit more interest to the picture. And also, because there's re-color toning. With contrasty photos, you get a lot more play with it. Yeah, and it just looks more natural. See the difference between the light and the shadows? There's a gradual kind of. Gradation? Yes, gradation. See? And you get more specular details. If you notice, if you ever shoot with contrasty setups, you tend to notice a lot more detail come out because at pore level, you see a lot of variations between the light as well. So it lends to the sharpness too. That's right. So we're gonna tighten up your post just a little bit more. So how are? Let's see, how are you standing? Let's have a look. Yeah, your leg's out? Can we turn your body a bit more in this way? Great, and then to have you tuck it back here. And then you can bring your arm out and you can have it up a bit like, yeah. Let's do this. That's beautiful. In fact, I'm gonna give you this because I'm gonna just, so I love to get into the scene. I'm gonna have your hand just a little bit like that and I'm gonna have this hair falling around you just a little bit more. There, like that. And so what this pose is doing is because we are taking it from the side, her neck suddenly appears beautiful and long. There's a lovely shape over here that I'm mimicking with the hair as well because they're all both going in the same direction and you just get light to her face as well, which is going upward. We're also going to get portrait of her looking dead straight at me. But the lines I think are very romantic and very pretty. So we're just gonna try and get that shape. Also, we try to leave more space at the ends so that there's more room to crop or expand later. That's right. So when you see these photos, you'll see that I've got all this beautiful brickwork at the back, but I don't mind that because I know that I can Photoshop that. And you can crop it if necessary. Yeah, you can crop it if necessary, but I also am leaving with some room here so I can use it, I can Photoshop it. Perfect. Yeah. The most important bit is that she's in the frame. Lovely! Oh, I love it! That looks stunning. I looks a little bit heavy here. But that will just have to do. I want to see some more of these leaves and stuff. There we go. All right, perfect. I like how she had holes, the phase one, and styles with one hand. That's like, such a talent. (laughter) Okay, (mumbles) a little bit. There we go. Okay. There's something very beautiful if you can connect your subject to the background. A lot of photographers don't do this and I don't know why because when you connect the two, like, it makes a very striking photo. Okay, so we're gonna try and nail this. So if you notice anything in the light, let me know as well. Okay. Because I appreciate a second pair of eyes. And let's make it happen. So one, two, three. Beautiful. Lovely. And I'm constantly looking and reviewing. Okay, let's tighten up this hand, your right hand, and just make it more light. Bring it down a bit, actually. Yeah. Lovely. One, two, three. Great. And now turn your head towards me. There we go. That's beautiful. That's great. Beautiful. And we're gonna take a portrait as well. (mumbles) What is the quality of life on her, light on her? That's beautiful. There's a catch light in her eye. Forgot to mention that. So sorry. Always have to make sure that there is a catch light in her eye, and again, that's so that she looks alive and not dead (laughs), so. And it's, yeah. It's in a lovely position as well. It's off the sides. It looks really natural as well. Also, if you ever work on a laptop or whatever it is when you're tethering, the easiest way to make sure if you have all your data and every one of those points is that when I take my cursor tool or my hand tool and hover over any of the locations, you'll see these numbers on top of the frame start changing with the RGB so I can have assurance that I have all my data there. So you can see like, over here at the darkest areas, I still have 20, 28, three, and 23. So you don't have to look at your laptop if it's not calibrated and trust it. You can look at numbers as well make sure it's there.
Class Materials
Bonus Materials with Purchase
Ratings and Reviews
Kathleen
Great class and great instructors. Genuine and informative. Practical tips to create stunning images. Seeing them work through the process from shoot to finished image was great and I loved that they shared the thought processes behind the creative decisions. Definitely recommended!
RoxSpiegel
Truly a remarkable duo. Bella is so down-to-earth and humble for a photographer with such a strong beautiful and ethereal voice. Her explanations of her process really inspired me--I was sketching concepts throughout the class. Pratik's process really opened my eyes to "smart" retouching--understanding what can be done in fewer brush strokes and slimmer PS files. All in all a really unique and inspiring class that makes me excited to realize my next conceptual shoot. They're also adorable together!
Mai Her
I've gained sooooo much from this I can't even contain my appreciation and excitement! So much inspiration and so much generous advice and tips to help me! Thank you so much Bella and Pratik and Creative Live!