Capture One: Image Selection and Color Toning
Lesson 28 from: Fine Art Conceptual Photography from Shoot through Post-ProcessingBella Kotak, Pratik Naik
Capture One: Image Selection and Color Toning
Lesson 28 from: Fine Art Conceptual Photography from Shoot through Post-ProcessingBella Kotak, Pratik Naik
Lesson Info
28. Capture One: Image Selection and Color Toning
Lessons
Class Introduction
04:47 2Artistic Vision and Inspiration
17:06 3Personal Projects
18:59 4Creative Motivation and Defining Your Story
15:15 5Organizing Your Inspiration
16:26 6Building A Character
03:19 7Creating Wardrobe and Props
33:59 8Location Scouting
12:55Resourcing a Team
17:52 10Working with Talent
06:39 11Building Community
05:06 12Scouting Location Pros and Cons
11:29 13Camera Gear and Modifiers
10:03 14Shoot Set Up and Styling
11:34 15Test Shots With Model
06:04 16Location Shoot: Model in Red Azaleas
26:04 17Location Shoot: Composite Pieces
16:35 18Plates Extending the Scene
07:11 19Set Concept and Design Overview
08:31 20Demo: Equipment Overview
04:39 21Shoot Set Up
08:12 22Shoot: Test Shots
15:08 23Shoot: Standing Against Flower Wall
06:47 24Composite Pieces: Hair
05:31 25Shoot: Overhead on Flower Wall
22:22 26Adjusting Images With Composite Shots
07:25 27Color Theory
11:40 28Capture One: Image Selection and Color Toning
19:42 29Moving from Capture One to Photoshop
17:01 30Compositing Hair
15:52 31Healing Brush Tool
06:42 32Dodge and Burn Tool
08:14 33Liquify Tool
12:01 34Adjustment Layers of Color Toning
35:05 35Blending Modes
10:44 36Channels and Channel Mixer
05:16 37Selects for In Studio Image
08:57 38Compositing Background
13:58 39Compositing Additional Elements
09:49 40Gradient Maps
15:51 41Color Toning with Controlled Light
21:32 42Adjust Skin Tones
17:27 43Retouching Skin
17:12 44Spot Healing Brush
06:11 45Clone Brush
03:47 46Dodge and Burn
18:49 47Sharpening
10:42 48Critique
15:40Lesson Info
Capture One: Image Selection and Color Toning
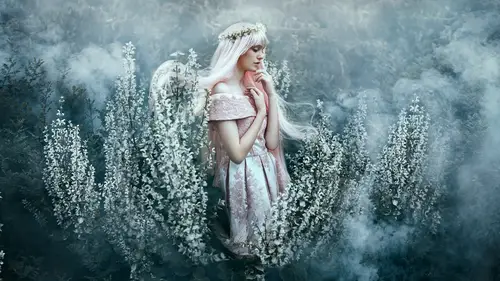
So, we are going to jump into Capture One, and we're going to go through some of the selects that we made, so. And one other thing that we want to show you guys is some of the shots that progressed as we were shooting. That's right. so that we can see what worked and didn't work, because a big request is always, you know, what's your process like when you make selects, and how do you know? Yeah, what are you looking for when you make selects as well? Exactly. Yeah. So, we're going to start, should we start with the first few photos? Yeah, and we can see what the shots were like and why you didn't like them, maybe. Okay, yeah. So I think at this point I was still testing. There we go. We're going to scroll down to here. There we go. So at this point I'm still getting very comfortable with the model. We're still finding our own rhythm, and we were just testing the light as well because we had a reflector in some of the photos, and we took the reflector out, so it was just, ...
and then we moved the reflector as well, so we were just kind of playing and seeing what was happening. Like over here you can see everything is quite flat. That's right. And so we had this reflector. We were just trying to see, maybe. We had it over here as well. Yeah. Yeah. Yeah. Yeah, and we had, we moved the reflector a little bit further away over here to see what was happening with the light. At some point we moved it to the other side, which I actually quite liked a little bit more. Hmm. Because, well I noticed it was just more light coming from above, and yeah, it was just. I liked the pop it was giving. Yeah. So at this point, I didn't mind so much that the reflector was peeking in on the photo, by the way. This is something that you just, I just don't mind, because I know that in post production, I can just clean that up. Because plates. Yeah, because plates, because clone stamp tool, if you don't have plates. Mmm. Because of the way the scene was I knew I could grab some clouds from here and put them there, so at that point in time, I was thinking more about the quality of light on her face, knowing that I could just save that digitally later in post, if I decided to go ahead with it. And that's why it's so good to have assistants to pay attention to that kind of thing while you're shooting, because she's so focused on the pose, and the connection with the model, you don't want to break that. Yeah, yeah. I need to focus on the model. Yeah. I do like that photo. I think it's really beautiful. There's something really lovely in her face, her expression. The hands are really nice. I love the quality of light on her as well. The light over here is hitting the side of her face, but we can always lighten up the eye area in post production as well, if we needed to, but I do quite like that. This is what's great about being able to see your shooting now, looking back at the video. Yeah. Seeing the progression of how the selects came out. Yeah. So I quite like this pose as well, where she is just standing very like straight and slim in her own world. Her neck is long. I had her face titled up, and her chin tilted up as well, and this is where we thought we would do some hair flips. Right. Wasn't it? So, they're coming here. There's Pratik getting ready. (audience laughs) Fantastic. So usually when it comes to hair flips I always count to three, so I know when to, yeah, everyone gets ready, and go do this. And, actually, speaking of counting till three, this is another thing that somebody brought up yesterday. I didn't realize I did this, but did you guys notice that I counted every time I took a shot? Did you notice it? I was like, one, two, three, and I took a picture. I realized why I did that, and I think it's because, from being in front of the camera, taking self portraits, I got quite used to having a timer, so when you have a timer, there's a countdown, and when you know it's going to take the photo, you quickly, like you give it extra, um, and I do that. I think that's just something I picked up from being in front of the camera and using a timer, so when I'm shooting a model now, I count to three, because on three she knows I'm taking the photo, and she gives it extra. So she, rather than just like, ah! She's like, okay, one, two, three, she's like there. She micro adjusts. She micro adjusts. Yeah. So that she's ready for that shot. Mmm-hmm. So yeah, I thought I would just share that with you, because I thought that was interesting. It is. I didn't realize I did that. Yeah. Yeah, okay, so there's a few hair flips in here that I really like. I quite like the hair flip here. Also, with my hair flips, I don't just think of it completely connected to this scene. We've taken the hair flips, and I know that I have enough skill set to grab that piece of hair and twist and turn it in another photo, or in another piece of the photo if I wanted to. Yeah, so we're. Yeah. Basically what we're doing right now is seeing the composite material we're collecting. Exactly. And then bringing those into Photoshop and using the best pose and the best expression to piece them together. Yes, and especially when you're standing in a general, in one spot, so for most of these photos, I stayed in the same spot. It's only if I had moved a little bit more around the sides, the light would have changed, and then grabbing those extra shots and adding that in the photos would just not work, because a composite piece only works when the lighting is the same. Mmm-hmm. So yeah, lighting is the first thing that gives it away when you're working with compositing photos together. So ideally you want to either be using a tripod or staying in the same spot, essentially, so that the lighting is consistent. So we shot from both sides, actually, Pratik took pictures. Pratik took hair flips. He hair flipped on one side, and then he moved into the other side, and we've got some shots there. You physically moved me there. Physically. Yeah. I picked you up and moved you. Yeah, okay. And then I always get portrait shots as well, because, for the makeup artist, yeah, the makeup artist, hair artist. I always try to get portrait shots, because they always appreciate that. I may not use those portrait shots in my portfolio, but I always think that if I'm working with a team, I like to give something a little bit back to them as well. Okay, so I want to go down here because we did something interesting, didn't we? As the shoot progressed. Right, we did. Yeah, so as the shoot progressed, I decided, oh here, so we took empty plates, and we're going to be using these in expanding our photos. We spoke about that in our video. And that is when you focus on the model, just to be fresh, really, and that is when you focus on the model, and then you stay in one spot, and she leaves, and then you grab shots of the whole scene with the same focus that you had on the model. And that's because if you change the focus to suddenly focus on the plants, we're compositing some parts of the image in focus, and some parts are going to be out of focus, and they don't mesh well together at all. Mmm-hmm. So ideally you just want to focus on the model. She moves away, and I just switch my focus from auto focus on the lens manual focus. Mmm-hmm. Do some really quick (mumbles), and then I just shoot the scene without her in it, and my focal plate arranges the same. Exactly. And we also, as you notice, we start some of these during the break so that way we get an idea of which ones we are thinking of, and you can see which ones we are gravitating towards as well. Okay, so these are the empty shots that we took. As you can see, you don't have to be completely tidy about them. All I did was just move very quickly and got the shots. Again, I might not use these, but I like to have the option of using them. Mmm-hmm. Great, so we put here back in the scene, and this is when I had an idea where I would take a piece of foliage actually, so I went behind the bush and I took a little bit of a couple of stems of the flowers, and they were at the bottoms. I don't think the bush minded, and I held them in front and I shot some photos, and I shot through the flowers. Mmm-hmm. And that gave me this really beautiful kind of dreamlike effect, and what I did was I moved that rapidly around the camera. Mmm-hmm. And yeah, I just wanted to try and get a little bit more emotion in that photograph, so that's a really lovely trick as well, if you want to take a candid-like shot, I often do this, where I'm either hiding in a bush, or I grab some leaves and It's true, yeah, and she scares people walking by. So when you're driving past some foliage just have a look in case there's a Bella hiding in it, but, um, honestly, I love to hold flowers and leaves in front of the camera, and shoot through it, and you get some really interesting effects. Mmm-hmm. I know some other photographers use prisms as well, and all these other props as well. It can get you very interesting effects as you're taking the photograph. The reason why I like to do it, is because you really do feel like you're peeking into another world, and it just amplifies that feeling in the photograph a little bit more. And again you don't have to be perfect. So at this point, I asked her if she could put her hand against her face, and I suddenly felt very connected to her. I was like, "Oh my goodness. We're on the right track now." I wanted some, there was a point where, you know when you're shooting, and you feel like, okay, we're getting there. And you have to keep shooting until you find that moment, and if you don't find that moment, just move. So I didn't move, but I made her move, so I was like, "Do you mind putting your hand up, hand down, hand to the side. I'm very open about giving directions, because at the end of the day, the model can't see what you see. She put her hand against her face, and to her, I think it probably felt a little bit odd, but actually it felt very beautiful when you were looking at it on the camera. So I directed her. Mmm-hmm. I was like, "Okay, turn your head down, tilt your head up, tilt your head away," and that's when I could start seeing the picture and start crafting it. Her fingers were getting curled in. I was like, "Oh no no. Bring them back out, and turn away. Turn your body back towards me, but turn your head away," and that's me directing the picture that I want to capture, and that's you know how you work with somebody who is an amateur, who might not be fully aware of how they come across on camera, because at the end of the day they are in front of the camera. It's difficult sometimes. Yeah. So yeah, I pretty much said that. So, "Look up, look away," and it's around this point over here that I really began to like what I was seeing. I felt the light worked beautifully. It just fell lovely across her face. We actually still did have the reflector, didn't we? In the same spot, on the side. I was in the same spot, so my empty plates that I took were still applicable. The lighting conditions are the same, more or less. Mmm-hmm. But that's something that we can always tweak. Yeah. I knew that. And that's the best part about doing these live is that, guess what, it might not work, but we're going to see if it does. Yeah. And then trouble shoot it. Yes, and it's okay. Actually the light did change a little bit, because the sun was peeking in and out, so some were a bit shaded, and some were a bit bright, but when you have Capture One you can tweak that a little bit more. Okay, so I'm going to show you guys what we starred and selected. Right. Yeah. So over here we have, our four stars basically going to be a lot of plates that we took earlier, the hair flips and all that. The composite shots. Yes, and basically what we'll do from here is use a couple of these plates for explanation purposes, and show you how to extend frames by using one of these plates and doing it that way, and the rest of it can be applied by extending even more if necessary. The same method. Right, and then finally over here we have the shots that we are gravitating towards. So the interesting thing about this is that the biggest problem is that we have an area here which we shot through the, um, we used one of the petals to shoot through. We did, yeah. And the plates did not, so how are we going to get around that? And we're going to extend the plate as well. Yeah. Okay, so. Right, so we're going to open up this image. And going through any color tuning in Capture One. That's right, so the first thing we're going to do is look at the exposure, the contrast of brightness and saturation. So I like to bring the exposure down just a little bit to there. Mmm-hmm. To something I'm happy with. Also, should we just make sure that's? Yeah. Lovely, okay. We're going to up the contrast just tiny bit. I make my neat changes. Now I always process in Capture One, because this program I feel processes the color tones in a very beautiful way. Yeah. The skin tones especially in a model or in scene. I guess the colors just pop, right? The color. Yeah. Yeah. I feel like I have more control of a color just when processing the raw, I guess, so. Why do you desaturate? Well, I desaturate, and you're going to see me desaturate again in Photoshop, actually, but I desaturate because I build up color layer by layer, and if I start building up color without desaturating, I go from like zero to intensity very quickly. So I like to think of it desaturate I go below zero, and when I build up my color I have a bit more room to play. Hmm. It's more about between the natural colors that are on set and your vision with the processing. So I'll just desaturate to maybe like minus 18 or something here. I always bring back the highlights a little bit, and I don´t need to worry about the shutters at this point. So, Capture one curves very similar to Photoshop. It has levels, very similar to Photoshop, but what I like to do is play with the color balance wheels. So, they are over here. You can just use any of these tabs to get from, you know, one sort of adjustment to the other, and just have a play if you're not familiar with this program, because it might look intimidating but it's really not. And because this is mostly a post-processing class on color, in Photoshop, we're going to spend less time in Capture One. That's right. But if you're interested, I do have a full course on Capture One on my website as well, so be sure to check it out. It's really comprehensive. That's right. So, on this color wheel, which looks like this, if you get an idea. You have your midtones, your shadows, and your highlights. And I'm going to just adjust each one of those individually, in their own individual tabs, so I'm going to move my shadows maybe a little bit into the darker side, so let's have a look. Let's bring it down to here, because I quite like how that looks. Mmm-hmm. I'm going to adjust the saturation of that shadow, using this little adjustment here. Just a tiny bit. And again, I'm just going by feel. I'm literally just seeing how I feel. This adjusts the lightness of that shadow as well, so I'm going to just bring that down a tad. So, the midtones. Again, I always work on the picture that I'm going to use, so the color adjustments I make are made on the photo I'm going to start off with. So tell me one thing. The main picture. Here in the shadows, and I think the audience is wondering. Why would you use one specific color here, versus the other? Was there any reason for that particular? I just quite liked how it looked. So it's very visual. It is. You can It's not related to You can move that down to here, and that, if somebody else loved how that looked. Mmm-hmm. That's completely fine as well. Yeah, it really is, but I quite liked how how this looked, because I felt like it deepened the greens, and just made the colors a little bit more intense and popping. Like over here, if I'm looking at the top right area over here, there's a bit more range, I felt, so I was kind of, that's what I was looking at. So yeah. Again, midtones. I'm looking at the skintone on her face at this point, so yeah, that looks great. It actually looks great, but no. We're going to go I think a little bit more like this, a bit more warm toned. There, I'm quite happy with that. It's not a very big change, and that's fine. I'm not here to make giant changes, so This is the basic part, because your magic mostly happens through the Photoshop stage anyway. That's right, but what I do want is just to have a nice foundation from which to begin my color toning process, and then the highlights, I always like to have a little bit of a cast on my highlights, so we're going to go, and it depends on my photograph. This could be a beautiful warm-toned picture I think, so we can even go up here with it. Actually I quite like that. It's a little bit of light blue, a little bit of green, and I'm just bringing the saturation of that down a little bit. Hmm. So let me show You should show One thing real quick. So basically can you tell us, you know, what's going to come after this next as well. Yeah, we're going to be taking this into Photoshop, and we're going to be compositing the photo together with other pictures, yeah. So for example, this is what you started out with, and this is where we ended up. So it's not major. No. Just a nice muted base. And it didn't, and as you saw, it didn't take many steps to get there. Mmm-hmm. Yeah, I think some people usually just use Capture One and they're done. Right. Yeah. Okay. So what we, before we go we need to copy the adjustments. That's what I'm going to do. And we're going to paste them over our composite plates that we took. Okay. So basically what I did was the select that we used. Yes. I'm going to copy adjustments. Yep. I'm going to go to our plates. I'll select the last adjustment. Last, uh, yeah. The last picture, the Oh, last picture, sorry. I'll hold shift and click on the first one, and then hit Paste. Right, and that means that everything's got the same color tone now. Right. So when I finish them up all together they make a bit more sense. Great. So there we go. So, we'll go ahead and Export. Export. So we'll use for compositing sake, we'll do the one that we're expanding outwards I think. Yeah. I think would be nice. Mmm-hmm. That works. And we'll start with those two. Great. So it's that one, and then that one. Yeah. That's lovely. So I'll Export Variants. Actually you know what, I could do this. Let me go ahead and edit in Photoshop. Let's see, Export Variants and we'll go Session Output Folder, so it's going to put it in its place PSD or TIF, depending on whichever one you prefer. Color profiles. Yes. So what do you usually do for color profiles? So when I'm editing in Photoshop I stick to Adobe RGB, but then whenever I share my pictures online, I convert that image to SRGV. Perfect. Yeah. And we'll go to 16 bit. Yeah. Cause it has more range. It does. Let's try it. For color as well as Adobe RGB, 300 pixels per inch. Mmm-hmm. Fixed scale, open width, Photoshop 2017. Yep. And I'll say Export to two variants, and what that will do is it automatically opens it really quickly.
Class Materials
Bonus Materials with Purchase
Ratings and Reviews
Kathleen
Great class and great instructors. Genuine and informative. Practical tips to create stunning images. Seeing them work through the process from shoot to finished image was great and I loved that they shared the thought processes behind the creative decisions. Definitely recommended!
RoxSpiegel
Truly a remarkable duo. Bella is so down-to-earth and humble for a photographer with such a strong beautiful and ethereal voice. Her explanations of her process really inspired me--I was sketching concepts throughout the class. Pratik's process really opened my eyes to "smart" retouching--understanding what can be done in fewer brush strokes and slimmer PS files. All in all a really unique and inspiring class that makes me excited to realize my next conceptual shoot. They're also adorable together!
Mai Her
I've gained sooooo much from this I can't even contain my appreciation and excitement! So much inspiration and so much generous advice and tips to help me! Thank you so much Bella and Pratik and Creative Live!