Location Shoot: Model in Red Azaleas
Lesson 16 from: Fine Art Conceptual Photography from Shoot through Post-ProcessingBella Kotak, Pratik Naik
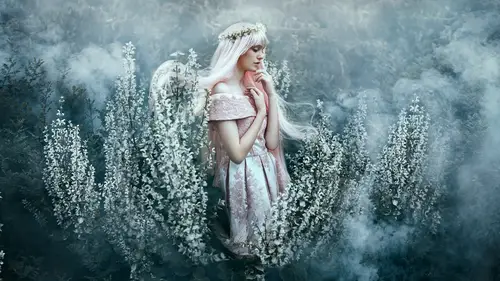
Location Shoot: Model in Red Azaleas
Lesson 16 from: Fine Art Conceptual Photography from Shoot through Post-ProcessingBella Kotak, Pratik Naik
Lessons
Class Introduction
04:47 2Artistic Vision and Inspiration
17:06 3Personal Projects
18:59 4Creative Motivation and Defining Your Story
15:15 5Organizing Your Inspiration
16:26 6Building A Character
03:19 7Creating Wardrobe and Props
33:59 8Location Scouting
12:55Resourcing a Team
17:52 10Working with Talent
06:39 11Building Community
05:06 12Scouting Location Pros and Cons
11:29 13Camera Gear and Modifiers
10:03 14Shoot Set Up and Styling
11:34 15Test Shots With Model
06:04 16Location Shoot: Model in Red Azaleas
26:04 17Location Shoot: Composite Pieces
16:35 18Plates Extending the Scene
07:11 19Set Concept and Design Overview
08:31 20Demo: Equipment Overview
04:39 21Shoot Set Up
08:12 22Shoot: Test Shots
15:08 23Shoot: Standing Against Flower Wall
06:47 24Composite Pieces: Hair
05:31 25Shoot: Overhead on Flower Wall
22:22 26Adjusting Images With Composite Shots
07:25 27Color Theory
11:40 28Capture One: Image Selection and Color Toning
19:42 29Moving from Capture One to Photoshop
17:01 30Compositing Hair
15:52 31Healing Brush Tool
06:42 32Dodge and Burn Tool
08:14 33Liquify Tool
12:01 34Adjustment Layers of Color Toning
35:05 35Blending Modes
10:44 36Channels and Channel Mixer
05:16 37Selects for In Studio Image
08:57 38Compositing Background
13:58 39Compositing Additional Elements
09:49 40Gradient Maps
15:51 41Color Toning with Controlled Light
21:32 42Adjust Skin Tones
17:27 43Retouching Skin
17:12 44Spot Healing Brush
06:11 45Clone Brush
03:47 46Dodge and Burn
18:49 47Sharpening
10:42 48Critique
15:40Lesson Info
Location Shoot: Model in Red Azaleas
We're gonna talk about shooting, actually. Just getting right into it. Yeah, we're gonna actually get into the actual shoot. Yeah, I'm looking forward to that. Yeah, so, I don't know if I mentioned it here, but I actually added some flowers on her hands. We didn't actually see that happen because it was a last minute detail. What I noticed was when I set her up in the scene before, I knew I was gonna put a yellow, one of the yellow big flowers in her hand, but I still felt that wasn't enough to connect because there was some yellow in her hair, but there wasn't enough in her middle to connect the scene. So I thought if I added some of the delicacy of the yellow little flowers, it would just connect the scene a bit more. And that's why I did that. Okay, so we're gonna be shooting now, and I'm so, so excited about this bit. This is my favorite, favorite bit. Before we get into it, I'm gonna just show you guys a few things that I was thinking about prior to the shoot and as we pre...
pare to it. Prepared for it and as we're gonna be shooting it. So, the first thing I wanna talk about is having a clear vision. When I saw this, it connected with me so much because of the color of the dress and I knew that I wanted to shoot this dress. And then after that, I just used the combination of both of those elements to bring this picture to life. We're gonna have a look at the model over here and basically, she is connected to the dress, she's connected to the scene because of the colors. But then there needs to be a little bit more interest. So I've added some yellow and green, lots of yellow and a little bit of green, to connect her to the background as well as just add a bit of contrast. Red and yellow or red and gold, they're very like royal colors. To make it a little bit more storyteller, we went with the gold leaf on her eyebrows. We've gone with the gold leaf on her upper lip as well and the reason for that is that it just ties the look in together. I think having it on her eyebrows, her lips felt a bit bare, or something felt a bit off. And I think that having that knowledge or that awareness for balance really comes into play. So everything I do, I'm constantly thinking about it. I'm constantly thinking about, is it balanced and how do I make it balanced? We've got, speaking of balance, we've got flowers on her hands. So if you show me your hands ... So what I did was, there's flowers in her hair that are big and voluptuous, like really beautiful and then I've added the little sunflower-like, little delicate ones because I thought that the big and the delicate would go quite nicely together. But then I thought I wanted to connect the picture together even further, and that's why I've added this, delicate flowers onto her hands so that there's a connection there as well. So the same connection as your gold leaf on your eyebrows and your lip, I want the same connection between the hair and the hands as well. And that to me really ties the look in together. Just that kind of extra thought and just bringing it together, and that's where I'm gonna be using this flower. These right here? This is just for you. Yay, thanks! So I'm gonna be using one of these flowers to bring the total look together even more so because right now, there's a lot of red heavy happening over here. The floral backdrop is just super red and heavy and your dress is like, beautifully red and I think that having just one more element just would tie it even more, make your character even stronger. So I can't decide between this one, or this one. I don't know, I keep getting drawn to this, but this stands out more. I think we should give the yellow one. Just because it's a good central focus point. I think so as well, because I think this actually has got too much orange, doesn't it, and it's, like fading into the dress whereas this actually stands out. Okay. It almost feels like there's reason why she's holding it. That's right, that's right. So another thing as well, I love to be bringing the background to life as well and I think that's what's happening here as well. She almost looks like a flower come to life. And I think I'm gonna go with that, like that's the concept that I had. In my head it was clicking anyway and it's only when it's all of the elements that I brought together, I can see it. I can actually see it properly in front of me and you look like a vision. So I'm going to just bring your hair out a little bit as well because we were talking about balance and right now, there we go. I just wanna, like, show of your neck as well and just have it framed really nicely. And this is where having a little bit more attention to detail really comes into play because of all these stray hairs everywhere. (laughs) So we're just gonna tidy that up just a little bit, okay. And another thing as well, I'm just gonna tidy this up over here. Let's push this back a bit. And I'm gonna push this back a bit as well here. So as you can see, I'm really hands-on with my model and, you don't mind, do you? No? (laughs) Lexi's saying "No, get away!" (laughs) But I'm like this for all of my photo shoots. Usually when I'm shooting at home, I do it all by myself. So this is a real treat this time, having a talented hair and makeup artist to work with. So you look fantastic and we're gonna start shooting now. We did some test shots earlier and when we were doing the test shots I was looking at light, so, and paying attention to that still but now we're gonna focus on getting the shot. Okay? I actually already have an idea of the type of picture I want. Which is why most of the time I shoot fairly quickly. Usually it's the getting ready for the shoot that takes ages, but yeah. We're gonna see how long this is gonna take us. (laughs) So the vision I have in mind is a central, I think it's like a center frame focus? Yeah, where's it's just like, I'm shooting straight on. Focused, it's just a straight on shot. So I'm shooting, shooting it straight on. I'm quite lucky because I'm short and you're tall, so most photographers have to stoop, but I'm like the perfect height for you. Especially in fashion photography, a lot of times you'll see shots that are taken from the ground up just because of that extra height. And so, coincidentally, you've added to the effect even if you didn't mean to do it on purpose. Yeah. That's what you would do, you'd always shoot from below just because it makes the model look a bit taller as well and especially when she lifts her neck and her head up and the light's hitting it, everything just seems longer and more elongated which is perfectly my style, and yeah. Our height difference helps out. (laughs) Okay, so, I'm gonna get directly in front of you and I'm just gonna take a test shot. So Pratik, if you notice anything that needs like tidying up that we can do now rather than later, let me know. What about the shoes? Will you see any of the feet in the frame? No. Okay, that's a good point. So, that is a really good point. Because I don't wanna take those out later. Yeah, we're not gonna see Lexi's feet. I actually already knew that when I designed this picture in my head, that we weren't gonna see her feet which is why I told her to just leave her shoes on so that you're nice and comfortable. (laughs) Which is good, actually, because it's a little bit ... Yeah. (laughs) Okay, so I'm just gonna take a shot. I want you to lift your head up. Beautiful, and I want you to have this, soft hands. Which is essentially, have them, let's have them here, so have this here. Just hold them, actually I'll hold it for you. Okay. So I kind of want you to hold them like this so I can see both of your hands and you're just holding this really beautifully and delicately between you. And I loved it when you had it a bit lower. Great. Okay, another little tip is, how are you standing? You've got both your legs side by side. Let's have one leg back, so let's have your right leg back. Perfect. Actually, let's have your left leg back. Let's have a look at that. Yeah, I like that, I like that a lot, a lot better. Okay, so let's have your left leg back and then I'm gonna just do this over here, okay? Opening that out a bit more, okay. Don't turn completely to the side. Come a little, three quarters, great. And now what you wanna do is you wanna put your weight of your body on your back leg. So, yeah, is it on there? Mm-hmm. Great, so just turn a bit this way. This way, there we go. And then you just want the weight on the back leg and what that does is, it puts all your, basically it puts all your weight on the back leg, A, so anything you don't wanna see goes back there. And then C, you get a really beautiful line here, and that's really what I wanna show off. There's like a nice little curve here that emerges when you do that. So it's a little like, sneaky little trick. Okay. Beautiful. Okay. I love that. And do you see as well, do you feel it as well? You can feel it. It's a difference in her posture as well. Yeah, you can see it as well. Because before you could see is weighing down a little bit. Yeah, you can see the difference as well because your shoulders are back now and your neck is a little bit longer as well. I mean you've got a lovely long neck, so you're sorted in that department. Beautiful! So, I shoot with a center point focus, so I focus and then I adjust. I know a lot of people actually have their cameras set to being able to focus manually while using this back button here but I like to have mine in the center frame, center point. Lovely. Okay, great, so I'm quite happy with my settings. My shutter speed is at 250, my aperture is at 2. and my ISO is at 160. Is there a reason why 2.8 over like four or, you know, six or seven? Yeah, so I'm keeping it at 2.5 because I still get the bokeh in the background. The beautiful blurry background and then 250 is because, we're gonna flick your hair. And when I say we, I mean Pratik. And especially because the flowers are constantly moving with the wind sometimes, you don't wanna, you wanna make sure that you're not getting any movement coming from the flowers. Yeah, that's right, yeah, that's right, yeah. I was actually thinking about the hair but you've got a really good point there. Yeah. And then my ISO is at 160 and ideally, you wanna keep that as low as possible because less noise means that you can go a little bit further with color grading. And just overall image quality. It's true, because less noise there is, there's more range for information in the file so you can do a lot more with yourself. Yeah, it's just image quality. So I'm gonna just move back a bit and I love the way you're framed. You look fantastic. So what I'm gonna do is, I love your hands. Let's have that a bit facing, turn it a bit, yes. Yes, I love that. And let's have your head a bit ... beautiful, one, two. And I want you to just turn that way, yes. Oh! Lexi, you are so easy to direct. Okay, one, two, three ... okay. I wanna see what it looks like with a reflector so Ken, do you mind if I have you just on the side over here? Which side? Just down there where you were. Great. That's much better. Yeah. So I decided to add a reflector just because well, you don't, you don't know, I'm just testing it. So we're gonna see what it looks like and then we, I'll decide if I like it or not. Yeah, the light, if you're going back and forth between the images, you can definitely see the difference with and without reflector. There's more contrast without the reflector. And I'm just gonna carry on in this area. Wonderful. Okay, and Ken, we're gonna take the reflector out for a second, just tuck it away, perfect. Okay, I quite like the contrast. Do you want to have a look? So that's before and after. I actually prefer it with the contrast, without the reflector. So do I. What it's basically doing is adding that wrap around her. So, what's happening is, the sun's out over here and it's hitting these flowers here but also hitting the ground here and because this isn't like a dark colored ground I have a feeling some of this light's being bounced back at her which is why she's not completely in shadow. And the fact that I'm shooting at a low aperture ... A high aperture? Low aperture, two point two, it just means it's catching all of that light and it actually looks really beautiful. I love having a little bit of contrast in my picture and that's because it just adds interest as well as, it looks as if you've got a light on location, but we don't. We've got natural light. So we're kind of like, as if, you understand how you like your lighting that really works with you well. And I know that I like to shoot in a way where people don't know whether I'm shooting natural light or with the natural light on location. So yeah, we're not gonna use a reflector. We're gonna stick with the natural light and we're lucky with our location that we have picked. So I'm gonna have you, okay, let's do, do exactly what you were doing. I love it when you bring your shoulders in. That looked really lovely. So just bring, oh, I know, the dress is a little tight, isn't it, love? Okay. Lovely. One, two, head up, beautiful. And in fact, do you know what, if you wanted to look away, that's fine as well. Bring the flower lower because it's interrupting your face, yeah. There you go, beautiful. And just turn to, yeah, let's get a straight on shot. So, head up. Neck up. Yeah. You can bring your hands in. I actually really like them around the flower. So you can put your, both your hands around the flower and bring the flower down. Okay, I'm gonna show you what it looks like. So we don't really want the hand there. That looks nice. That looks, yeah. I quite like these where your hands are like just lightly holding them, like that. See, that's lovely. Isn't that lovely? Yeah, so we're gonna try and go for something like that. Okay. Yeah? Okay, was that helpful? Yes. Yeah. No, it's good seeing, I like seeing the pictures. Yeah, because you can see what I see and it helps you tidy ... yeah. So, I know some photographers don't like showing behind the camera to the model, but I think, like, all the information is good. (laughs) Okay. Well, you're doing a really lovely job. Really lovely, so one, two, head up. We always want your head higher because it catches that light, yeah, beautiful. One, I'll count to three, and I want you to, like, give it to me in your eyes. So, one, two, three. So the light's gone in a bit. We're gonna need you, Kevin. It's okay, it's gonna happen, because the sun's playing peekaboo. That's the thing with natural light. You never know what to expect. You never know. So I noticed when I wasn't getting the catch light in her eye, and I had it before. Should we do it from this space, or it resembles what, yeah? Balances that light? Yeah, let's have a look. We wanna emulate kind of what we had originally. There you go, can you see it? Yeah, that's better. Okay, look at me, love, there we go. One-two-three. Beautiful! Because it's getting flat having light coming from one side and then having it reflect on the other. Wonderful. So, hands down, like nice and soft here. Head up. Beautiful. One-two ... Beautiful, and one more. And now this time, tilt your head, yes, yes. And now this time look over here. So turn your head that way like ... And just, like, you're like ... Yeah, that's it, that's it. What are you thinking about? I don't know. Think about something you really ... Think about something you really want right now. Yeah, milkshake! (laughs) I want all of the milkshakes. So literally just be like, (sigh) chocolate! Yeah. So ... Beautiful, one-two-three. Oh, I love that! A little bit more. Beautiful. And now you can even move your hands a little bit with each click of the camera. So, great. One-two-three. Eyes up, yeah, that's lovely. Right. In fact, you know what, can I get one with your eyes closed? So if you're standing ... I love that, if you stand, hold the flower a little bit more straight, keep your hands exactly where they are because that's really pretty. Have your head straight and face me dead straight. Up. Yes, and in fact, if you stay there, one-two-three. Okay, I wanna take one with you at, yeah. Give me one second. I'm gonna actually adjust this hair because if we're gonna use this shot ... You're gonna flick it in a minute. Ah, okay. We might want a straight one, you never know. You've got a point. Okay, one-two-three. Beautiful! I actually love it because it looks like you're in your own little world. Okay, one-two-three. Wonderful. Okay, let's have your expression a bit more serious. (laughs) So like, head up, yes, that's beautiful, stay there. Stunning, stunning. So at this point, I can actually still see the reflector. I'm not worried about it right now. What about the flowers that are in front of her hands? I love that. You do, okay. Yeah, I love them. In fact, I might actually bring them into the opposite side when I'm editing. I really like that. Because if they're just like, the flowing ... The leading lines almost, you know? Okay, one-two-three? Beautiful. So we've just finished a shoot and it was so much fun. I love the way it turned out, what did you think? I thought it was great. I think we're done. We're done. No, no, we've got a lot more to do. We've still got editing to do. I'm fairly confident that we got exactly what we needed and as you saw, the setup was really simple. We didn't have a lot. We literally had one camera, one lens, and we just made it happen. And one me. One you, one natural light, and one reflector. So yeah, that's more or less all you need. You don't need ... I would still, I was thinking, I want to say that you don't need to let yourself get bogged down with not having the right equipment. Like, never let that hold you back. You just need basic equipment, but what you do need is vision. So focus more on building that and focus on developing that, because I think that will definitely make your workflow, A, faster, because we shot fairly quickly because I knew what I wanted to shoot. But also it will just make your ideas come out, like yeah. They'll make you stand out more. Once you have your vision, you pretty much have a beautiful shot as it is and then the rest is just capturing that vision and the rest is, you know, what you have with you. So that's about it. Yeah, and I also think it's what's gonna make you stand out from another photographer. It's not whether you have a better camera than so-and-so, or a better lens than another person. Your vision's gonna make you stand out from other people out there and that's what you need to focus all your energy on. I truly believe it. So when I first started shooting, I started shooting with a point-and-shoot and now I'm shooting with, you know. A Canon 5D Mark III and we're gonna see me shooting later with a Phase One, so. Having the equipment was never the issue. Focusing on my vision and creativity and taking the time to bring a concept to life, that's where you should bring all your energy to because that's really gonna make you stand out and grow as a photographer. That was wonderful. Well thank you very much. Wait til you see the final photo! We're editing it together, yeah. So what did you think about this whole thing? Is there anything you would have done differently now that you look back on it? Um, no, I think I captured exactly what I wanted to and I'm okay with coming out of a photo shoot with one or two photos that are, like, bangin'. So that's my goal anyway, whenever I go into a photo shoot I know that I need to come out with one amazing shot and I will go out of my way to make that shot as amazing as possible. And I saw it, I saw it when she was standing there with her eyes closed and we flicked her hair and it felt like that was a really beautiful moment and that everything else that I captured was to realize that. And then there was another picture as well that I think has some potential so we'll see when we go through the photos, and yeah. Which is interesting, because, at the moment, you're not 100% sure which of the final scenes are gonna be created. It's kind of play, even at this point. Yeah, I think a lot of magic happens in Photoshop as well. It really does because you have to make some decisions then and what I like to do as I mentioned before is just give myself options, so when I'm on location, I'm making sure that I'm getting those hair flicks and making sure that, say for example, if she has a flowing dress, I'm getting the shots of the dress being thrown around. Which we didn't in this case, but, you know, just in case. And making sure that I get those empty plates and I make sure that I get shots around the model as well if I wanted to extend that picture later in post. So I just make sure that I give myself options so when it comes to playtime in Photoshop, I have things to pull from, I've got the information there. Perfect, and, which is also great because the next part we're talking about and showing is the composite piece, so how you composite everything together in terms of the photography and, right. Aside from that, does anybody have any questions regarding the shoot? I see you've added the gold leaf to the eyebrows and lip. What about the gold fingertips? Where do you find the props for that kind of thing? Ah, yes, thank you, I've actually forgot to mention that. So those are the Chinese finger guards that are from Ebay for one dollar fifty. (laughs) Part of a, like, I just typed in "Chinese finger guards" and the reason I was inspired to do so was because there's a show on Netflix called Empresses of the Palace. Have you seen it? Yeah. It's called Empresses of the Palace and it was just so striking, the styling of it. I love watching shows that have beautiful styling because those give me ideas. So this gave me an idea because the ladies in there had beautiful finger guards, and that's because, you know, they were of such a height, they were of such an authority figure that they didn't have to use all their fingers. They just used three fingers and they had all their maids do the rest. And I quite like that, I was like oh, I'll probably make ... She does that too, I have to do everything. I just use three fingers and that's it. But yeah, so I got the idea from there and I went on Ebay and I bought that for $1. and I brought them in. They were gold but you can spray paint them into different colors if you wanted them to. One of the things I might do at one point is to buy some more gems and stuff off Ebay again and just stick them on and get really crafty with it. So yeah. Yeah, just get crafty. So basically inspiration comes from everywhere, even Netflix. Yes. Perfect. Does it ever happen that you think you got the shot and you didn't get the shot? (laughs) Oh, a lot! Yeah, I'm okay now. I'm better now than I was before, because before, I would shoot and shoot and I just wasn't feeling it and I wasn't sure what it was. But then, I learned from that mistake, which was, I needed to move. If I wasn't feeling it in one place, then that meant we needed to move immediately. So I would get us up and get us out of that situation and find another spot. Maybe I needed to move, I would find another angle. I'd get into lie down, look up, jump, something to shake it up, until you find the shot where it makes your heart go, ooh! When you see it on the back of the camera. Because if you feel excited when you see it on the back of the camera, then it's going to be great in real life. At that point you just have to pray that it's sharp. (subdued laughter) You're like, okay, I hope it's sharp. But again, that also comes with experience making sure that you're focusing where you're focusing and then you take it and stuff like that.
Class Materials
Bonus Materials with Purchase
Ratings and Reviews
Kathleen
Great class and great instructors. Genuine and informative. Practical tips to create stunning images. Seeing them work through the process from shoot to finished image was great and I loved that they shared the thought processes behind the creative decisions. Definitely recommended!
RoxSpiegel
Truly a remarkable duo. Bella is so down-to-earth and humble for a photographer with such a strong beautiful and ethereal voice. Her explanations of her process really inspired me--I was sketching concepts throughout the class. Pratik's process really opened my eyes to "smart" retouching--understanding what can be done in fewer brush strokes and slimmer PS files. All in all a really unique and inspiring class that makes me excited to realize my next conceptual shoot. They're also adorable together!
Mai Her
I've gained sooooo much from this I can't even contain my appreciation and excitement! So much inspiration and so much generous advice and tips to help me! Thank you so much Bella and Pratik and Creative Live!