Lessons
Day 1
1Introduction
18:50 2Optimizing Your System
11:30 3The FCP X Interface
43:20 4Importing and Organizing Media
1:05:14 5Projects/Timelines
43:06 6Working with Clips
37:22 7Editing Audio
1:00:09J and L Edits
15:49Day 2
9How to Dissect an Edit
1:24:19 10Let's Edit Something For Real
1:18:45 11Introducing Music
1:18:56 122:45 pm - Audio Mastering
1:22:18Day 3
13Introduction
05:14 14Color Tools and Effects Part 1
1:07:44 1511:00 am - Color Tools and Effects Part 2
1:07:44 16Effects and Titling
1:17:04 17Exporting
47:49Lesson Info
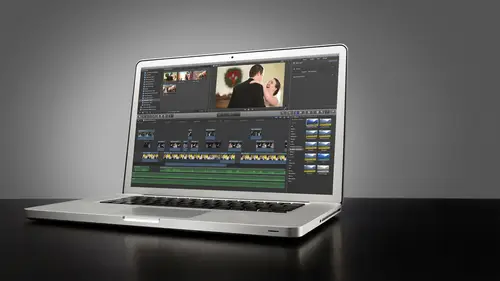
Projects/Timelines
I think we're going to start with first is talking about projects because up until this point we've really been focused on the events we've really been focused on the events library, the event browser and organizing our clips in the event browser, so the second half of working in final cut pro ten is working with projects and projects are our timelines final cut projects are timelines, so this is where we're gonna build our story so there's a lot that goes into setting it up to make sure that it actually is set up correctly toe work with our media from our event. So now that we understand what projects are, we know we can use media from any event or multiple events, so what that means is if we have four events and it doesn't, you know, we have just media scattered across different events, but we only have one project we can still use media from multiple from those other events in our one project and that's a really cool thing no longer do we have to import our media into every project ...
we're working on, like back in the day if I was going to be doing a project let's say for one of my clients is loreal yusa let's say I was going to do a series of four videos for loreal and I want to have four super project files so I would create the first project filing, edit the video, and I'd have to import all the video I shot, okay, but loreal, we only did one shoot, but we're making four videos, so each one of those projects, I'd have to re import all the footage and each of those project files and then hit save every time I make changes and all that kind of thing, because final cup pretenders changed all that, we can have multiple events like multiple days of shooting and multiple projects, and we can all share assets, which is fantastic. So with that in mind, you just have to keep that in mind when working with projects that even though you have multiple events, you can still grab media from from different events and use a media projects. It could be a little confusing, but it is helpful to know that we can do that because there's no, no limit to the number of events or project that you could have, so projects are always linked to an event. We never have a project that's not linked to an event, even if you're using media from multiple events in one project, that one project has the link to one of those events. Okay it's just the nature of the beast that's the way it has to work okay? So projects or timelines and timelines have two very distinct features in final cut pretend this is so important to understand and we will get into this in depth because this these two things um about the list words like the things that when people first opened final cut pro ten and started working with clips went what the heck is going on? I can't just put things where I want anymore that's because these two distinct features are present in final cut pro projects one all projects have a primary storyline well straight that in a minute and all projects are a magnetic timeline all right, so they have a primary storyline and they are magnetic right? Which means you can't just put things wherever you want all the time all right, so what we're gonna get into that will kind of explain how that works very soon there are no tracks media can be placed anywhere on the timeline as long as you abide by certain rules all right? And this is what an older timeline used to look like. So this is final cut pro seven all right and in this time line if you look up with the top half of that the blue are video clips, the green or audio clips and they're all stacked in lines going across you could actually see you can actually see the lines you have the tracks, one through, I think five up top and audio tracks one through six on the bottom and those act as I think of it as a horse track every watching horse races and they all line up in the gate, they'll come shooting out well, that's what the tracks were, they were designed to keep things in line. Okay, so we no longer have that in final cut pro ten now the timeline and final cut pro ten there's no tracks except for one track that goes right down the middle of that timeline. That's the primary storyline. All right, we're going to get to that. What that is in a minute. Um, notice also in this picture that blue and green still represent audio and video but what's different anybody, right? You can put audio up top, you could put video on the bottom. It doesn't matter. You can no longer this video have to be on top in audio on the bottom you could put video you could put just your music on the bottom have all your dialogue up on top doesn't matter. It gives you this whole new frontier of which to work with in final couple attendants really interesting so there's no specified place for video outside of the primary storyline no specified place for audio, so to speak and we'll explain this more both video and audio could be placed anywhere on the timeline okay project timelines we're going to figure out we're going we're going to teach you in the segment how to create a new project timeline howto a pen video clips onto our timeline had to edit movin trim clips on our timeline how to understand what the primary storyline is and how to work with it and we're going to get familiar with working in a magnetic timeline all right? If you have not seen this in action yet, you have no idea what I'm talking about, but once I show you, you're totally understand what I'm talking about so let's move over the final cut pro and let's let's kind of get into this a little bit, all right? So in the last couple segments we worked with our tutorial event and we brought in some video clips of vanessa this's all the raw footage from her yoga promo video here on creative live we've got a mix of b roll and some interview stuff and we have ah track of audio here and we're just going to create a project now to edit some of this video all right? But before we can create a project we have to understand where products go and how to set one up correctly down here in the bottom in the project library, we talked about this earlier on in the day, these air where our projects are going to be stored, essentially what the project library is is a visual reference of what's in our final cut projects folder on our media drive. So we have two hard drives connected to our computer. We have a mac hd hard drive, which is a system. Dr, we don't have any media on that. We don't want to put any projects on that. We want to keep our events and projects together on the work. Dr, this is a separate internal work, dr we have if I treat this down, we have some folders here and within these folders, we have timelines, we have projects, these air, all individual projects, okay? And like I said, before we can grab and we can skim over them, we can kind of see what's in them, we're going to create a new one. We don't have to create a folder for it. At this point, you don't have to put things in folders. I just do that for my own organizational sanity. We're going to create a new project by coming down here to the bottom and clicking on the plus sign. And when I do that it's going to create a new project but is going to ask me a couple questions first is gonna ask me what I want to name it I'd like to name my projects similar to what my event is named. All right, this helps me to keep track of what projects are associate id to what events? Right? So our event name is tutorial we'll call this tutorial project works for me by default because I have the tutorial events selected over here in the event library it's automatically going to default to editorial event here on this dropdown box. However, I could associate this project I'm about to create with any of these events if I wanted to we're going to associate it with tutorial right there. Okay, this box right here is this used custom settings this is going to open up a whole new world for us boom! Lots of different things happening here. Okay, we have something called starting time code and it's set to all zeros basically what that means is when we create our project down here it's going to start with time code zero zero zero zero zero zero zero zero why are there four sets of two zeros? Well, it's very simple time code works like this these first two digits are ours second ones or minutes third one seconds last one frames okay for shooting twenty four frames per second on our footage. We get a twenty four frame count for every one second video, right? I leave this zero there's no reason to change this unless you have a specific reason which would probably won't even cover in this course. Video properties set based on first video clip. What that means is if I just allow final cutie jute to use this default setting, the first video clip that I dragged down or a pen to that project timeline will be the project's settings. So if I just did that, it would say okay, well, the clip that you put on here, this is the first clip it's shot at nineteen. Twenty by ten eighty resolution. It was shot at twenty four frames per second, and the audio sample rate is forty eight kilohertz. It would automatically set the project settings for that. It's a great idea to do this if you know all of your footage is the exact same foot is they shot the exact same way. If you have mixed frame rates like you've shot some of your footage at sixty frames per second. Oh, are you and you shot some of it at twenty four frames per second? You might want to use custom settings just so you can set it up manually. To whichever you need first. All right, you can always change this later on, but it's going to mean rendering re rendering if if you have to go back and change things that have already been applied and rendered so in this case, all of this footage we're working with his ten, eighty phd footage, the resolution is nineteen twenty by ten eighty, the frame rate is twenty three point nine. Eight. Okay, essentially the same thing is twenty for the slight difference is we're not going to go into that now, right? But that's the footage, native frame rates going to leave it alone audio and render properties if we went down here a custom, we have a couple different options, audio channels, all of the audio that I've captured is either mono or stereo. We're going to get into that when we start talking about audio, but I'm going to leave this it's stereo if I had plans to create a surround sound mix when I'm all done, you want to set this to surround, make sure you're not working in surround if you have no plans to use surround sound. Okay, if you don't even know what that means, you probably shouldn't even be using it, so just leave it alone surround sound is a whole different beast in itself. Audio sample rate forty eight kilohertz per second that isthe standard for video if you ever see any video editing timeline settings that are not set to forty eight and you're using video camera footage or dslr footage, you should be set to forty eight kilohertz per second that's the standard for video production the render format we talked about this before this is our trans coded media final cut pro tem will always trans code optimize footage to apple progress for two too, so we want our project to match that if the project is set to something else like four to two, lt or four, four, four, four every time we put a clip down on the time line that's been optimized, we'd have to render it okay, we don't have to deal with that, we want them to match so it's not a big deal. The rendering doesn't take long, but it's still something that it's unnecessary so and it creates files that we really don't need to have. So I just keep this apple programs for two two unless I've pre trance coated my footage to forty two lt but again, we're not going to go down that road right now, okay, so now that we've dialed in all of our projects, settings were ready to create our project. I'm going to click okay and I'm gonna double check again before I do this that the default event is tutorial it is the project name is tutorial project good here we go let's click okay and what's gonna happen is we went from the project library it created the project and then automatically opened it all rights and now down here on the bottom we now have a timeline window we no longer have the project gallery project library any time I want to get back to the project library it's very simple. All they have to do is go down here to the little riel click that and it'll give me back to the project library. Okay, I'm gonna double click this here's another way you can get back to the back to the product library and this is I'm going to introduce you to the timeline history buttons these buttons right here little back in a little forward button this if you click this back button it will take you to the last place you were. So if I was working on a time line before I went to this time line it would take me back to that time line since the only thing we worked on before this was the project library it's going to take me back to the project or I'm sorry it will take me back to the previous timeline that I use before so before we even started this program, I had been working in some other timelines, so if I want to get back to one of those timelines I can use this timeline history will take me back to the last timeline that I viewed to get back to the project library, click a little real on the bottom sorry for any confusion there ok if I want to see which timelines I've worked with, if I hold down, it'll give me a list of all the timelines I've been working with all right? So for example, if I click back and it takes me to this other timeline that we had opened before, I can click forward now and will bring me back into the timeline I just created all right? We'll use this later when we get into using multiple projects and working with multiple projects, okay, let's, talk about this timeline window for a minute there's a couple things in here we really need to understand. I was explaining before about the primary storyline this gray bar, the dark gray bar that runs down the middle of timeline that is the primary storyline when we start a pending footage to our timeline from our media browser from our from our event browser by default it has to go first to the primary story line let me break this down for you this is how I'd liketo explain this imagine this timeline is a desert okay and that you're driving from vegas to l a all right it's just wide open desert this primary storyline the gray bar is the highway okay that's the highway and highways have rules highways have traffic laws I always have lane's okay this is a highway that runs through the desert all of this area the light gray shaded area on either side of the highway that's open desert wild frontier it's the wild wild west anything can happen in that area alright keep that in mind as we move forward here and I think this will be a little bit easier to grasp all right, so we have our highway which is the dark gray bar and we have our light gray area here anything I bring down that's the first thing I ever bring down from the top here and we're going to get into how to bring things down more specifically in a minute but if I just bring something down by default I just hit the e key to upend that to the timeline it automatically goes to the primary story line okay, the primary storyline will be the basis for where we start laying down our main action. Okay, so in this particular instance in this video let me just illustrate this I'm gonna go back to the actual prebaked the actual finished video of vanessa's yoga video here, okay her interview her talking head thes two shots this wide shot in this close up her talking by play this back take a whole body e I knew if I kept going the way that I wass my photography crew was not gonna last as long as I wanted it to that's our main action the primary storyline is meant for your main action it's meant to be the route the anchor of your video all this other stuff that's happening above and below it in the wild frontier on either side at highway khun go wherever it wants I can move this stuff around I can reposition it all that kind of great stuff if I try to move something down here there's more of an order to things things they're not going to be place wherever I want it's going to start grabbing other things there are rules associated with this primary storyline that we have to follow otherwise we're going to find ourselves in deep doo doo okay we don't want to find ourselves in deep doo doo right so the primary storyline when I start moving footage down from my event browser is gonna automatically start applying itself to the primary story line I'm gonna hit shift z to zoom out here I'm just and I just grabbed any old random clip here I'm just grabbing random clips I'm hitting hee to upend it you see how automatically it's going down to that primary storyline okay, I can't now aiken drag something down from here and put it up on the top we're on the bottom but I can't upend two that I can I can there's other ways we'll get to that in a minute. All right? So basically the primary storyline is our main highway and it is meant for our main action and all the other stuff will go elsewhere all right for now again, this is just this is subject to the rules can be broken but we'll get into that later. So what I want to focus on right now is howto efficiently get clips from this media browser window our media viewer down the temperature down here onto the timeline. Okay, there's a couple different ways we can do this. Remember before we set ranges of clips and we kind of went through and we dragged and we hit or were we just j k eld so I had j and l and I hit I too set in in was that in right there starting its way through good clip here. This's media's testing it's actually not a good clip show the next one arrow down it's gonna take me to my next one I'm gonna hit l let's let it play I'm gonna wait for a good starting point for a hit I too start she bends over and I want the quick stop right there. Okay, so I've defined a range here that I want to bring down into my into my timeline there's a couple different ways we can do this we can either just click and drag it down onto our primary storyline. We can use keywords shortcut or keyboard shortcut e for upend ok in the way of pen works if I have multiple clips stacking them upend using the e command will always put it one right after another on the primary storyline. Okay, we can also come down here to our toolbar and select this we get select this e option right here for upend and just clicked that I hardly ever use these buttons guys, honestly, I always either use either drag it down right? Is he it's the fastest way to get things down the timeline rather than coming down a clicking another button but that's another way you could do it. I'm going to leave these clips for now. Ok, so that's one way. Another way to get things down from here down to the timeline is to use insert insert at it. Okay, so if I place this play head in the middle of this existing clip and I choose another clip range let's just say for instance, let's, you know let's grab our favorites member before we mark some favorites boom there's our favorites and let's go up here we'll see the rest of the favorites good okay let's grab looks like we only marked one favorite let's just you know what let's just skip that because I don't want to confuse anybody like going with favorites let's just do this all right? So let's say for example let's describe this clip right here I'm going to find a range if I had w watch what happens down here on the timeline it's split the original clip and it inserted the new clip right in the middle and it shift shifted this second half of that first clip over to the end I'll do it again kind of show it to you shift dizzy or I'm sorry commands you to undo come up to the clock to the top grab our clip again w to insert and there it is it inserted two right in the middle okay so that's another way you can do that all right you can also insert by clicking this button right here there you go that's an insert at it okay um we can also use another insert command it's more of an override command and the command is keyboard shortcut d now watch what happens when I do this I'm going to take this clip highlight it put my play head somewhere in the middle of our first existing cliff but I'm gonna head d d is for overwrite watch what happens okay, so it overrode everything from that point where my play head wass I'll do it again, but the play had to hear this time when I could d it overwrites the clip on the primary storyline. So those are the three ways we can get clips from our event browser down onto the primary storyline, which is where our main action will be. So if I have an interview with vanessa and let's say I cut this up in a sound bites that's my first sound, bite him e and drop it down there now it's a long clips so I need to ship z to kind of see the rest of my time line or I can zoom out down here. Okay? Notice how would put automatically put the play head at the end of the video clip when I upended it let's go get her second sound bite and I'm hypothetically editing here. Let's, grab a second part of her sound bite depend let's, grab another part of herself our interview upend. So this is how I would lay out the main store reaction, the interviews, the main action on this, putting my sound bites down here on the primary storyline and this is what we call a radio cut it's a radio edit why we're just getting the main story flushed out down here we're cutting around her sound bytes where she starts you know, starts talking stop start talking starts talking stops talking and is putting him together down in the primary storyline okay using ito upend we'll put them side by side using w will split that first clip in half okay using d will override it completely right I know I'm moving around a little faster I'll slow down okay now that's the primary storyline watch what happens if I try to move something on the primary storyline I can't just put it over here it snaps back okay that's because this is a magnetic timeline this is very unique to final cut pro ten they've put a magnetic timeline in here that makes it so we have highway rules and regulations to abide by on the primary storyline why do they do this? You're going to see throughout the rest of this workshop that this is meant to keep things together okay why do we want to keep things together? Well if I cut a scene and I've got not just my main action but other clips up here on the top and other clips down here on the bottom and I go to move the main part of that scene I don't want I want everything kept together I want all those clips to be married to this main action so that brings us to our next method of bringing clips down from the event browser to our timeline, we're going to use what's called a connected at it, right? So we have vanessa talking about ceded yoga positions let's just say she's talking about sitting down and doing yoga well, I'm gonna grab a shot of her sitting down as b roll because I don't want to see her just talking the whole time. I want to cut away to a shot that shows her doing and demonstrating what she's talking about. So grab a shot here. I too, set in in point head space to play it. Stop hit. Oh, I've got my range selected. Now I can either grab this clip and drag it down and place it on top. Or I can use keyboard shortcut queue for connect. Okay. And wherever my play head is, it will connect that clip why's it called a connected clip. This's why watch this if I grabbed the primary storyline main action clip and I move it, those other clips stay with it. Okay, this is nice. This keeps things were moving out of sync. We're not necessarily out of sync, but keeps from keeps you from making mistakes and changing your edit and slipping things out from where they should be so that's meant to do that. Right so that can get confusing when we have multiple things happening here but I wanted to kind of illustrate what connected at its are now if I zoom in here you see that little line that line indicates that this clip is connected to this clip if I drag one of these clips over here on top of this one it doesn't get connected to this clip it stays connected to this clip connected clips are always connected to clips on a primary storyline all right, anything if I take another shot and put it down here it's still connected to my primary storyline clip and it can't move unless I move it independently right now you wouldn't see that clip because it's you know the timeline works like this it only shows you what's on top okay she'll notice if I play this back now we're seeing we're seeing the primary storyline than it's going to cut to our top clip and there's gonna cut back when that clip ends and now watch what happens when it hits that one of the bottom we don't see it because it's underneath our action I would have to move it to the top in order to see it okay so I know it's rudimentary but that's really important understand that connect clips could be married I see married it's just like the term I like to use its married to this main action clip well what happens if I re size and we haven't gotten the trimming it but we will if I start re sizing this watch it happens wth eclipse go wait for me mommy they don't they still want to stay connected to that clip all right they're not going to just decide okay well now we're on our own it's going to stay married to that clip okay so that's how connected clips work so the different types of edits we have e for upend evil upend your clip w will insert if I want to cut it in half here's one part here is the other here's the new clip we have overwrite by hitting the d command will override it from that point of my play head and then we have connected clips which work by hitting the cute the q key on the keyboard connected clips and we got that okay all right so now now that we sort of understand how married clips work there's other things we can do to get video inspected you're down here on our timeline weakened let's say for example we have vanessa talking here let's actually get a shot of vanessa talking let's go up here it doesn't matter what we're not worried about the audio right now so we'll penned that down to our primary story line I just dragged it it's all I did and let's grab some b roll so let's say we want to use this shot right here, okay, but I know I don't want the audio there is audio associated to this clip how do I know there's audio associated to this clip? Well, I can play it back and hear it, okay? Or you know, look here and I see that there's an audio way for him that tells me that there's audio in that clip but I don't want that audio I just want the video so when we play this back it's not conflicting with the audio from vanessa talking well, we could do it a couple of different ways we can come down here to these buttons I never use and click next to these edit options and we can choose whether we want the video on lee or audio on lee or both all wood I mean, we're bringing down both video and audio, so in this case I would just select video on lee or I can hit the easier way for me to do that would be so wild I'm still up here hit keyboard shortcut shift too and you'll notice down here that something changed. Okay, originally these were little white icons meaning that there's both audio and video associated with that when I hit shift to it turns blue and it gives me a little person little little head in a box that just means it's going to bring down the audio are the video rather if I want to bring down this the audio I would use shift three I'm sorry I have to be selected appear shift three and now you see if you have a little green audio icon and that means that I'll just bring down the audio of the clip so let's reset this and I'll demonstrate so from this point right here if I want to connect this clip with just the video no audio shift too you see my icons turned blue and now I can hit q for my connected at it and you'll notice that there's no audio now there's no more way form associating with that clip it's just video so when I play this back I'm only going here the audio from down below in control I strain and stress okay if I wanted just the audio we do same thing shift three and hit connected at it and it put it down here and that's just the audio from that clip now know something it's green it's not blue audio clips agreeing video clips or blue and it put it down on the bottom of it underneath the primary storyline not above that's because by default final cook says okay I think video clips you go on the top an audio clips you go on the bottom but then we can move that wherever we want we can put the audio appear if we want doesn't matter right so many, many different things we can do if you just want to pull down video on lee are audio only those would be the ways to do it we can also use these hot buttons right here or we can use our shift one two and three keyboard commands okay, great let me see something really cool let's say for instance were working up here in our event browser and we're just defining ranges of clips and we're putting them down here on the timeline really fast. Well, I like I like to be for this part I wanted to use my keyboard I really don't want to use the mouse much because I feel like I'm clicking and dragging too much and they have to come down here and do all this stuff we can do this with just keys, which makes it really fast so let's say for example, let's start up here on this clip we're going to use our j k and l commands and our you know, commands to set our in outs and I'm going to hit alan just play through this stuff I'm gonna wait for a good shot and go on ahead I said the n o to set the out q to connect okay when I connected it whoops well what you see what happened there is just the audio so let's undo that we're going to hit shift one or should you shift to well to take the video down? All right, now I'm working primarily down here in the project timeline I need to be up in the event browser okay? So I can use command one will activate this window and you'll know it's activated because it went from dark gray toe like gracie the change there I click this window and are wild wild west frontier gets more gets gets brighter back and forth okay, we can do that with keyboard commands to make this action really fast. All right, so let's go back in here and start from scratch so let's so I in space bar out okay shift to just bring down the video connected the clip good down our command one will bring us back up into the events browser and now I can use my arrow key to go to my next clip let's hit el to play and I'm just gonna do this or what? You guys kind of see what I'm doing here is for a good shot fast forward a little bit and get to it faster. Okay, that looks good I n space bar to play shot looks good to me I'm gonna hit stop set the outpoint cue to connect my clip command one brings me back up to the events right down arrow and I can continue this process just on my keyboard so I can connect clips I go to my next one I can play it and I'm never having to touch the mouse which make thing makes things really fast for me and editing so I can go multiple clips here and let's go back up and grab that wide shot here let's just play this out see how it goes I like the wide shot but it play hell to play I set the n o to set the out q to connect command one brings me back up the events but see how fast that is and I can just go through all my footage and bring things down it's especially helpful when we've marked favorites so what's this mark a bunch of favorites here for example favorite favorite notice the green line above it favorite favorite and now I'm gonna tell final cut okay show me just the favorites all right I want to start connecting these down here well these are all my favorites I know these are all good shots because I've already marked him his favorites right well I could just go through these connected at it next clip play it just to make sure looks good maybe set a new n point by hitting I q connected at it well that's too long okay so let's undo we'll go command one get back up on the events window will play the clip will set a new outpoint that was way too long I'm just playing it using the space bar k to stop said the end q next clip okay so you can see just by using keystrokes I can go through it and edit my stuff really quickly and that's mean and it's six of one half dozen of the other it all depends on how you want to do this but I like to be very efficient during this part of it so you if you wanted to you could still come up here and set ranges or just press in and out and then use your pen tools to bring them down however you want to do it it's fine that's just the fastest fastest method for may to get things down onto the timeline so in a nutshell we just kind of covered how to get clips down onto the timeline now we need to talk a little bit more about what we do with the clips now that they are down here on the time line so now that we've got a bunch of things happening down here I'm going to get rid of these two because of two similar to our main action um we have vanessa talking down here on the bottom and then we have some b roll shots which I want so I'm just gonna move I'm just gonna move these over just a little housekeeping here they're okay so what I want to start doing now is trimming these clips all right, the way trimming works on the timeline is simply by clicking and dragging a clip two three size or to re extend or detract from the length of the clip right so if I come down here to my primary storyline and I want to trim the front of it maybe to this point right here where my play head is I can simply come over here with my mouse grab the front you'll notice that the very front of the clip now turned yellow and I could just click left click and drag and it will re sais that clip it looks a little weird because what's happening here is we have this like no man's land it's just all this is doing is bringing the start of the project timeline up to the point where you want things to start okay and because the first clip we put down here on the primary storyline is but it directly up against the start of the project timeline there is no black or pre role to this video the second I started we see video okay there's no black there if I wanted to fade up from black we'd have to take additional steps we're not worried about that right now so I just trimmed the beginning of this clip up to where I wanted it now if I want to trim the end I couldn't do that with no problem right here but watch this if I had another clip on here, eat to upend this other clip down here, and I'm going to turn this out to make it bigger, by the way, if you see red that's the end of the clip, but there you see some red that's at the end of the clip they're gnome or to that particular video clip, if I want to now trim the end of this primary storyline clip, watch what happens to the clip after it, it comes with it that could be a problem later on. If you're trying to keep things in sync, right, so a couple different ways we can get around that we'll get to that in a minute. But that's, just keep in mind that anything you trim on your primary storyline by default, it's going to start pulling everything else with it that's called rippling. All right, when you affect something, you know, up here in time, and then you start moving in and affects the rest of the time line it's called rippling, so we just have to be careful of that. I can trim any of these other clips out here, and and no man in the wild, wild west with no problem, I can grab, you know, the first frame of that clip, let me actually get in here is a little tricky with the zoom on the kind of the beginning of a clip there we go I can grab this and just trim this all day long and it's not going to affect anything before or after it remember this is the wild frontier while os anything goes there are no rules rules no rules all right just keep that in mind uh look what happened there I trimmed this b roll clip to extend past the one next to it and it bumped it out of the way that's cool man I like that it means I'm not gonna overwrite this clip if I do that it'll still remain the next clip in the sequence okay if I extend something the other way it will do the same thing it'll bump clips out of the way if I grab and move a clip in our wild frontier and move it it will bump things out of the way all right, so this is it takes a little bit of getting used to when you're working in the programme once you have a feel for the way this works it's actually really, really fun and easy to work with so just remember rules down here on the primary storyline no rules up here we can do a lot maura versatile and it's up here okay everybody understand that good okay, so I'm just gonna zoom back out here just you can see the whole timeline you also you shift z but that fills the window like this but I'm just gonna hold option you see that my zoom handle now has a little minus thing on it I can just click zoom out this gives me a little bit more real estate to work with okay, cool now let's talk for a second about trimming by frame by frame because there's going to be times where you don't want to make massive adjustments when you're trimming we just want to work with a piece or just work frame by frame and the way we would do that is rather than clicking in dragging by the way do you see this window that popped up? Let me zoom in again I know I'm moving around I'll slow it down look what happened here when I dragged the end of this clip you're seeing this little time code read out there what that's telling me that the number on the left is the current length of that clip I am now two seconds in one frame thiss clip is two seconds in one frame long at that point if I extended out it increases in time okay? The number on the right is telling me by how much I've increased it okay, so if the clip started out as one second and I grab it there we go it's telling me okay, now I've increased it by one second and it's now two seconds long, so on and so forth. But if I want to get frame accurate because that number on the right oh eight that's the frames that's the number of frames where were two seconds and eight frames into this clip, I can simply grab the beginning or the end of a video clip. Comma and period will allow me to trim one frame at a time. Okay, so, uh, comic e nudges it left one frame at a time comma or period will allow me to go write one frame at a time. If I hold shift while I do this, it'll go ten frames at a time. All right, that's handy. It also comes in handy when you're moving clips. If I want to move clips, I could just use the comic he to go backwards one frame at a time and the period key to go forward one frame at a time hole downshift it. I'll move it in increments of ten frames at a time. Okay? This helps when you are up against other clips like this and you don't want to push that other one forward, I can simply nudge it left and right k to get it where I want to go, okay, well now, I just want to trim the end. I could just grab the handle on the end of the clip in it until the other clip drops down. Okay, just some precision movements that help you get familiar with working on the project timeline. Lots of different things we can do down here, it's just helpful to know how to navigate and howto work around it. Okay, let's, take some questions at this point because I really I just gave you everything you kind of need to know about getting clips from the event browser down onto the project timeline so let's, see if anybody has any questions about that excellent question here, let's go in this city of covering this later on, but does the magnetic property of the timeline prevent you from being able to jump around to edit? Like so if you're if you're editing to a song and you want to edit something towards the end and then go back and put together the beginning, you know, does that make it hard to do that's the next thing we're gonna get to, there are ways to break the rules of the highway, so we're going to circumvent some rules in the next and the next part. We're loving that whole highway new frontier thing it helps to think of it like that that's what you have some structure to kind of wrap your mind around otherwise you look at it go we'll understand what does this do this and this doesn't so highway desert excellent mark w has a question about uh, optimal setup he says f final cut pro ten seems to really lag when I scroll through all the video thumbnails what is the optimal set up to avoid this? That sounds to me like it's, his system there's really? No way we've already gone up into our preferences and set playback to better performance, but that really doesn't affect skimming skimming is this? When I just run my play head over video like this faster systems will allow this to happen at a quicker rate, slower systems we we will get some lag, so and you didn't mention you could go back and watch the re watcher when you purchased the video? Definitely you can check those out you know your list of what you're using? Yeah, you having more than eight gigs of ram will help that having faster processors will help that closing applications and that might be running in the background might help that that sounds like more of a personalized system issue than anything else any other questions? Yes question from ralph from dubai howto howto adds a slug in between the clips in the main timeline in there. Okay, next thing we're gonna show that it's directly related to what? Anna
Class Materials
bonus material with purchase
Ratings and Reviews
Crispino Dourado
I've been using FCP since 2013 or so I thought! Until I went through the lessons here and boy was I hooked on! I've learned a ton of stuff that I can use from this course! Really awesome course for beginners to professionals and a must for wedding cinematographers! I loved every bit of this course! Thank you.
Ryan Pierson
Rob Adams and Vanessa Joy are incredible speakers and thoughtful educators. In three days, they take you through the basics of editing theory and explain everything you need to know to dive into FCP X. Rob even details how to do advanced color grading at a pace that is clear and easy to understand. Without a doubt, this course has done more to improve my personal and professional use of FCP X than five years of experience working with video and audio. A+ great course.
a Creativelive Student
Thoroughly enjoying this course! I have seen all of Rob & Vanessa's creativelive workshops to date and am constantly and consistently learning something new. Thank you for sharing your wisdom. I am really looking forward to working this into our company with our first cinematography wedding in May! Courtney Liske Photography
Student Work
Related Classes
Final Cut Pro X