Lesson Info
14. Editing Review
Lessons
Day 1
1Introduction
18:02 2Key Terms
27:06 3System Configuration and RAID Storage
19:22 4Q&A with Creating an Efficient Workflow
19:36 5Interface and Media Management
31:02 6Importing Media Part 1
30:40 7Importing Media Part 2
11:58Ratings and Keywords
32:21 9Reviewing Clips for Edit
25:13 10Importing Clips
19:26 11Editing an Interview Demo
33:20 12Replace Edit and Timeline Index
32:50 13Compound Clips and Auditions
18:27Day 2
14Editing Review
13:34 15Trimming Part 1
28:43 16Trimming Part 2
39:03 17How We Hear
21:51 18Audio Key Terms with Q&A
12:14 19Audio Basics, Meters, and Inspector
31:01 20Audio Q&A
08:55 21Dual System Sound and Audio Analysis
28:58 22Multicam Editing Part 1
27:08 23Multicam Editing Part 2
15:02 24Transitions Part 1
23:27 25Transitions Part 2
24:06 26Formatting and Animating Titles
30:18Day 3
27Additional Effects
12:36 28Editing and Trimming Review
11:58 29Changing Speed of a Clip
31:31 30Inspector Effects
36:35 31The Effects Browsers and Generators
19:37 32Blend Modes
17:10 33Effects Q&A
13:58 34Simple Effects
16:52 35Intro to Color Correction
18:20 36Video Scopes
19:25 37Color Correcting for Video
20:28 38Color Correcting Skintone
23:11 39Color Correction Q&A
08:54 40Audio Effects Part 1
26:20 41Audio Effects Part 2
23:08 42Exporting and Sharing
21:28Lesson Info
Editing Review
Thanks so much for joining us for this day to end what I want to cover in today's sections were to start with trimming, which is the process of adjusting where two clips touch will also do an editing review discussing what we learned yesterday to sort of review what we talked about and make sure it's still fresh in your mind as we talk about it today. Second sessions, one of my favorites were spent time looking up audio everything from how we hear how audio has generated taha audio was created on the computer audio codex, which is sort of the math class that's the pain you go through before we actually start the actual working with software, then we'll use audio inside final cut look at how we can set audio levels, set pan and do multi channel mixing work with dual channel sound all kinds of really interesting stuff with audio is going to be in the second session. The third session takes a look at multi cam editing, editing more than one camera at a time, and we'll wrap up by making a ...
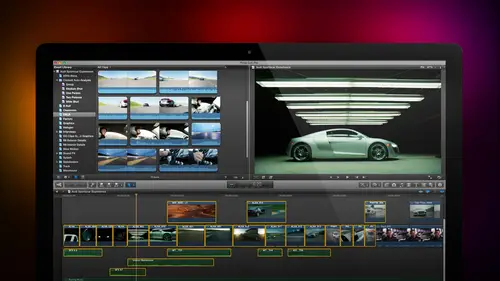
transition out of editing into effects by looking at transitions and titles, which presages what we're going to talk about tomorrow, which is a whole day devoted to effect. Specifically for this session, I want to start with an editing review. Then we'll look at trimming clips will look at a brand new feature inside final cut ten called the precision editor. I'll explain how to trim with the mouse. I'll explain how to trim with the keyboard and what trimming is in general, then well, do what are called split edits, where we trim the audio and video separately. This really adds power and gives me a chance to talk about one of jim's favorite stories, which is the story of john and martha will share that with you a little later this morning. A couple things I wanted to find before we get too carried away first is trimming. Trimming is the process of adjusting where two clips touch now, where two clips touch is the edit point, and there are three sides to another point there's the out, the inn and both ian and the out. Now, just to give you an example recently I was given a forty three million dollars any a grant to study the concept of trimming and I want to share with you what the results of that forty three million dollars any a grant where this is your tax dollars at work, so pay very close attention this is the outgoing clip the last frame of the outgoing clip is called the out this is the incoming clip on the first frame of the incoming clip is called the inn and where those two clips touch right there is the added point now an edit point has three sides it has just the out it has just the in or has the n and the out that's how we trim when we're adjusting something we're adjusting where one clip ends were adjusting where the other clips starts or where we make the switch from one clip to the other there's a technical term associated with each of these this is called rippling the outlet ripple like and water this is called rippling the and this is called rolling the n nd out ripple when it's one side roll when it's both side the reason's called a ripple is that when you change the out everything downstream pulls up its effects ripple through the rest of the timeline when I changed the end everything adjusts it ripples downstream from the into the end of your project so trimming is the process of adjusting the inn in the end the out or both so that's that's all trimming is but the interesting thing is that trimming actually affects the emotion of your editor. We'll talk more about that, he said, making a note because otherwise I'm going to get off track here but we'll talk about how trimming can affect the emotion of your ad it just a couple minutes what I want to do first though is I want to do a quick review of what we covered yesterday and then jim if you're still with me after that was a great interview with miles by the way nice job oh thank you so much and he well he was a little nervous so but he did a rocking job well he had a good person asking questions and when you talk about stuff you love the questions make all the difference way should talk about that because the whole process of of creating a promo is one of generating a particular action having the audience do something watched the show for instance and and that really depends on how you construct the shots and when you construct the shots that leads into what editing is all about and so I want to do a review what we covered yesterday but if you remember yesterday I said that we were going to start the fourth segment with a dead body do you remember that and then I forgot and I and the body just died and labor there and we never saw what happened to it so remind me before I get into trimming to do the dead body because otherwise without the dead body what we're talking about doesn't make a whole lot of sense we need this stiff so help me remember we'll do all right so let's just hide this let's start final cut there are three there are three where are we here? Dr cerf on dh projects okay there are three core concepts that we covered yesterday we spent a lot of time explaining why these concepts are so important but there's three core concepts that we need to understand from yesterday the first is importing media the second is reviewing a clip to set an in and an out based upon where that clip starts and stops in terms of how we're going to edit that into the project and any actual editing into the timeline so let's review those three steps to import media notice here I have dr cerf again we can adjust the size of of the distance between the libraries and the browser by grabbing this vertical line click hold on dragging it wherever you want I've created a number of different events each one of these folders is an event remember event is a folder in which we store stuff I have audio files located in the audio event I have pictures inside the b roll event I have dr cerf inside the interview event I have more pictures inside now four by three and I have a project folder which is our collection of edits there's no limit to the number of events that you create you can have one you have to have a minimum of one you can have as many as you want it's an organizational concept like we were talking a file cabinet yesterday the library is the file cabinet and inside the file cabinet we have folders and inside those folders we have media or projects the events of the folder and the media the projects of the material it's stored inside the folder so this is simply as many as you want to create okay we import media if there's nothing here this is really obvious blue import button but we got a bunch of stuff here so that blue import but one is gone I can click this downward pointing arrow that allows me to import which I never use I could go up to the file menu if I was mouse centric and go to import media because that works perfectly but I am a keyboard junkie I just remember the keyboard shortcut which is command I with command I open up the media import window when this allows me to access all the media which is stored on any hard drive which is attached to my computer I have my media located in a source media folder which is just a folder that I created and stuff media in or you could put any folder together there's no restrictions on what folders air called there's no restrictions on where media is stored except two number one I recommend not using the boot drive to storm media because it's going to be preoccupied and often too slow and the second is, I recommend that you store your media on the fastest and largest drive that you've got, because media has a huge band with, you need to have a lot of of data transferring from the hard drive to your computer, so you want to store this on the biggest drive and the fastest drive that you have. If you need more information specifically on how storage works, be sure to refer to session one. Yesterday, we spent a lot of time talking about that let's bring in some animal footage here, because that's certainly relates to the interstellar internet, and I'm going to simply click on a bighorn sheep clip, and I am in the media import window, and when skimming is turned on, I can quickly skim across the clip and have our ram do a star turn and wave to you from the forests of the far north. To be able to import a clip, highlight the clip, or the group of clips that you want us to import and click the import selected button. This opens up the media import window, and we talked about what thes settings are. Click the import button, and after a few seconds, that clip will show up in whatever library you designate so here's our clip, we can now set an inn for the clip let's, find the spot where just before the ram turns its head, we type the letter I to set the start or the end of a clip, and we'll wait for him to turn his head back and he starts to walk out. We'll set out this golden box now determines that portion of the clip that we want to add it to the timeline with that golden box there we can now do four different edits to the timeline, the letter e or this icon right here, the letter e edits the clip into the timeline at the end of whatever clips are there, so I never have to worry about the position of the play head or let's, just take this clip here, where's nasa right there we'll go with this clip and we'll set it in the letter. I will set out the letter o and put the play head where I want to insert the spinning earth clip. I'm going to use the up arrow key put the play head at the start of a clip, and this time we'll click the second icon, which doesn't insert at it it in search, the clip at the position of the play had pushing everything else downstream, or I could we'll just set up burning globe here I and oh, I could put the play head and say the middle of a clip and use a there's no icon, but we could use the edit menu. Go down tto overwrite the letter d and it override it's replaces what it lands on, so I have a letter e to do in upend at it adds it to the end of the timeline the letter w doesn't insert at it inserts it at the position of the play head and pushes everything to the right. The letter d overwrites starting at the position the play had replacing that which is in the timeline with that new clip that comes in from the browser or the letter q will set an end will set out and type the letter q adds what's called a connected clip it instantly patches that clip ah bah above all other layers if I did that again, type the letter q notice that now my clip is above all other layers do it again, the clippers above all other layers and it a positions the clip at the position of the skimmer noticed that thing I'm dragging back and forth or if the skimmer has turned off the play head. I'm a big fan of the skimmer up here in the browser, but I'm a bigger fan of having skimming turned off in the timeline because the skimmer always is in the wrong place and I always end up editing the clip where I don't want it we can toggle skimming on and off by kicking, clicking this keyboard shortcut here typing or typing the letter ass isn't skimming, and we can have the skimmer appear or disappear. So when I'm in the browser or the media import window skimming is on. I'm a big fan of it there when I'm in the timeline I typed the letter s skimming is off because I don't like the fact that skimmers always in the wrong position and when I read it like doing, insert at it or do a override it at the position of the skimmer, I end up with cliff scattered all over everywhere in back there's a variety of other edits that we can use, we can do replace edits. We can use three point out it's we can use back time at its and we talked a lot about that in the fourth session yesterday. You have a chance to review that if that's useful to you. So we import media command I weaken import individual clips. We can import groups of clips. We can import a range within a clip. We review media inside the browser set where we wanted to start by typing the letter I or forgot noticed this vertical yellow line here. Grab the vertical yellow line, drag it left or right to change the start, grab the vertical yellow line at the end to change the end so you can adjust the enemy out by click hold dragging with the mouse or by typing a letter I or by typing a letter. Oh, you can also mark a clip by going up to the mark menu set range starting set range and I'm very grateful that apple put those in there. I have never in my life used them, but if they're useful to you feel free. If you need to get rid of the enemy out option x, select all the clips that have ranges that you want to get rid of just by dragging a rectangle around them type option x and you make that rectangle that that range disappear. We can now well, just close this library. By the way, a library is a container that holds everything it holds our media holds are project's holds events, it holds everything that we can open and close libraries whenever we want. File open. This is the list of the most recently opened libraries or click on other and you can open any library stored anywhere on your system and to close the library simply right mouse, click on the library name itself, go on to close library and you, khun close the library
Class Materials
bonus material with purchase
Ratings and Reviews
a Creativelive Student
Absolutely one of the best & easy to follow teaching / learning sessions for this product. Larry has a great approach & insight into delivering a wealth of information from his years of experience that budding video engineers will certainly benefit from with a product that is powerful & great to use. I'm enjoying the journey to better understand & use this great product, expanding my experience in producing awesome video presentations. Great work Larry, & also huge fan of creativelive Keep up the great work you all do to assist budding producers in mastering their skills. Noel Blake Melbourne Australia
plb42
Final Cut Pro with Larry Jordan has been of enormous help to me just stating in FCPX. Larry has a unique way of getting the message on the basics across in an easy to understand manner. I have not yet looked at the entire course as I am practicing the steps as I go through the course. Many programs of FCP are not presented in the easy to follow manner thatL array does so well. I am 100% delighted with my purchase. I am in Sydney, Australia, and, due to the time difference it is impractical to view courses live. So I had to purchase on trust which in this case was a good choice. It would be good if Creative Live could perhaps rerun programs so overseas folks could view them at a convenient time. The courses still need to be purchased as I find it best to run it on another monitor and put what is taught into practice. Well done and thanks for the special offer in July.
a Creativelive Student
Attending this class was really a life-changing experience. Larry is a wonderful teacher and clearly on top of the program and methodology, and the way he structured the course, did frequent reviews and constant technique reminders (naming keyboard shortcuts as he did them, for example) really added a lot to the presentation. The depth of the class was very much appreciated, and his command of a complex subject showed that it was possible. I have wanted to understand FCP for several years and have only gotten the beginnings of a handle on it in the last 6 months or so. This class was an exponential knowledge upload and I hope will allow me to do lots of things I've only wondered about. I thought Jim was a good foil for Larry and did a nice job keeping things together, even when there was a technical problem. The value for me of being able to sit through the class before deciding to purchase was huge, and I am very much looking forward to reviewing the videos as questions come up. The class was very thorough and I didn't feel anything was being left out. Thank you so much for making it available.
Student Work
Related Classes
Final Cut Pro X