Lesson Info
11. Lighting for Drama
Lessons
Lesson Info
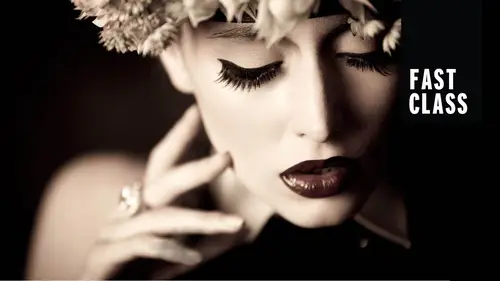
Lighting for Drama
last type of set up, which is drama. More dramatic lighting setups, a little bit more contrast, a little bit more shadow and men. Some of the considerations I might think of when lighting men. So what we're gonna have them dio is I'm going to put a black background up. We're just gonna put a V flat behind the subject to fake having a black seamless. By the way, whether I shoot white or black or gray, I always shoot seamless. It's just it's the easiest for me to control the light a soon as it's a fabric or a Muslim. Um, I end up having to worry about wrinkles, except for if it's I'm going for that look. Otherwise, I would just use paper. All right. Perfect. So let's take a look at the first one. All right. So the very, very first one is one light, a beauty dish and a silver reflector. But the Silver reflector in this case is used for separation to separate the subject from the background. So may I have my male model, please, And let me get you a chair, put it in the center, find Yeah. Y...
eah, that was fun. Yeah, that'll be great. Thank you, guys. And I'm also going to grab the grid when I'm shooting for drama. I want there to be more shadows. I tend to use a grid more often. And what it does is it focuses the light so it doesn't spread out as much. And also it will make it to the light. Doesn't reach the background. So if I were shooting on a gray background or honestly, even this white, if I use a grid, I could make the background appear black, so it gives me more flexibility. Great. All right, so we're gonna add a grid. In this instance, I'm using a BT dish because it has a little bit more crisp shadows than I would get with a soft box. But it's still flattering Light on the face for a portrait. You can take a seat. Yep. Perfect. And I'm going thio pump that modeling lined up a little bit. Where such as? High as it goes. There you go. Got it. Perfect. So I can see the modeling light. You can set it at full power or proportional. So it's matching the actual output like so you could see how different lights compare and output. I'm just turning all the way up so I can actually see It. Looks great. And I'm gonna have you be my reflector man. All right, So what I want is I want some kind of dramatic lighting, either loop or Rembrandt and short light. So short light is when the shadows fall towards the camera. So I'm gonna turn you this way, that same pose. But this direction, great. Something like this. Perfect. And I am going to test the exposure on his face to start off with. And then you have just even more that way a little bit too. You're right. Good. And then ice towards me. Let's see. Perfect. A little bit bright clothes on. It's a tiny bit. All right, So what you'll see is just a sliver off light underneath his ID to create Rembrandt light. But of course, that side of his face totally disappears. So we're going to try Thio and the grid might make it difficult. We'll give a try. What we're going to try to do is catch a little bit of light for a little bit of separation. I don't need a lot I just don't want to totally blend in. It might be problematic with a grid, because the grid focuses. Light them so much that it there might be almost minimal by the time it reaches that. So I'm gonna bring you even closer entering head back to where it was. Yes. No. Looks good. Okay, Excellent. So what you're doing is the whole It's a billiards thing again, though. You're trying to line up that reflector to catch the light from your your beauty dish. If he stood further back and off to the side, he's not catching the light. You have to actually watch for it. And this is why I turn off all my ambient light right now. It's hard for me to tell if it's working till I take the photo. If I were using modeling lights on Lee, I would be able to see, so this gives me a pretty nice crisp I light. Even without a second light. Silver is what I would use to give you that contrast, especially if you're working with a grid whites not going to catch enough light to do anything but just subtly give separation. So this gives us a nice shape. And you have the nice Rembrandt light. So this is dramatic lighting set up number one, Rembrandt. Light short with a silver reflector. Uh, kind of equal, distant back to capture that highlight. I'm going on to the next slating set up. That was lighting set up. Number one. You're going to lighting set up. Number two is going to be beauty dish and barn doors, part of the like. The restrictions of this set up is that notice how, John or the light stand. Whoever I had, whatever I had had to be right here to catch the light because it's a grid. If use another two or 3 ft back, there wouldn't be any light to catch anymore. Plus, by the time it kicked back at your subject would reach. So, yeah, I could get that nice lighting pattern on his face, but only for a tight head shot. If I want any more flexibility, I need to lights. So I'm gonna leave it in the exact same place. I could do this short light. I could do this more broad light, Rembrandt, but we leave it in the same place. But now we have barn doors so I could shoot mid length or full length. But you put your head in the same place again. Great. So I'm gonna do one close up, entering head back towards the late a tiny bit right there. Great. And I can vary the power. They actually look relatively similar. But I have just so much more flexibility here. I can shoot a wider shot, for example. And I wouldn't have been able to do that with just the reflector. And I get uneven Highlight that goes down his back. Notice what the grid does is the grid cuts off the light so it is almost completely dark by the middle of his body, and his feet would be in solid shadow. It's a creative effect. It could be right or wrong. And let's say I wanted to highlight here, but I did want to see a little bit of his clothing. No problem. I could add another late below really low power just to give him a little bit of separation. But you would know the attention was meant to be on his face. Okay, So what I would like to dio is I'm gonna have you step out for a second. May I borrow you? Great. All right, so we're going to do Ah. Sexy booed wash shot here. Okay. And take a look at the same lighting set up. That's perfect. And, Aiken, everyone perfect. I'm gonna have to raise my light up, because remember, I take it perfect. And I just said it right here. Right. So remember, I would have to raise this light up because you need the light to be about nine inches or above the models head, and she's wearing heels. And is this pointed close to the center of your face? What do you want me to move? It was okay, but how about the height? That good? Good, perfect. So I still want some shadow. And this is all about shape and form. If there's no backlight, I'm gonna have you turn that off real quick. What will happen? Would you play your face to that side? Good. What will happen is this nice, dramatic late Chin down. Good. But I lose the curve in her back, which is what's so beautiful and feminine. E you lose that shape. So I know I need to have something to Carver out from the background. A silver reflector would not work. Barn doors is what I need. And she's wearing black. So I know I need something with a little bit more oomph to separate her out from the background. All right, so I'm gonna have you play right there. Play your elbow. Ford. The reason I had her do that when she pulled her elbow back, it cast a shadow. And then the barn doors weren't working to my advantage anyway, So I'm playing with my pose to make sure I can see the highlights I need. That looks perfect. Other hand up to your neck. Great. And could you pop up your front? Needs that? Yeah, a little bit. I know it's a giant heels and arch your back a little bit more trust. This is that I knew exactly what I was asking you to do. Is not easy. Good. That's cool. Relaxing if you need to. Okay, All right. So now this curve is what's beautiful. We like to see curve and women and also separates her out from the background. It's nice and bright, but not to crisp. I'm watching for this highlight to not become pure white. And I like this. I think this is dramatic, but I would also like to see maybe another highlight on the other side of her body, and that would be three point lighting. So I'm gonna pop over to that. So I'm gonna take another grid, another barn doors to create three point lighting, one barn door from either side and notice the height that we have the light. It doesn't have to be that high, but the reason it's that high is because we wanted to illuminate her shoulder. But if perhaps you just wanted to highlight here you're just trying to draw attention to the lower part of her body. You could do that. You could lower the light and focus the light and and just put a highlight there. And that's E C. That a lot and glamour photography. All right, so I'm gonna turn off my main light. Great, Perfect. And I'm going to take a look before I use my main light to pay attention to what those room lights are doing. Yeah. Yep. And so let me take a shot so you can see how the barn doors are affecting the shot. So right now he has the barn doors open. You're fine. That's one. Yep. He has a barn doors open now closing even more good. This closes in a little bit, and another way to make the highlight more narrow is instead of having the burned or off to the side, can you put it back even further, right onto the seamless and then angle it back at her by moving further back and inwards and angling that light to kind of back 45? That narrows. The highlight is, well, the actual distance and angle. Also having her further up if she takes take two steps back now, the lights are like cross split lights. So it's a very, very restricting lighting. I have very specific areas you can stand. So pop back up here again. Somewhere around right there. Perfect. And I'm gonna move that light anyway. So let's take a look. At what so far? Just those room lights and hand on your neck. Perfect. Pop up. You can get whatever stance you want. I'm only shooting to your knees, so whatever is comfortable. Okay, good. So this is just a curve. Great. And now I'm gonna pop on the light. I'm going to start with the beauty dish, and then we're gonna switch over the grid so you can see a difference. The beauty dish would be more for a portrait grid. Might be if you're going for incredibly dramatic, like film noir style. So great and right there. So now she has more separation. Put your hand on the side of your face. Other side, your right hand side. Great. Perfect. And had a little lower. Great. Okay. All right. So now she separates from the background for what I often do is I pump those up even more and you can switch that for me, John? Uh, 10 degree. I'm going to pump up the power in this even more to show you how far you can push it. Like how bright I could make these. So this is going toe be on the verge of being too bright, but it's going to be dramatic. So I'm gonna narrow these beams of light, bring them around from behind a little bit lower and pump up the light. So before I get that light firing, I'll give it a test. Perfect. Let's see how these highlights air looking. Okay, so now you'll see the difference. There will be a little bit more crisp. Ah, little bit more narrow. I could go even brighter than that if I want. So I'm gonna actually just open up a tiny bit. Perfect. So I'm gonna go for really bright highlights, carve her out from the background. And even if I didn't add another light, can you turn your head? You turn off one more time, Head Teoh, I don't know if it's too long. Can turn your head that way. Really, really far. You might have to switch if this light this light on the left hand side were higher, I could just shoot her in profile and not use the main light. It all All right. So I'm gonna put you to look back at the grid. Let's pop the grid on and give it. I'll get test here when you're taking a meter reading. If you are from a grid you have and inch or two toe work with. If you are even this far over, it could make a massive difference in your meter reading. So be careful with grids. You wanted to point straight back in this case, that the light So I'm gonna try it right there. 12.7. You mentioned times the little Oh, Uh huh. Okay. Aito perfect. So let's take Ah, look at this. So all you will see are the curves of her body and a spotlight on her face. And it's a little bit hard to see the spotlight with this ambient light, But this is why we use modeling lights. I'm gonna have you look into the light this time her fiction down a little great. And if I shoot this in black and white, this becomes kind of a film noir. Look to it. Let me switch to monochrome so you can see great. And she's carved out from the background spotlight on her face. Nice light on her jaw on her entire body, all about curves It would be really dramatic. And I pumped up the contrast a little bit more in post if right now we're using attended degree grade. If we wanted more focused on her face, I could switch to five. Or I could move that grid in and just have ah spotlight here as a side note. Now that you know how to use grids? I didn't shoot where This girl, She had a fake gun. Okay. It was like for a TV promo. She's holding the gun there. I had another light that was just lighting the the gun with this lighting set up because everything else follows the shadow. The gun would disappear without that. So you could build your lighting in any switch to five just to give you a new example. So it's going to be even narrower. Here we go. So now Wow. So now it's just in the middle of her face. Great. Look straight towards out like beautiful. Alright. And watch this no longer on her shoulders and under chest watch just on the center of her faith. Really beautiful. Really dramatic. You look great. You have one more lighting set up to go through. And so this last one is going to be dramatic but high key, and you can leave the grid even. I'm going to turn this around and we remove the black V flat. We are going to have her in silhouette, but with a spotlight on her face. And I shoot this sometimes for fine art nudes as well. So we'll be a lot of curve and then just a highlight on the subject's face. So I'm gonna back this light up, and this is going to be for lighting that background. Wait. Perfect. Okay. And I'm gonna move this one Bacca's Well, okay, great. And if I'm going to just for time's sake, leave the barn doors on and point them at the background. Normally, what I would do for this is I would switch to those umbrellas, feather them across so I could get nice even lighting. So let me just flip this over here, and I'm using the barn door to make sure that I'm not getting too much spill of light on her. All right to test that. So I'm going to test this to get an exposure, And I might need department a side angle again. Faint. Okay. And you will begin to see ah, little bit of Phil ideally building black V flats, this wall and these, um, curtains up here are catching a little bit of light and filling it in. I'm gonna close down just a tiny bit. Perfect. That's really nice. Pose. Good. Okay, So I've got a pure white background. Ideally, I would have a silhouetted subject that would be a black V flat close. And now I can pop a grid on her face, especially in black and white. If we just make it a little bit higher contrast, it has a ton of drama to it. So can you play your eyes this time, though? To the light? Great. And we're watching carefully that modeling, like, tiny bit higher right on the center of her face. Great. Right there. Hold that. And so now the image is all about curve with a little bit of pop of light on her face. I'm gonna open up a tiny bit, Mark, you turn it up just a little great, and I'm gonna have you, um, switch legs. He popped the other knee forward and then lean that hip out. Yeah, Good. And I'm going to try to arch your back just a little bit just for a sec, Miss Testa, engine up and feel the light on your face right there. See how little movement she has to work with. Okay, great. And I'm gonna have you switch your legs again. Great. And yet cross that anyway. in. Perfect. That's what it looks. Good. Okay, great. Okay, So you guys get the idea. Even that little movement moved her the light a little bit higher. So if you're playing with a five degree grids, every tiny movement, I'm gonna do one more. Let's do something that's like a dramatic side shape. Tuck me in. Great. And, John, can you put that light and the tuck your knee all the way to the other knee, even though it's, like, almost impossible. Perfect. Great. And then put the hands. I can see your pinky. Perfect. Okay. And then if you can, you can cross your legs. Actually, you could even cross them, right? Yeah. Oh, well, maybe not in that outfit. Maybe not. Good. Good. Okay. All right. Perfect. It was. It was in between expression. We'll wrap up with a perfect expression and then just pique your eyes back at me. Great. Okay. Perfect. So you could, with the flats, make it go to solid black so that everything is just a curve and then just highlight on her face. So that gives you dramatic lighting with 123 lights high key, low key. And this could be done with a grid. Or it could be done with a beauty dish and a grid as well
Class Materials
Bonus Materials with Purchase
Ratings and Reviews
Dennis Day
Awesome class. Lindsey Adler is an excellent teacher. She explained some basic concepts that I couldn't figure out on my own. The section showing 1, 2, and 3 light setups moves pretty fast. So I'll watch that again. This Fast Class was nice for me because I don't have time to do a full lengthy course.
Colin Cunningham
Great Course, Lots of great information through a variety of examples. Learned tons from this course, and loved the wide variety of lighting setups for Male and Female models as well as groups. Would recommend it to anyone new to portrait photography.
Student Work
Related Classes
Studio Lighting