Lessons
Lesson Info
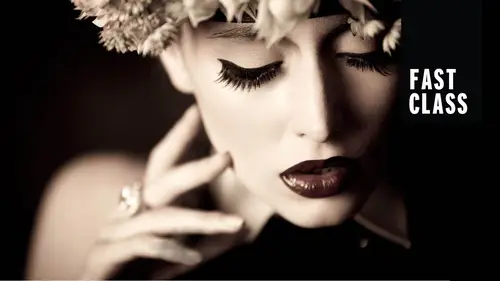
Beauty Lighting
we're going to talk about if you do. Ah, lot of beauty shots. Ah, lot of head shots. You're going to want a beauty dish. And a beauty dish is going to give me a little bit more crisp shadows than a soft box. Gives me a little bit more control. And generally, I would use this. And this is gonna be a beauty light section, maybe for photographing a woman. But you can also photograph a man using the sliding set up. So while waiting for her, I'll just show the difference. I'll take one shot like this. Perfect. And this is actually going to be on Ah, background. That's not let. So everybody who's watching these back strobes are not firing. I'm just not moving them because it's convenient not to for this segment. All right. And you Perfect. All right, So for a beauty dish, perfect, I want to keep it nice and close 2 to 4 ft, especially for a nice tight head shot. And typically for a girl, maybe I would have it flat lit to the front for him. However, I'm going to move the light off to the side...
to give me a little bit of Rembrandt and raise this light up higher than I normally would. That's I'm Can you angle that down? Because I don't know if I could do this for a second. I'm not sure. Thank you. So I'm gonna raise that light up even higher for a guy. I better the circles that your face is in your face. Perfect. See how we're asking that question. You want the center of the beauty dish right at his face. So I'm going to bring that around to the side to get Rembrandt. I'm gonna have you hold this. And for a guy, I might even raise it up a little bit more. I want a lot of shadow. All right, So how is that looking? Still roughly at your face. Okay. Perfect. So let's take a meter reading 0.5 point six was already 5.6. Perfect. So even though clam show lighting can be more for women, I would I could modify this to be a little bit more dramatic for a guy. And so if you look, you don't see the catch like it's not like, flattened, glowing and airy. I've moved it off to the side a little bit. And now the catch like that's predominant is actually the catch light in the bottom. If I do not want so much light on the background, I confess either this away or hold a black sea flat or a black piece of foam core. So it doesn't quite hit the background, so it should be a little bit darker, just a tiny bit. Okay, so this wasn't actually intended for you, so I'll have you step out now. Where are you? Thank you for being my lovely standing. Okay, So the core of beauty light if I have one light is going to be ah, beauty dish as centered as I can get it. Perfect. Lovely lady. Beauty is s center. It is possible which is called Paramount Lighting. I want it to be high enough up in order to shape her face. I want to show her cheekbones If it's too flat, There's not too much shape. If it's too high, their shadows in her eyes. That looks perfect. So I'm going to give it a try without the reflector first. Great. There you go. Oh, let's give it right. Well, let me Let me test this and we'll do a shot at the end and look eyes with me. Great. Okay, Perfect. We'll do one more. So this looks nice. But if I really want that glow that you like from beauty lighting, we add a reflector underneath. And if you want her to use her hands, which sometimes you would then you need someone else to hold a reflector. Or you would get a reflector stand or last delight Trife, Lector or John Cornyn cello, Uh, or what I'll do to sometimes. If the stand, um it has, I'll put a clamp here and then we'll put ah, clamp on the reflector and then she can use her hands and it rests on her waist. That's another creative way to do it as well. Yep, and so it's kind of his balance. Perfect. Great. When you add a reflector, it catches all this light from the beauty dish. So it's going to give you a really much more bright exposure, so you might need to close down. Ah, little bit. The closer I bring the reflector underneath your chin, the brighter it gets, the lower that I put it, the less filled there is Silver gives you sparkle. White gives you a subtle Phil. So let me just dio one more and head straight towards me for one good, great, and one more would turn up. And if I think that's too much, Phil, let's switch to white just so you can see the difference. One with silver when was white. It'll be much more subtle Phil on this one. Perfect, so you'll be able to see there's more contrast with silver. Watch the highlights on her neck and on her chin. White is just a little bit softer. More shadows are visible, so that is beauty lighting. With one light, I would choose a beauty dish above and a silver reflector below that is called clamshell light. We're going to switch to two lights. We have the beauty dish above a silver reflector below, and I'm going to put a soft box behind her. So this is how I can give myself a pure white background, even when I don't have multiple lights to light that background. And the other thing I like about it is the light. It acts differently than just lighting a white background. It pours over her shoulders it wraps around her hair. It's much more off a glowing effect. So we're gonna put the soft box right behind her and the distance is actually right up against her. The more I want the light to wrap, the further I put that soft box right up against her head. And the less that I want that lights rap, I have her step away from the soft box and the highlights get smaller and smaller. I could do this with multiple tutu modifiers like I could use a soft box instead of a beauty dish. But for beauty, I like the extra contrast to emphasize cheekbones and jawline. So you look perfect. And the only thing I'm gonna have you dio is can you pull that hair on your left side off a little bit more? And the reason I'm doing this is just what I want you to see. The light wrapping around the jaw. If her hair is down, you won't be able to see it as much. Also with blond hair. With this backlight, it can potentially get overexposed. Overexpose is a little bit relative in this situation. Depends on what looks good and I want to make sure that, more or less, that the head behind her is not over her shoulder, the center of that light. I want a little bit behind her back, and so if it lowers a little bit, great. If not, it's okay. That's fine. What a perfect. Because if it's over her shoulder, the center of the light soft boxes, they have hot spots. Even if you add a diffusion in the center to spread it out, it's still gonna have that bright, bright spot in the middle. So I want that to be just a little bit lower, and I can already see this nice glowing highlight on her jaw. I'm not using my main line at this point. I'm just using the backlight. And so I'm going to be able to see what that backlight is actually doing. And what it's doing is giving me blow from behind really heavenly and this nice highlight on her jaw. If you have a problem with the hair kind of getting blown out here, this would not be a lighting set up. You would go for. You would instead just light a white background or you pull her hair back street, and then you don't have that problem, so you kinda have to make a decision. Hair like mine would be much more objectionable for a set up like this because it would start to piece apart darker hair with lots of curls. So I like that. Let that looks good. Let me add in my beauty dish. Next, great, beautiful. And this looks great even without any reflector below. Giving her a nice shape on her jawline. Really beautiful definition. If I want that highlight on that side of the face, her right hand side of the face to show up more, I create a little bit more shadow. And I could pull the light off to the side a tiny bit more that tiny bit more shadow will emphasize the highlight from the background. Okay, But then to give this that duty, look, I can add a reflector from below. Let's do white. You could do white or silver. One has more filled than the other. Let's just try a soft fill of white. Perfect. Great. I'm gonna close down a like a third of a stop. Nothing. So you're just a little bit darker. Beautiful, greatly on her jaw Nice. And now your hair looks like it's glowing from every direction. All right, so that is beauty lighting with two lights. Now I'm going to switch to beauty lighting with three lights, and we're going to do a high key and a low key version. Alright, So beauty lighting would be beauty dish with a silver dish below. So we're gonna actually stack the lights, will have a clamshell created by two lights and then barn doors separating her jaw line. So the reason if that I would do this, is I want maybe a little bit more drama. So that light and it doesn't have to be Rembrandt could be loop. So I'm gonna set this up. This looks good. Going to give her a little bit of shadow that side of her face. I'll take this. Okay. And let's test it out. So far, those barn doors, we can close them down to just be ah, hairline on her jaw. Perfect. That looks nice. She's got some separation from the background. It kind of pops out the hair. It's a nice hair light. And then what I can do is I use the beauty dish to sculpt her face, and I could use a reflector to fill in the shadows, but sometimes, and we talked about this. Sometimes it it gives you less control, like it's just you can kind of fill it in. But if you take a grid or a silver reflector, you could pop just a little bit of light in the shadows and control the direction in the quality of light. You could put a soft box underneath if you wanted a ah softer, broader field. Or maybe you wanted a strip light across to give you that long, narrow highlight could do that. So we're going to just pop a silver dish, and what I need to be aware of is the number. One way to mess this up is to have your bottom light too bright, because then it looks like there's a light from below. It's kind of the monster lighting makes your face look wider. Highlights underneath your chin underneath her nose. Instead, you just wanna pop of light. Perfect. All right, take a look. That looks pretty good. I might take a half step closer to see how it can subtly fill in the shadows and you mind holding up just a little bit higher? Quick. Great. And I have to do pump it up just a little bit, just so you can see the difference and turn your head straight towards me. Okay, Perfect. So I can give myself a little bit more shadow on that side of her face. The barn doors carve out her jaw line, and the silver reflector dish below pops the light in her eyes. You can go even more dramatic if you wanted to. You could bring this laid off further to the side as well. It is not a right or wrong answers. Just more or less shadow and perfect. Get that looks great. Something I did want to note a note is watch out when you're using those barn doors when people have hair like this, because what will happen is the barn doors could shoot through the hair and then create funny highlights on the face, which I find distracting. It starts to get that way here with hair in the ear, so you just wanna be aware of it. And so that's why I turn off my main light when I start setting the barn door so I could see exactly exactly what it's doing. Can you put your hair back one more time? That's okay. I'm just going to show you guys. I moved the hair and look ahead back this way and so I can actually see in this example just all I want to do is look at the highlight on the side of her face between the two. You know, in one it was the hair and she was turned away. So just like an inch or two of distance makes a big difference with barn doors who just want to be careful on that. My services are lower key example. I like this one that we just did shot on black. The reason I like it shot in black is it's a little bit more shadow. It's a little brighter highlight. It's a little bit more contrast than I would go for for high key. So here would be my high key. Do you wanna just We're gonna point thes barn doors back at the background, okay? And I am going to beauty boxer, we're going to go for, like, really glowing and flat light. So to get that I need to bring the beauty dish as far in front and center as possible. I'm going to do that first and foremost, nice and flat light here, which looks beautiful. And because of how this stand is built, I can actually get paramount light because I don't have to shoot past this stand because it elevates it out to the side just a little bit. So shoots. And that's this is what this is. Good. Okay. Said it's shooting a little bit over her head. So you wanna point it down just a little bit? I could lower it just a little, Like, great about their. Alright, Perfect. So the next part of this is this will probably look fine as is, but it's not the really glowing and high key look that I'm going for. Let me get a quick test here. See how that background looks. So you have a white background, but the light on her face I wanted to be totally flat, very glowing, so I'm going to box her in. Can I have one more reflector? Oh, it's right there. Okay, Perfect. Alright. So how this works Beauty box and boxing her in one reflector on either side to make a V. If you have phone core, all you have to do is fold a piece of foam core in half, and I have to bring even close, so as close as possible touching in the middle. It's gonna catch light from all directions, and it's going to make the picture brighter, so I might have to close down good and let me take. I'm pretty only take one more. A third of a stop closed down perfect, and so it will give me completely like flat, creamy, even light, which is really good for people that have have your wrinkles or have some blemishes because it eliminates shadows. Not as good for somebody that has a really round face because you're not using any shadows to help them out. So that Waas beauty lighting with 12 or three lights, three lights, high key and low key
Class Materials
Bonus Materials with Purchase
Ratings and Reviews
Dennis Day
Awesome class. Lindsey Adler is an excellent teacher. She explained some basic concepts that I couldn't figure out on my own. The section showing 1, 2, and 3 light setups moves pretty fast. So I'll watch that again. This Fast Class was nice for me because I don't have time to do a full lengthy course.
Colin Cunningham
Great Course, Lots of great information through a variety of examples. Learned tons from this course, and loved the wide variety of lighting setups for Male and Female models as well as groups. Would recommend it to anyone new to portrait photography.
Student Work
Related Classes
Studio Lighting