Crappy Lighting: Dappled, Backlit, and Overcast
Lesson 4 from: FAST CLASS: Conquering Crappy LightLindsay Adler, Erik Valind
Crappy Lighting: Dappled, Backlit, and Overcast
Lesson 4 from: FAST CLASS: Conquering Crappy LightLindsay Adler, Erik Valind
Lesson Info
4. Crappy Lighting: Dappled, Backlit, and Overcast
Lessons
Crappy Lighting Conditions: Direct Sunlight
27:40 2Crappy Lighting Conditions: Fluorescent and Mixed
16:55 3Crappy Lighting Conditions: Low Light
22:14 4Crappy Lighting: Dappled, Backlit, and Overcast
11:04 5Setting Your Camera Up for Crappy Light
19:18 6Crappy Lighting Condition: Backlight
26:06 7Crappy Lighting Condition: Low Light Outdoors
18:53Lesson Info
Crappy Lighting: Dappled, Backlit, and Overcast
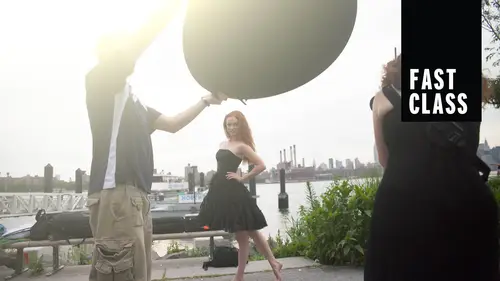
rapidly is when on somebody's face there's a highlight and shadow. It's kind of modeled light. Sometimes it can be really beautiful. And Eric has an example of that. The fashion photographer, me. I shot this for an editorial, and I'm like, Let's just rock the definitely and have high contrast in on her face and they can look pretty, but not usually like. Here's another example of when it works. Well, you don't explain what you did here. Yeah. Okay, So this this photo right off the bat was to Dapple It looks like this. There were highlights were clipping her face. And there was really, really dark shadows. So I kind of basically played a little pool game with light here and had the light coming down from the top bouncing off the giant scream. Jim, you see the guy holding their the reflector with the silver reflector, bouncing it back down to kind of fill in the top of the door and everything over there to get some direction to the light because she was kind of directly in dappled shade.
And then I've got another assistant in the corner with that smaller reflector we talked about just trying to light her face to even out the light on her face. So by kind of tweaking the existing dappled life, I still maintain the dappled light on the clothes which led to the environment but maybe wasn't so extreme as like I would for a fashion application, because they're paying me to see the clothes you know, So I can't be blowing out the clothes. They'd be kind of ticked off at me. And so from everyone else's usual applications for something like that, if you have a situation where your subjects, they can't move from where they are and it's going to be dappled light. If you can build in some with a reflector building some more light to try to fill in some of those shadows, that's going to help you out. I usually just move thumb if I can take control of the situation and all right, so here's a dappled light situation. She was standing underneath the tree, the leaves were blowing, and so as it leaves, blow, highlight would come on her face and then their nose. And so we have a couple options. If you can't move the person, you can either block out the highlights or defuse them. The reason I included this slide is what I want you to do is look very carefully at her hair, the picture on the left. She looks like she's in the shade and there's no light on her hair, the picture on the right. You see some of that soft light wrapping around, and generally I prefer the one on the right cause she looks like she's in the environment, that kind of cut and pasted or in the shade, so that would be the difference between the two. But there's been situations where doubled late. I didn't have anything. I found a piece of cardboard. I don't have anything to work with. I just held above their head. It would give you the example on the left, and there's a lot you can do. You know, here's the example on the left, and we've just blocked out overhead. So see how there's not really any environment on her. Just looks like she's on the shade, not what I prefer, but you can add a little bit of a reflector to build. A contrast beckoned. We're gonna look at examples like that So we finish the last two we have here strong back legs. I'm going to be talking about this in several sections, about kind of focusing in strong back like these are the problems you run into. All right, lens flare. Of course, if you think it's a problem, yeah, what Lens flare is very in vogue right now, but it's technically a failure like you're not supposed to know. You're not supposed to have the light coming directly and hitting your lens, because that lowers contrast. But both of us incorporate a lot of lens flare as a stylistic choice, but it's technically a flaw if you're gonna be old school about it, and you would see when you're actually looking at the lens, you would see the light hitting the lens, bouncing around what I had an assistant on shoot for something. If they could just stand in the way of the sun from hitting my lens that would get rid of the lens flare. There's a couple different ways to do. Also have a lens hood on Lens Hood will do it. That doesn't save you, though. If you're shooting into this, like at the Sun, it's not going to save you, but a lot of people. And I'm gonna admits this. I'm like Lens had takes up space and it's awkward. And then I, like, get rid of it like not to get rid of it, But I don't put it in my bag. But when I'm shooting in a backlit situation, the results of not having a lens hood if you're not going for creative lens flare, it looks muddy and flat. It just looks like a muddy picture without a lot of contrast. Doesn't even sometimes doesn't even look sharp. So adding that lens hood brings back a lot of that contrast and sharpness to it. So that's why you would want one of those. If not, have someone try to block off that light. When Eric and I have shot together before he's held a reflector. And I think that was the ad for the class. It was actually holding reflector that wasn't blocking her. I wanted a lot of light, and I wanted her to be heavily backlit. He was blocking the light off me so it wasn't actually shining on her. It was just a kind of shade. The lens, um So that's how you would handle lens flare. One other thing you can do is well is with composition. If you put the subject in front of the sun, you will have the lens blur. They're duplicating their actually acting as your lens hood slash person, blocking the sun and used to with the composition. Um, depends on if that's what you're going for. So when you see my examples later, you'll see that difficulty focusing. I know that you have a couple ways that you that you handle this, um, I will be talking about something called back button. Focus, um, in a little bit, because what I will do is I will move my camera so that I can get something and focus. Okay, I'll try to block out the sun, or I'll move so that the sons in shade and I can actually lock. Focus may be on on the side of her body, and I use my back button toe lock that focus in place. So if I recomposed, I can shoot in. It stays and focus. You can actually still do that with your main trigger. But what would happen to me? It's sometimes I'd like, let go of it or I would would need to, like, grab a different exposure. And because we'll talk about this because your exposure and you're focused around the same thing. If you're holding your focus and they want to grab a different exposure, you can't. So that's why you need back wouldn't focus, so we will touch on that as well, on difficulty achieving correct exposure. Backlight is one of the very, very few situations wherever flip well besides in studio, where I flip over to manual mode. But I still most the time, use aperture priority and exposure compensation. So we're going to talk about all of this. But if I just give you the overall description, this is what my camera gave me when I just pointed it at the scene, not with spot metering. If I was just doing evaluative, that's what it gave me. It basically tried to remember average out everything in the seem to grab, so it just kind of put me everything in the middle. Okay, when I did spot metering, so I meet her just on her it way over exposed, and it brought the son back into the scene because I was saying, I want her skin to be correct. So it just blew out everything. So I was trying to go for something a little bit in between. So this is where I would have my camera on aperture priority. We talked about this before a leader, and I would either go plus to make the picture brighter or minus on. My exposure will to make the picture darker. That's how I work. Eric wouldn't do that. He would shoot Emanuel. I'm smarter than my camera. I like to think so days So? So we're going to show you guys around better. All right. So very last one. Before we move on to talking about camera settings. Drab, overcast day. Eric was actually commenting that somebody when we were talking about this being a bad lighting situation, someone's like, no drab, overcast day is what they say. Yeah, Okay, so what was it? It's like saying it's gods Gods. Let s Okay, you never read the forums on a website, but I read someone's post about why are they complained about Dr Overcast Light? It's the best light out there. That's what I pray for. And it is great because it saw. But a lot of problems to you get huge, huge shadows in the eyes if it's overhead. So here's how I would describe it. Quality is good. Direction is still bad. Okay, on an overcast day, even though it's overcast and soft and diffused, there is still a direction of like the sun is still somewhere in the sky, lower or higher. And so, just like I would on a sunny day, maybe turned the subjects back so that the sons at their hair to get good light in this picture. All I did is turned her to the side towards the light. So I turned her around and had her lift her chin up. There's no reflectors, no diffusers, no nothing. So in other words, when you go out on an overcast day and you're just like, Oh, it's all being soft light. No, there's completely different light in that environment, depending on which way that person is facing. So what I'll do is on an overcast day. Also, you can you may favour. You just slowly turn around and I'll watch until the light looks better on their face and I'll oppose them. That way. I'll just make them turn around until the light looks good. So that's exactly what I had her do here. I had her rotate until the light look best on her face. No reflectors, no diffusers, no nothing. Just saying, turn around, look up. Another example is all right. If that light is just bad and I can't figure out how to fix it, if I can get the person to stand underneath like a porch or an overhang, it cuts out overhead light, which flattens everything. So this is This is how I envision it when I put something shade over their head. All of the light has to come from in front of them instead of from above. And the light from above is what puts the highlight on their nose and the shadows in their eyes. So once I have blocked off, everything has to come from the front and it's much more flattering. Sold in the direction, rose, change of the models, right. And so instead of having her move around, I could have her stand underneath an overhang or in this situation, there were no overhangs, so I had Eric Holder, piece of foam core over her head. I made shade using form court. It would work great in a situation like this, where it's one model doesn't work when there's a group of people, and that's the problem you run into is you're trying to create shade and just to take a look at this, this is the, uh, this is a shot here, where she's standing out in front of the overhang in the light under face to see the highlighter. No shadows in her eyes. If she backs up one step, watch one step, see how it flattens it out. So there is something a difference. Something called open shade, which would be something kind of like this, meaning there's nothing above her head. She's in the shadow of a building or, um, I don't know the things. She's in the shade, but there's light still coming from the sky above. But when she backs up, it's covered, so there's no light from above. It's all from the front, so open, shade covered shade. There's a big difference between the two when I have an open shade and can avoid it. I have to have my subjects. Lister, chin up. We're at a reflector versus I don't have to do much and cover Jade. Okay, so here we go again. This the same thing we're working with, Um, and you get a little more versatility to in your posing if you're willing to bring some of your own flash into it. So Lindsay's taking a natural approach and blocking off the overhead lights. We don't like the direction and forcing the light to fill in underneath. So she just kind obtained the entire son. I find it easier to bring like a tiny son in my pocket and pop it up every now and then said So we did with the umbrella here. You look very quickly, we letting the ambient light to all of the work for us, but we want to be able to shape her. So we basically brought in the flash just right enough to fill up those shadows and kind of overpower the contrast we had going out of the face.
Class Materials
Bonus Materials with Purchase
Ratings and Reviews
Jessica Garner
Student Work
Related Classes
Lighting