Crappy Lighting Conditions: Direct Sunlight
Lesson 1 from: FAST CLASS: Conquering Crappy LightLindsay Adler, Erik Valind
Crappy Lighting Conditions: Direct Sunlight
Lesson 1 from: FAST CLASS: Conquering Crappy LightLindsay Adler, Erik Valind
Lesson Info
1. Crappy Lighting Conditions: Direct Sunlight
Lessons
Crappy Lighting Conditions: Direct Sunlight
27:40 2Crappy Lighting Conditions: Fluorescent and Mixed
16:55 3Crappy Lighting Conditions: Low Light
22:14 4Crappy Lighting: Dappled, Backlit, and Overcast
11:04 5Setting Your Camera Up for Crappy Light
19:18 6Crappy Lighting Condition: Backlight
26:06 7Crappy Lighting Condition: Low Light Outdoors
18:53Lesson Info
Crappy Lighting Conditions: Direct Sunlight
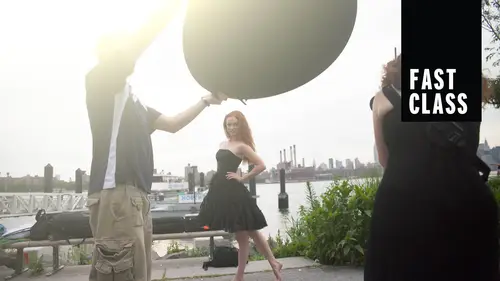
Let's start off with number one. Um and I'm gonna cover this one. And of course, you can add l your brilliant expertise, but I'm gonna talk a little bit about direct sunlight. Um, and we're not actually going to talk about in this overpowering the sun with a flash because no, half, they were trying to keep it kind of simple. So direct sunlight. Let's take a look at this. The problems that you have. Bright highlights on the face and dark shadows. In other words, there's a really high contrast range which looks really bad on people. It looks awful. Can't capture the entire exposure. So you got a kind of pick. Do you want the highlights to be correctly exposed? You want the shadows to be correctly exposure. Just try to get something in the middle that you have Everything, um, unflattering. And another one is the squinting eyes, which is another thing. When educating, my clients were trying to do a portrait session at high noon. Like, you know, a lot of times, if it's bright, people get re...
ally squinty and then you can see the wrinkles more. Okay. See, I use this thing I dio what I say It works. Just gotta build him back up on set your beautiful See you. Look, you listen to me. Look at that light. Exactly. Exactly. Escorted. Um, solution will start after this one. Find shade. I mean, that's the easy one. And that's the obvious one. If you have shaped, the next thing we're going to be covering is what to do if there isn't any shade in sight. Eso finding shade using a shade using shade plus adding reflector in and then finding natural Fletcher. So let's take a look at a couple of these natural reflectors. So we already touched on this, but I wanted to give you a demonstration. This is Sarah. She's a friend of mine, and she was very agreeable. Toe. Let me like her in the worst light possible. Um and so I'm photographing herds near high noon is at the corner where I live, and the light in her face is awful. But what I see behind her is a large, light colored apartment building lit by the sun. So the difference between these two pictures is this facing forward. And then she faces the other way. 1 80 That's it. This is the difference. So if you take a look at the quality of late on her face, it is night and day. I mean, it is completely different. I have not added a reflector. I've added a diffuser, but I kind of added reflector. But I used the building. And, you know, if you were shooting this, you could go ahead and add a reflector in to add a little bit more filter rise. But a lot of times that's gonna make for a great portrait anyway, So looking for natural electors makes it easy. So you did the group shops on the church? Yes. This is exactly what I would do to those group shots, none of us on a 50 foot reflector. But there's buildings everywhere. And I was also often asked to photograph sports teams when they have the big groups of people. And if there was like a gym or something that was light like a white Jim like y M c A. I would do the same thing and I'd have it. So it's shot right across from that, trying to make my job a little bit easier, but something to be aware of is that whatever is your natural reflector has to be completely neutral. If it's not, you pick up that color on the subject space so you can't quite see it. But that's yellow paint behind man Left way. Have a yellow model and you can fix a little bit imposed. But it's it's not something that I would recommend. The ones to watch out for are the ones that look like like a light gray but actually blue in them. That, like kind of bluish gray that one will hire. That s so cool. Why is it that would be why so watch out for that as well. Um, And so the next one, I say, take cover, just get out of the direct sunlight, do what you can on and then add a reflector back in. So let's take a look at some things to watch out for when you use a reflector. Most of the time, many photographers are using the ones that are like the 32 inch That's really common something around there. Yeah, this kind of kind of range 30 to 40. Um, they're usually circular often, and what happens is if you're close to your subject. So let's say that you are like 56 feet away. If you're catching the sun to fill back in, you're actually giving a beam of light a flashlight of daylight, which is wides on her hip. In this one, where is over here? It's more correctly on her face. So just if you have, you know it's It's the her brother, for example, helping with reflector. If they just stand like this, it might not be doing you any good. So this comes down to when you're photographing groups of people. Let's say that you have a whole bunch of people and you've got this little reflector and it's just letting Mom and Dad it's not letting everyone is this your although usually they want the kids to look using, Um, so for something like this, what I'd recommend for the group of people is you need to back up okay when you back up with that reflector away from the subject. The example that I've used if you've seen me on creativelive teach a couple times for lighting is the bucket example. I think of light like a bucket of water. So I have a bucket of water, and I'm standing right next to you, and I throw it that same thrown at your face. Sorry, Um, it might just hit, like right here, cause I'm so close, it doesn't have room to spread out. But if I back up over here, I saw that same bucket of water. It spreads out, and so it more evenly will light your subject. So that's what you would do with a group of people. You would do the same thing. You would take the reflector, you would back up and try to bounce it in. The problem you run into is that if you have a small reflector like inch, there's not enough water. By the time I back up and try to throw water, all of you, it doesn't even reach you. So this is an instance where you would want a bigger reflector, and both of us have solutions for that we use. We both use, uh, you scream. Jim's, we're gonna will be talking about all these things to actually be able to see them. But we use the scream gym, which is a large frame, and you'll see a picture of it in a few minutes and add a reflective surface to that. They come in a bunch of different sizes. I have a six by six foot so I can give myself a six by six foot silver reflector back up and bounce it in. Um, I also have a couple California sun bounce reflectors I before by six foot one of those, which is really nice because it's it has some nice handles. It's easy toe. Hold on to a few shoe. Yeah, it's more like a shield. Has the keys to this Why did this exactly? So that's something to keep in mind. Back up and get a bigger reflector. If you're trying to like a group of people, if you are close, watch with that beam of latest hitting because it is like that small bucket. All right, so let's take a look. Next thing next thing that I would dio is if you can't get out of the sunlight, at least put their back to the sun so the lights not in their face, not to the sides. You get that need shadow thing. Watch the highlights on the nose and oh, this is something to watch out for so ah, lot of people know their good side. Okay, A lot of people don't realize it. And so one of the things I asked people to dio is I say when you take a cell phone picture of yourself, what do you dio? So if they hold their cell phone up and do this, this is their good side. If they hold it up and do this, this isn't the good side of the side that they prefer. The other thing is part whatever side of the face. So, like, if I had my hair across the side of face, I clearly like this, I'd better. Okay, um, the reason this comes into play is I'll pose a group of people and then they know their good sides to keep going like this. And I keep getting the highlight on the nose. So if you notice somebody nonstop is favoring one side, you have to pose them to make up for that. If it's direct sunlight and you're trying to bounce off, you're trying to bounce light back into their face and they keep picking up the sunlight because they're turning their head and the sun's hitting them over the shoulder, rotate them this way. And so then when they turn their head, it's still not picking up the light anymore. I have to do that all the time. They're people, and it's guys and girls, okay? Not just the girl. You just move your feet and they just come like, hopefully follow you around. Yeah. Yeah. All those that were like shoulders, shoulders, the hips, They had nothing. So talk about reflection. Not all reflection is good. And this is I'm gonna admit I've debated whether to show everybody what my early work looked like. Like at some point. Yes, we know we want to see you. Even my not railroad tracks, bricks, black balloons on the beach. You name it? No, but like my light and my focus. And it was just bad. Um, I'm debating to show people, Is it in this present just thinking maybe a different day? But the reason I'm saying this is this is one of the This is one of the places that I had. The biggest problem is not correctly using a reflector. So let's take a look. Picture on the left. There is no reflector being used whatsoever. And honestly, when I shoot a lot of fashion, I'll do that and just turn it black and white. But this is fashion. Okay? I'm gonna let you know fashion and correct lighting are not the same thing. This is why we balance each other out so well because my clients would shoot me if it didn't look natural. Incorrect? Oh, it's blurry and grainy. It's fat there like now. Did you screwed up? Yeah. And I could be like, oh, is high contrast, black and white, which was also my favorite solution. As a beginning photographer, I was a black and white high contrast photographer. Go where, while going into all this reflection stuff, though, the reflection is just the light source. Just like the sun. Just like a soft boxers, like an umbrella. Anything else? So as she goes through these, you're going to kind of get the sense of where the most of our light sources come from. We've got the sun, so it's gonna be overhead, kind of shining down at an angle. You've got overhead lights, you've got streetlamps. We've got lamps that are always taller than most of us. Anyways, when you walk into a room so that direction of light, no matter what the sources, is kind of what we're trying to get you guys to look at. And it's gonna be a common thing throughout all of these. Different, yeah, exactly like we will do in the fluorescent light later. Perfect. So take a look again at the 1st This key to remember and this is one of most common mistakes I see is, even if you're not reflecting, something is. So what's reflecting here? The grass because the sun's behind her head. So it's bouncing off that grass. And that's your natural reflector, except for your natural reflectors green and you're trying to get away from it. If they're situations like this, I've actually moved people up to the edge of like a parking lot concrete if they want, like the green grass in the background. Um, because sometimes even when you add a reflector, you can overpower if it's that bright of a day. Okay, so the second picture and the third picture, or what I did for the longest time picture number two is the reflector held underneath her chin, cause in my mind what I'm thinking is I need to bounce light into her face. And for me, I was thinking Bounce has to be like bounce now. That's what I was thinking so would hold a reflector underneath because also, I'd see people do that. I'd see professional photographers do that sometime. That's more appropriate for overcast days, reflector underneath to papa catch light in the eye, not on a sunny day. You absolutely don't want to do that. So that was hold underneath her chin. If you look at those pictures by far, that is the picture where she looks the heaviest. It is the least flattering because you're lighting underneath her jaw. It's making her job look wider. Her cheeks look wider, the highlights underneath her nose. So all of this looked big, and all of this looks small. My horror story like flashlight on the staircase. Monster lady. And that's exactly yeah, don't ever tell them it's monster lighting. You know you might lose him, but that's exactly what it is between you. Enough and they won't get the jokes. I used to introduce City, though, like, I'd like, say, photo jokes, and they wouldn't get it. Be embarrassing photo groups for the client. Picture number three is when I held the Reflector equal to her face, even with her face, and that's like flat lights. If anyone's ever shot in the studio, you don't have your light or your modifier right equal with their face. It's usually a little bit above right. The reason is is you're trying to carve out their features, trying to give dimension. So if you look the only picture that I think really works unless I'm trying to go for edgy fashion, the only picture I think really works is the last one was a few seats. See how her lips look bigger? You see the shadow underneath her bottom lip. It's because the reflector was held above her head, casting like down and see how she actually has cheekbones here. It's the only picture where she extras, cheekbones and the only picture she really has a defined jawline. Those are all things they want. Fuller lips defined cheekbones to find doll jaw lines. So my rule of thumb is when you're reflector is the main source of illumination on your subject. That reflector needs to be higher than their face, so if you have a mom helping you, and she just wants to hold it. Convince Mom that it's really for that senior portrait to make the daughter look good. She's got a hold that reflector up and they'll do it. It's just a matter for how long, Maybe work quickly. And if you look at all these photos, I mean, we're talking about shadows on the face. Shadows under the eyes is like a bad thing on work. Kind of combat them by bringing in reflectors to do that. But the shadows aren't bad. Like you were saying, The shadows air. What sculpt you? It's just we have to position our lights that we get pleasing shadows. That's all we're trying to do. We're not trying obliterate them completely, because then we would take a beautiful three dimensional model with nice cheekbones and full lips flattened out like you see in the third photo there. So our goal is to shape light so that we create pleasing shadows and sculpt people rather than obliterating the shadow altogether. So to do that, we have to be constantly conscious of the direction of that light and the shadows that creates. And here is one more look at that picture. So up for me, by far the most flattering. Just to give you an idea of some of the gear and you will see all of this in use, um, we were able to use Westcott reflectors. I also have a California sun months. That's what I was talking about with the nice groupie thing. So sometimes if I got to get that reflector up above the head, that's what that reflector is. I'm gonna tell you significantly more expensive, then say Westcott, reflector, But sometimes this is what I need. I need to be able to get that up high and reflect down. So those are two of the reflection tools that I use. All right, So how about direct sunlight when I simply cannot get in shade or it is high high noon. So, yeah, it'd be nice to put this on at their back, but it's no, there's no back. It's straight down. So you gotta have some solutions here, So let's take a look. Problem? You have same. A direct sunlight. There's no state. A shade too straight. Save you from the situation. All right, So is this one through these all right. So this is thistles, my fashion photographer response. This is shot near high noon, but what you're doing is you're picking what's important, and so we're going to talk about metering later on. But this is where you would need to spot meter, because if you let your camera make a decision on a situation like this, you cannot predict what it's going to dio. I'm guessing that it would think that you want to see more detail in the shadows, and it might light enough the pictures and blow up the highlights. Just try to pick something in the middle. Your camera generally wants gray it once middle of the road it wants to be like, Here's an average result. You can't get mad at me because I gave you something that's not really bad, but not really good. So that's why we'll talk about exposure compensation versus manual mode. We both try to steer our cameras different ways to the correct exposure, but auto mode just basically wants to wash their hands of it and get you close enough So spot metering basically takes a tiny tiny dot of that scene, probably about 2% or up to 8% depending on how you define it. And that's where you tell your camera to meet her for. And we'll look at this all more closely later and then. One more fashion emergency. This is the fashion approach. Embrace it. Use a direct sunlight and love it. Okay, but that doesn't work for most portrait's most people. You put them in direct sunlight, and they will hate you forever because she wants write and direct Sunlight is very, very contracting. This is, you know, contrast. It's what you squint. But what contrast means his contract like if you drag the contrast slider in photo shop, right highlights get brighter and shadows get darker so that the same thing happens. Direct sunlight, which means highlights, will get brighter. Shuttles will get darker, usually for the non model. That means they're wrinkles, get darker and their greasy forehead gets greasy and things like that. So you're not helping people. You're trying to soften the light, which is why we don't in the studio use a silver reflector dish on someone's face. We use saw fox or beautician trying to soften the light, so let's take a look at the solution that gives you the softest and was glowy light. And so this is the script you want. Talk with the scream, Jim for a second. Yeah, so the scream Jim rocks. It's It's basically a couple aluminum rods. They're hollow. That comes in a small bag, and they have different attachments and stuff you can put on them so it can be a small is a three by three reflector, which you can then fold up like any other ones where it can go to like a six by three, which is perfect because it's long and tall and narrow like a human. So you get a nice reflection for a full body, you get a six by six, which is what we both use the most often, which is what you see here. They don't even goes as biggest, like an eight by eight. Or you could just keep adding pieces to it and have different sized fabrics. I've done shoots where I've had, like an eight by eight overhead toe, act like a like a giant cloud that we're gonna talk about here, and then I can just have people walking freely underneath that, like they've got a huge cloud sitting over their head. So if you look at the sea and on the left, you see the shadows next to their feet, like how dark and contrast see that is. You would never think that that was taken in that situation. It is going. It looks like you took a soft walks outside on location. It is beautiful, and we did. So that's that's a six by six foot soft box. Essentially, it's It's about a 3/4 stop diffusion, which means it's gonna eat up almost a stop of light. But also you have a nice, large, soft light source really close to your subject, which is why it cuts down on that contrast. So basically, that transition from that highlight to the shadow is very, very, very gradual on her face versus the transition from the highlight to shadow on the people out in the sun is instant. That's that hard light that hard contrast. So if you ever if you don't have giant strobes and big soft boxes, just get a scrim Jim or some kind of diffusion material. The sun is your light source. It's your strobe, and then that's the front. Your soft box If you really have no money away, Bedsheet, if you really want low thread count Chief Sheer Well, yeah, exactly. Because I've actually there's one portrait session ended early on, but I didn't have a scream. Didn't have anything like that. So I took the bed sheet, and I, um and I I taped it to a tree branch and then put stones on the ground. And that was my diffuser for the light coming in from the side cause I didn't have anything else, so it definitely works, but not always the most versatile. So something to watch for this they have stands. Um, you know what? It's Westcott makes the scream, Jim. They have stands to support this. We have a little problem in New York City. The problem in New York City is the second that you use a stand. You need a $300.300 dollars. Now, the second that there's a stand, it touches the ground, your find or needed. But that's OK. People holding this gigantic thing. That right is ridiculous. So I'm gonna talk about a couple other solutions. And so we've got Yes, I've got one more. There's another example. You see that of tough? I have a large. And this is if I could tell you I hate giving, like, definitive. So I could tell you probably one of the best investments that I recommend anybody that has to shoot in direct sunlight. This umbrella, I would say this umbrella. So let me let me describe why. Okay, um, first of all, you don't need stands so one person can hold it over the scene. So that's me while Eric shooting Holding It's a seven foot shoot through umbrella by Westcott. So you hold it, open its fuses. The scene. Um, we're not sure. Light through it. It is our diffusion material. The sun is the sun is the light. So that's that's one great thing about it. It's collapsible it ZZ hold. The other thing is, if you are like me and sometimes as a photographer, you like to photograph in places you're not supposed to be like, how many guys have help defense before or ignored a No trespassing sign or we just had to get this location or whatever. If you have a scream gym in the cops come, you got to break it down and, like, put it away. If you have one of these, you close it. You run like you're out of their way. So I expect this like just meeting you on the street. You wouldn't. You have no idea. This is your approach to it. Sometimes that anything for the image, right, it doesn't matter, although is really funny. Because I just don't have an assistant who I was shooting someplace last week that I wasn't supposed to be and crush him and he liked looked at crossing over the fence. He's like, I can't because he had gotten a citation for trespassing like recently, because one of us with it so you can get in trouble, but or photographers? Who cares about? Yeah, by the way, guys permits are a lot cheaper than bail money. A lot of I've got a friend of one of our bodies in New York was assisting on a shoot, and it was by like, a wooded area just outside of New York. But I guess it was too close to one of the water reservoir feeds or something like that. So they hop defense to go scout this location and the cops showed up. I guess they had monitors or something somewhere. So now he's on, like a terrorist watch list or something like that, because he was in, like, a contributing water supply thing to New York City. So we're not recommending that you go out and do this. But if you've got a pack, your gear and run from the cops and robbers are a lot easier to dio kind of meant that cheek. You know, if you are looking to get permits, you need to have insurance to cover you on location, and it's really inexpensive, and you can use you get as an add on to your insurance. That's one of the things that they require. Any place that you go, you want a permit. They want to see a proof of insurance. Just basically want liability than you. Give him a piece of paper, a certificate of insurance. They keep it on file. You photograph. Are you contact the city for us? A lot of times of the city, or it might be the county if you want to shoot like a park or anything like that, so just check out their websites. They have easy forms to fill out, and then it's a painless process. Most places it's free. Contact your local film commission or your city services, and they'll be able to direct you to the right route in New York. It's expensive because of how many productions. But in Florida I was able to get free permits constantly. So and then it's nice because the Park Ranger knows you're coming and he might help you put the gear in a in a four by four and drive your but to the beach rather than having you hollow the year down. They're worried about getting kicked out, and they try to prevent people from bothering you. Look, I've had that were really nice. They want to watch and the like shoot people off. So if you give him a heads up, a lot of times you find people really helpful and it's a spectacle. Photography is cool. This is why we all do it. So, like park rangers, like I don't have anything to do today. I'm gonna hang out, you know, police, you're set for you for free. So that's gonna go. Speaking of, I shot this in Golden Gate Park, back behind where the museums are, and I did have a permit for that, and Ranger did help us all day. So the perfect example. Um oh, and then Eric was adding the shoot through umbrella is one of the few things in all of photography that costs under $100 promises a cost just like 99 bucks. So that's not a stocking stuffer, like it's seven feet. But, I mean, it's It's in the price point where it could be like a gift like that. Yeah, it's definitely something I recommend and to a couple of examples. So this is shot at high noon. I was shooting a fashion editorial, and how it works is if I have, like looks to shoot during the day. I can't stop at high noon. I have to shoot. And so if the theme of the shoot is she standing in the middle of the field at high noon, I'm still shooting the middle of field. So this is a big diffuser above her head, and we styled her hair after me. And so there's the scream Jim with the stand. Just to get an idea. We don't think we have stands to demo? I don't know, but they'll probably put stands for us. Yeah, well, have stanzas stuff, and I've made some brackets are a little more lighter weight and stuff to or you could use a clamps or, like me, showing you assistance. It's really versatile, and this stuff is lightweight. It's aircraft aluminum or something like that in a sheet. So it's it's not gonna It's not going to have it. And then this is what that looks like. In case you wanted to know seriously, one of definitely a thing I would recommend. It's beautiful, too, and you put a light through it. I mean, but it just has so many uses, though in a lot of time. A running gun diffusion like that is awesome. Like I put it on the end of a mono pod sometimes, or a paint pole or lightweight light stand with an umbrella bracket, and I just have my assistant boom it up over somebody, so I'll have a light shoot a lot of active stuff. So my subjects are walking around and I'll just have him following around with a stick with a giant umbrella over it. So that cloud just follows wherever we go, so it's gonna be nice. Um, another way to go about this. And this is something that you'll see is a fusion and adding reflector. So this is what you have to remember. Okay. Here, sir. Again. Awful light, right? It's poor girl. One of the happiest people you'll ever meet Ever think is awesome. Okay, So horrible, horrible, horrible light on her face. Adding a diffuser above her head does not change the direction. It just softens it. So just like he said about that Grady in between, from shadow to highlight, it just softens the radiant. There's kind of a couple things were gonna be touching on the direction of light is one thing. The quality of the light is the other. So that's our difference between hard and soft. You'll hear say that a lot. Basically, the transition from that highlight to the shadow is that quality, that softness or the hardness. If it's a very quick fall off, and then we have intensity will be the third thing, and that's just the brightness of the light. So when we're going over this, I mean, those are just three vocab words to really kind of nailed down, so we're on the same page going forward. But the direction didn't change. Intensity went down a little bit. Quality of the light changed immensely, so we covered one of the bases here. And so you know, the diffusion that we have in this scene is California Sun Bounds. It's called a son swatter and, yeah, school and what it is, it's on a pole. It has a lever system so that you can build into it. Get it out over a scene which might be useful if you have a group of people and you're trying to boom it out and you don't have stands and one person can hold it. Um, it is definitely more expensive, but you're paying for the capabilities and the convenience that it gives you, and so you can do a diffuser and then add a reflector to kick light back in. In this example, it's flattened out her face, so if you wanted to have some shape to her face still, you would feather the reflector. So instead of instead of trying to catch all that light and bouncing it back into her face, you'd angle it away and it would just kick in a little bit instead of totally flattening everything out. And so here's an example where I've done that. This was on a sunny day. It's diffuser overhead and a reflector underneath her chin. So I have. It's not completely flattening everything else. It's nice and smooth. And this. I love this stuff. We want talk about this. So this was last week. So I was shooting some clothing boutique stuff in L. A in Hollywood, Beverly Hills, and the weather is awesome. That's why I have a little bit of like a sunburn tan thing going on. Like it. Issa's good, as they say, if you've never been to California, but it's really, really, really bright, And there was like, no clouds the entire week I was there so that scream Jim, with the diffusion material, was flying above pretty much every single shoot. I did outdoors for an entire week and the cruise pretty cool out there. This was after a long day, along third day or something like that. So we kind of relax on our uniform point, but you can see it overhead defusing the lion. But again, we don't change the direction just the quality. So if you look really closely on here, you see her. She's got raccoon eyes. You see how there's a highlight on her nose, all that kind of stuff. So we softened it down, so it's easier to deal with were there when that dynamic range in the photo. But the girl over here on the right is holding a reflector, and that's giving us that direction of light. So we're adding in that punch of light on her face, giving us the catch light in the eyes and giving us that direction to then you know, even this out So we don't have the weird recognize here in the big spots on the nose on we're getting. The rest of her body has the nice, soft quality of light that was coming down from above. What's nice about using diffusion is if you just kind of blocked her off and put her in the shade. She wouldn't look like she's in Sunny California, which is my usual my solution. I sticker in the shade This That's not what they wanted. Their an l, A based company. They want son, And that's why if you look at her hair. She still has the direction of light still looks like a bright, sunny day, but it's not direct sunlight. So what he'll do is he kind of compresses the scene the highlights, instead of blocking it off and then builds back in. And so it definitely is. The solution is naturally, that that's my goal in the most of my work is you have really bright highlights, he said earlier. So I mean, you're gonna overexpose your sky or you've really dark shadows where you're not gonna be able to see anything. So my job is to keep the feeling of the environment, to keep the location, to get the sunny California, but so that our camera can see it So our hair's not blown out in our faces and in shadows. So it's it's a dance. I mean, it's your definitely trying to compress your highlights in your low lights, but keep the quality and the overall feel of it. So just the simple direction of light and some reflectors and diffusers is like how you make a living. It's incredible. So
Class Materials
Bonus Materials with Purchase
Ratings and Reviews
Jessica Garner
Student Work
Related Classes
Lighting