Lessons
Class Introduction
09:12 2Favorite Family Group Poses
12:45 3Plan the Photo Shoot
04:08 4Meet Three Person Family for Shoot
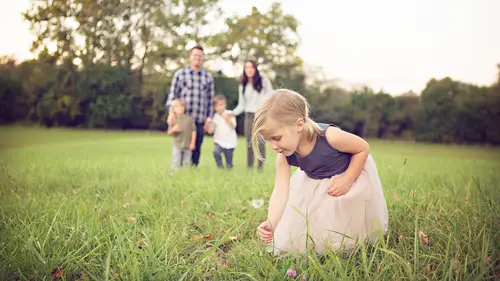
04:02 5Shoot: Get Family in Front of Camera
15:23 6Review Images from Shoot
04:37 7Shoot: Get Family Comfortable
14:45 8Family of Three Shoot Recap
10:05Tips & Tricks For Family Group Posing
03:30 10The Art Of Unposing
02:46 11Using Furniture In Family Portraits
07:47 12Demo: Using Furniture
04:24 13Shoot: Family With Furniture
24:28 14Shoot: Combine Family Members on Furniture
08:01 15Shoot: Siblings Laying On Rug
06:21 16Shoot: Close Family Image on Furniture
08:48 17Creative Shooting Spaces
05:59 18Tips For Photographing With Dogs
05:54 19Demo: Studio Lighting
04:07 20Shoot: Introduction to Shooting With Dogs
09:17 21Shoot: Favorite Poses With Dogs
18:41 22Introduction to Generational Photography
06:23 23Large Group Posing Options
06:51 24Demo: Large Group Posing
11:29 25Shoot: Favorite Poses For Multigenerational Families
15:29 26Shoot: Incorporate Ring Light
09:05 27Shoot: Colorful Generational Family Images
13:38 28Shoot To Sell Products
05:52 29Photoshop®️ CC Efficient Workflow
06:09 30Post Processing Before The Sales
10:40 31Sales Templates in Photoshop®️ CC
09:06 32Post Processing After The Sale
06:31 33Concluding Thoughts
09:02Lesson Info
Post Processing Before The Sales
I have kind of broken up my program, the Now What Program into pre-sale and post-sale, so there's a lot of stuff that you can do on Spec before the sale. You don't want to take a lot of time cause you're already taking a lot of time shooting, editing, coloring, being with the client, all the stuff you gotta do, right? So what we try to do is we try to make things as quick as possible and automate as much as we can beforehand because it's on Spec. You don't know if someone's gonna buy this stuff. They might not want anything, but I can guarantee you that the chances go way, way up if they can actually see it. Put yourself in their position. That's just how it works. Now, what I actually did with this session is, as I went through Lightroom, keeping this in mind, I thought to myself, Oh there's several different images that worked really, really well, but the dad had his eyes closed in a couple of them. So what I did was I took a couple of them out just to show you that I wouldn't do thi...
s across the board, but if I saw a killer image, especially in a challenging shoot like we had this morning, and I'm like, "Oh, oh, oh, if I put those "two images together, that might be worth it." So I would actually take the time to do this. So I took these two images, alright? Dad's got his eyes closed there. He's got them open here, but I like how the mom and the daughter are both looking at the camera, this is a perfect image right here, cropping it the way I would want to crop it. But I need dad's eyes from the shot before. Real quick and easy, and this is also how you fix glass glare and a lot of other things for that matter. But just bring it over. Okay, now I use a technique, it's not done. I use a technique, it's close, but not quite done. I use a technique in our layer modes called Difference, where you can actually see underneath, and it's pretty slick that that worked out so well. It doesn't always work out that well, so sometimes you have to transform a little bit, rotate a little bit. This worked out great, and I didn't plan this cause we just shot this this morning. This is not normally part of my program. So, thank you Vicky for nailing that one. That was great. So, what I'll do is I will throw a hide all layer mask, everything's being hidden on that layer, right? So the layer mask is down here in the layers palette. I'm holding option, I'm clicking the hide all layer mask. That dot is there but it's hidden, and I will use a white brush to go back and bring his eyes back. Now you'll notice, they're a little high, that's okay cause they're on their own separate layer. We can move them wherever we want to. Now again, remember this is on Spec. It doesn't have to be perfect. But let's just say this was an image that I thought was fantastic. Because I was able just to spend a couple minutes and do this. So dad's got his eyes closed, he's got them open, see? So it works. Alright, this is the image that I came up with. As I have this image now, I will save this, and I put an A, I always put an A after the file name, which means it was adjusted, and so it doesn't overwrite the original. But then that goes into the proofs instead of the other one. So anybody on our end will know that something was done to that image. And I'm not overwriting the original one, but it's just something you can do really quickly. Again, you're doing it on Spec, it doesn't have to be perfect. If they happen to order that, then go back and export the high res files and then go do it, and then you can spend five or 10 minutes and not feel bad about it cause you're getting paid for it. But don't spend more than 30 seconds on this side of it, especially if you have three or four different things to do. That's two, three minutes, and it might not seem like that much but two or three minutes times 30 different things, and all of a sudden you're spending an extra hour and a half and it's on Spec, and don't do that. Don't do that. Just do the things that you feel make sense, and do them in ways that are quick, as quick and easy as possible, alright? Here was another... So this is another example. This was a whole head swap with the little girl. I liked the parents in this image, they're both laughing, and there's that little girl. But I wanted this face on this body. Now, this one took me about two minutes, but I got it. And so I just did, I took this, put it here, masked it all in, same thing I did before, but with the whole face instead of just some eyes. That's an image, they might buy that. That is a contender, alright? So it's worth it to me to put a minute and a half or two minutes, especially considering how challenging the session was. You have to take that into account too. If you have a million great images, don't do this, don't. But if you need to and it doesn't take very long, feel free. Now, this is what we do in Photoshop. So this is an image of just the two of them that I'm gonna use as an example, alright? So, once we export everything out of Lightroom, and really the only major adjustments that I do in Lightroom, maybe when we import them I add 10 vibrance, 10 clarity, 10 saturation. It's my 10, 10, 10 preset. Upon import, I apply that to everything. It just gives it a little bit of pop. I don't want to do too much to it because of my proof actions in Photoshop are gonna adjust contrast. They're gonna soften things a little bit. They're gonna do some retouching because that's our look. A little bit on the softer side, not too soft. But we use a plugin called Portraiture from Imagenomic. It's like 200 bucks, it's just imagenomic.com, Portraiture plugin, you can also get it for Lightroom. Again, we use it in Photoshop cause of all the other stuff we do in Photoshop. But when the images are exported out of Lightroom at about 1920 x 1080 cause that's how we project for sales, we open them all up in Photoshop and run a batch on them. So I shouldn't even say that we open them up. We just run the batch on them. And we use a droplet to do that. So, let me just do what we would actually do. So I would do this with all 114 images, but here's my droplet. So there's a color proof without a vignette and there's a color proof with a vignette. I'm going to choose the one without, and instead of dragging just one image, imagine I'm dragging 106 or 84 or 22, or whatever. And then I have a destination folder right here called Proofs, and that's where everything would be. So basically I have this proofing action that softens it up, does a little bit of retouching, and yeah, I've spent less than five seconds on 114 images to get things to look... I can show you a before and after, maybe that'll help a little bit. So especially if you look at her face and her skin, it always makes the ladies look better, and that's always a good thing. You want that every time. He looks better too. It softens things down, doesn't affect the eyes, doesn't affect the teeth, barely affects the hair. But again, this is for proofing. So this isn't finished, but it does look better and it's all automated. Again, this is pre-selling, the presale. So a little proofing action. Certain treatments that we do. So, maybe I want something changed to brown tone, father and son, I might take half a dozen images or 10 images and run a batch on those too to get a certain look. I'm not taking a lot of time doing that, but maybe I'm picking half a dozen. And so some of the images they see are gonna come up like this. I tend to think that the more intimate images are more conducive to brown tone and black and white, the more photo journalistic type style. Not necessarily the traditional type portraits, but certain things make more sense to me. I really like this image in brown tone, so I would show them a version of that as well, but I'm not gonna spend a lot of time doing it, I'm just gonna batch them out, you know half a dozen to 10 images maybe to show them those options. Here's the sun flare action. Now, we didn't shoot outside today, so I have this image. This image was great, it's one of our promo images that comes up. But the sky is kinda boring, there's nothing there, so I thought it was conducive to the sun flare action. This is one of those subjective things, but I thought it worked. What we did was we created four different sun flare actions. One of them builds two suns, and one of them adds flare. So I have two yellow suns, and two white suns. So if you just want sun, you could just play that action and it'll just give you a sun. And then it's on its own layer, so you can just move it around wherever you want. You know, put it up there. If it's too hot or too small or too big, just transform it or drop the opacity of it. So you're not doing... Where do you want the sun, you can kind of put it wherever you want to for the most part as long as it makes sense with the light on the rest of the image. But if you want sun flare, there's a separate version. Yellow sun flare, you hit Play, and then it gives you instructions when you through. It tells you to move the sun, feel free to adjust its opacity and size, and then press Play again. So I put it where I want it, let's just throw it back here. And then I'll press Play in the action again and I'll go to the next step. Now use a soft edge brush, paint your sunlight. It's on that layer mask, that's a curves layer mask, and I'm gonna use the big white brush. I like to knock it down to about 50 percent, and you can essentially paint sunlight into your image as much or as little as you want to just using black and white brushes. And all of a sudden, you have, in my opinion, maybe a more impactful image. You're going from this to this, right? Beauty is in the eye of the beholder, all that stuff. Maybe that's better, maybe that's not. The point is if you see something like that, you can do something like this on Spec really quickly beforehand, it takes less than what it just took me there because you're not gonna be instructing a bunch of people on how to do it when you do it at your house or your office.
Class Materials
Bonus Materials with RSVP
Bonus Materials with Purchase
Ratings and Reviews
DOlores RUsso
All I have to say is - Vicki you are a saint. To handle four kids, dog and their parents too, not to mention a class of students watching...AND YOU'RE TAKING PHOTOS, GOOD ONES!! All I know is, I could not handle that as you have even though I was a teacher for 25 years (K-12, all of them) - and wonderful people like you are far and few between. May you stay healthy and happy and continue interacting with kids and parents - you really have a talent! (I had to turn the sound off on the vid because it was driving me crazy,, with kids, dog, etc etc!)
Marla GIbson
It was true to life and yes, a bit chaotic. But I enjoyed it, it shows the work that often does go into a session with all the multitasking. I got some great ideas for poses, and learned some new way to interact with younger children. Thank you for a honest session and not a perfect planned one.
Lee Boddington
Awesome class, really informative, and loved how you handled all the chaos. Great sales and promotional advice from your hubby too. Fantastic, well rounded :)