Lesson Info
3. Collage for Simplification
Lessons
Introduction to Abstract Collage
04:21 2Collage Materials & Techniques
10:25 3Collage for Simplification
13:13 4New Color Horizons with Collage
10:41 5Collage as Catalyst: Variation/Improvisation
11:42 6Collage: Remnants of Consumption
13:32 7Biomorphic Collage Expansion
14:56 8Deconstruct/Reconstruct: Cubomania
16:15Lesson Info
Collage for Simplification
So simplification is not simple simplification is sometimes I think one of the hardest things to do when we're working with an image that has a fair amount of detail and we ask ourselves, what can we let go, how can we let it go? So what we're going to work with in this lesson is using collage as a way to simplify an image and in this simplification of the image will actually create something much more abstract, there'll be an essence of the original image there, but it's really a way to let go of the things that we might think are important and it's very hard for a lot of people to do that, including myself. So, collage is an incredible teacher for simplification if you give yourself some rules. So I have this image here, I took this photograph on the beach out in Provincetown on Cape Cod and I love the way the boats are situated on the beach um and I thought, you know that would be that might make a pretty interesting collage. So I took the image and I made a drawing from it, like a ...
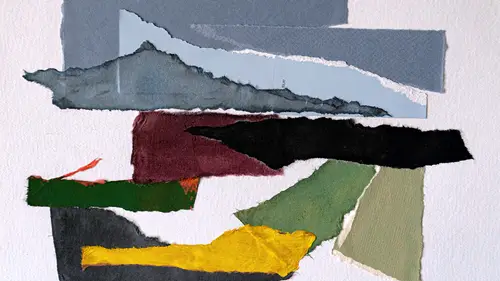
simplified drawing. So already in the process of working from a photo to a drawing, I've started to simplify, but I knew this was going towards the collage, I knew that I wasn't so interested in cutting out every blade of grass. I wanted it to be a little more simple and graphic. So what I did is I took a piece of tracing vellum which is a transparent or translucent paper and I laid it over the image and I actually said amy you just get five shapes. That's it. So and and it's a challenge, Right? Because there's so many shapes actually going on here. So I took a pen and I just said all right, I just get five shapes. So I made one shape, the boats. I made the other shape, the beach. Another shape is the grass, another shape is the sky and the fifth shape is the buildings in the distance. So I did that and this in and of itself is quite an abstraction if you're knowing that it started here. Right? So, I don't really need the photograph anymore. And I don't really need the drawing anymore. And what I ultimately made from this is this collage. The colors aren't exactly what the colors were in the original image. I just chose colors that I felt were sort of suitable or look good together. And I want to take you through the steps of how I got from here to here. Just so that you can potentially try this for yourself. Now I know I mentioned that you could cut paper or tear paper. You could this is a hard edge collage. This is a collage as you'll see that I cut with an exacto blade and I glued it down and it's quite hard edged. You could take this idea and take paper and you could rip shapes like if I was working with ripping this central shape here as opposed to the precision of scissors, I could take this feeling of the central shape and just start to tear the paper keeping the remnant shapes because those are often so beautiful. I love just the feeling of the paper as I tear it actually. I love the kind of Yeah so you know a shape like this versus a shape like that, a different feeling. It's kind of got the gesture of that shape. But if you like this kind of chunky organic kind of quality you could certainly try this with tearing. So that's that's a possibility. But I'm gonna take you through the cut paper version because there's some things that I think will be helpful for you to know about. Alright so what I also have here is a piece of what they call transfer paper. Transfer paper is pigmented pigmented on one side and the other side is not pigmented. And I use this because it's a shortcut. It's basically a shortcut. What I can do with it is because I have my map. I consider this a map because I have my map. I can take the transfer paper and I'm naming this fifth shape. I'm gonna do this very light color for it. So I can take this paper and I can lay it with the pigment side down on top of the light paper that I've chosen and then I can take a very hard edged pen like a ballpoint pen. Some kind of pen that has like a metal tip and often I'll tape down the edges if I'm doing something a little bit more involved double check that the pigment side is down and then I can go in and just trace around the shape. So you've already done the work to create these shapes, right? You've already done the work through the tracing process and through the difficult process of simplifying to actually, you know, create these shapes. So the effort to kind of try to redraw them all over again just seems like for me like a waste of time. So I did that and it transferred down onto my page just like that. And because this shape is little, I'm gonna use my blade, I'm going to come in and I've got a cutting surface down beneath it. I'm gonna come down and I'm going to one thing with these is you want to make sure that they're tight, this is a little bar that you can you can turn to make sure the blade is tight in there and I'm gonna come down one side here. Sometimes I'll turn the paper to make it easier to cut in a different direction and you wanna just be steady and slow. There's no rush here. It's actually a very, I really enjoy cutting shapes out. It's a very meditative process and again I find cutting towards myself a little easier than cutting sideways or cutting away, you'll find what's easiest for you but I definitely recommend, you know, making it as safe as possible. You never want to have your hand behind the blade, you always want to have your hand in a safe place. Alright, let's see how this goes. So I think yeah, I can pop this out. There's my shape, right? And now let's talk a little bit about assembling the collage. So this shape is this shape here, just sort of redoing it for you and you know what else? I really love, I love this this remnant. We'll talk more about this but you know, don't say oh well this paper is ruined now because you know, it's left over from this. This is the stuff that later on in this course, we'll be using these remnants of process to make even more abstract things. So keep that. So I have to put down for this this version, you know, a surface that I'm going to glue things on and then I'm going to start to place my pieces. I did a little pre cutting of these pieces but you can see as I'm laying them on each other, they are kind of looking interesting even over here. So I cut these, I transferred these and I cut them in just the same way, it's like a puzzle and a beautiful puzzle, a puzzle that you've pretty much planned and figured out, but you never really know until the end, you know what's really um what it's really gonna look like. So I've got this piece here, I'm gonna flip it this way, there we go. So I've got these pieces now and you know, I have to make a choice about how I want to put them together. So one thing that a lot of people do with collages, you know, these aren't perfectly cut, you know, they're gonna fit best they can, so some people really snug them in and put them right up to the edge. So it doesn't, it almost doesn't matter like what color the paper is beneath it. So you know that's definitely one option, put this guy in here, you know that's that's one option. But another option which I also think is kind of interesting and again we'll talk a little bit more about this when we talk about color variation. But another option is to actually give them like a little wiggle room, like a little breathing room. Um That that can also be sort of beautiful depending on what's underneath. So just giving them a little space in between creating a little bit of a gap can also be quite wonderful. And then it would be the process again of gluing things down which we saw. But I'll just do it with this piece to remind you sometimes I don't like putting the glue on top of the piece, I'm about to glue down with the collage directly underneath it because then if you get glue off the side, it's gonna get on the collage so you can do a number of things. One thing you could do is just take a piece of scrap paper, it's kind of your glue surface and you can then have that beneath it, put your glue down and I'm gonna try to get it out, especially to these pointy bits, I'm gonna try to get it out as far as I can to the edge, so that when I glue it down, those don't curl up on me and you can move your glue paper aside and then just lay in your first piece. These other ones are movable because they're not glued yet, but just and I like to like start in the middle and spread out to the edge to start in the middle, spread out to the edge all the way around. Yeah, so that's pretty nice, very satisfying. Just even feeling the paper is very satisfying. So that's my first piece glued down and then the other pieces would follow suit just exactly the same way. And ultimately you end up with this version, very simplified version of the mother image here. And I think that this possibility of simplification, the possibility of using a map and again, this mapping process is incredibly helpful in terms of even even the fact that you can't see completely through the tracing paper. You know, you don't have to make a drawing. If drawings, not your jam, you don't really have to even make the transitional drawing. You could just lay some trace paper on top of a photograph, right? And trace it. The trace paper obscures a lot of the detail. I can't really see all of the blades of grass and just choose five shapes. They might be, you know, that means you're gonna have to let go of some of the in betweens, right? But those five shapes can lead you to what I consider a kind of beautiful simplified version of the subject, which is in itself abstract. So I suggest looking through your photographs or maybe going out and photographing things with collage in mind over time. You'll start to see things in a new way, You'll see the potential of your world in a new way, bring it back, get some paper. Maybe try to find some transfer paper. You can even get carbon paper at a, at a copy store and play a little bit with transferring, cutting, varying maybe the color schemes and backgrounds. But try working with this discipline of simplification because simplification can be very beautiful and it's one of the gifts of collage
Class Materials
Bonus Materials with Purchase
Ratings and Reviews
Susan Gold
Fantastic class! I am a beginner when it comes to abstract collage, and Amy demonstrates a generous number of techniques—all accessible and with clear instructions. She shows how each step can yield exciting variations, and she inspires play. Many of the techniques utilize a photo as a “muse” or “mother image," and it’s fun to discover new possibilities for my photos.