Matching Ambient Color in a Composite
Lesson 7 from: Essential Compositing Tips & Techniques In Photoshop 2021Jesús Ramirez
Matching Ambient Color in a Composite
Lesson 7 from: Essential Compositing Tips & Techniques In Photoshop 2021Jesús Ramirez
Lesson Info
7. Matching Ambient Color in a Composite
Lessons
Class Introduction
01:14 2The Importance Perspective
05:35 3Examples of Perspective in Compositing
08:56 4Creating Depth with Atmospheric Perspective
09:39 5Matching Brightness in a Composite
05:59 6Matching Saturation in a Composite
04:06 7Matching Ambient Color in a Composite
08:01 8Making Selections and Masks for Better Composites
11:06Lesson Info
Matching Ambient Color in a Composite
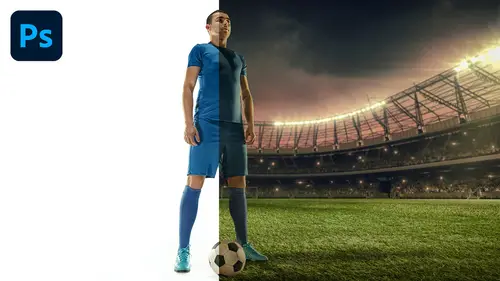
next, let's take a look at how we can match ambient color in a composite. We're gonna work with this background and this model. As you can see, the background has a color tint to it. And if this person were really standing in this background, some of the light that hits the wall would reflect onto her body, and her body will take the colors of that light. In other words, this necessarily wouldn't be a neutral gray. Instead, it would have a little bit of that green tent. So in this example, I'm going to show you three methods that you can use to match Ambien color. Let's start with the most simple one. I'll select the background element and press control John Windows commander and the Mac to duplicate that layer. Then I'm going to move it up to the top of the layers stack. You can, of course, click and drag the layer. Or you can press control on Windows Command in the Mac and tap on the right bracket key to move the layer up in the layer stack. Then I'm going to press control All G on W...
indows Command Option G on the Mac to clip that background copy to our model layer. Then I'll go into Filter Blur Gaussian Blur, and I'll just blur this image so that there is no more detail in the image. Only the colors like so and I'll press okay, and I'll change the blending mode to color and decrease the opacity accordingly. So this is the easy, simple method. I think there's better methods, but I still want to give you an easy option in case you were looking for something quick and easy. The next method that I would like to show you actually requires a check layer so that we can see what's going on. And I'm going to create a solid color fill layer and make it a neutral gray anywhere around 50%. Gray will be fine. As long as the hue and saturation is set to zero, you'll be OK. Am press okay, then I'm going to change the blending mode to luminosity so that the hue and saturation of the original layer stays. But all the luminous values are now at 51% and it gives us this result. It's a little difficult to see the result, so I'll create a human saturation adjustment layer and increase the saturation. And now it's very obvious what we have going on in this image. I'll select the human saturation adjustment layer, then hold shift and click on the color fail layer and press control G on Windows Commander in the Mac to put those into a group, and I will call this group ambient color check. And now I can disable these two layers at once just by clicking on the I icon. So now let's analyze what we have here. Notice that the background image has ah lot of greens and yellows. Obviously, the right hand side is a little different because we have a different light source and is changing the lighting of the scene. So let's just focus on this half of the image where it's mostly yellow and green, with a little bit of red and a little bit of blue. If we enable our model layer and we take a look at her gray sweatbands, remember, her sweatpants are pretty much a neutral gray. In other words, they don't really have a color, but notice how much blue there is on those sweatpants so clearly this wouldn't match, so we need to add some of that green onto her body so that we can match the ambient color. One way of doing that is by selecting the model layer and creating a selective color adjustment layer. I'll click on this icon to clip it to the layer below, or you can use a keyboard shortcut, control G and Windows Command D on the Mac. Then you can add green to this image. There's no green in the labels here, but if you know how these sliders work, you'll know that the opposite of Sion is read. The opposite of magenta is green in the opposite of yellow is blue. If you forget, you can create a color balance adjustment layer in. Photoshop does a much better job in displaying their relationship between these colors with these sliders. But anyway, if we reduce magenta, we'll add a little bit of green. See that? See how now this is looking much more like the background, and I can also increase the yellow to add a little bit of yellow. Maybe reduce the green even a bit more, and I'll disable the ambient color check just to see the result So this is before and this is after. It's a subtle effect, but I think it does a lot in making the composite more cohesive. And I might have been a little heavy handed on the green there. I'll just bring it up to negative four and reduce the yellow just a tad before and after. And now let me show you a third method. I'll delete this layer and I'll create a curves adjustment layer and actually let me expand the panel so that we can see this better. And I'm going to click on the adjustment layer thumbnail to make sure that we're working with the actual adjustment and not the layer mask. Notice this white outline. If I have it set to the layer mask, the next step wouldn't really work. So make sure that you select the adjustment layer thumbnail. Next, you can hold Alton Windows option on the Mac and click on the auto button and from the auto color correction options, make sure that you select find dark and light colors and unchecked snap neutral mid tones what this algorithm is doing. The find dark and light colors. It's simply making the darkest color black and the brightest color white, and this will neutralize an image. Remove any color casts, but we want to do the opposite. We actually want to introduce a color cast, and if we look at our image, we have a greenish color cast, and we saw that earlier by looking at the ambient colored check so we can change the color of the shadows in the color of the highlights so that they match the background and that will apply a color cast that it's similar to the background, making the composite look more realistic. So if I select the shadows, the color picker will come up and I can look at where my shadows are. I see some really dark shadows here, so I'll click here and you can see that that is not really black, that it's a dark green. So that's what I will select. And now I'm going to select the highlights. We have highlights here on the right, but remember, we're not really concerned with this right side because those secular highlights wouldn't work for our composite. But the highlights on the left side will work again. We have speculate highlights here, so they may not work, but I'll still try and see what color they are. And they're just an off white color. And for now, I think that may work, so I'll press. Okay, so we have this dark green color and we have this bright green color. Then I'll press okay. Photoshop will ask me if I want to make these colors my new default colors. In most cases, you don't want to do that. You want to keep black and white as your default colors, so I press no. And now you can see my before and the after much better. One advantage of using the curves adjustment layer is that you can actually use this main RGB curve to bring contrast into the image like so and the adjustments were actually made in the channel. So if you go into the red channels, you can see the adjustment there and in here in the greens as well. You can see how the points are not in the original positions. See that this was much lower in the blue Channel. So that's how that effect was created. And we are controlling the contrast of the image by creating these points in the RGB composite view, and if you want to make things more precise, you can create a vibrant adjustment layer and bring down the saturation. Go back into the curves adjustment layer and you can control the brightness of the image this way. And just like I've been saying before, if you can make the black and white image look good, then you can definitely make the color image look good as well. So once you find something that works for you, you can disable this vibrant adjustment layer, and you have the final result before and after and again these air subtle adjustments, but they make your composites look so much more realistic.
Class Materials
Bonus Materials with Purchase
Ratings and Reviews
David
This course teaches what you need to know about creating composites. As alway Jesus delivers in a clear, precise and fun way. You can just tell this guy has a great personality and he loves what he does. I greatly enjoyed the course and would strongly recommend it. A big thumbs up!!!
a Creativelive Student
One of the best courses I've done on CreativeLive and that's a high bar! An incredible mix of in depth guidance but also some simple photoshop tips along the way, I had so many 'wow' moments, learning things I had no idea you could do in Photoshop. Really a good pace too. Quite a short course but so many good lessons to revisit. Great work!
Jorge Perez-Martinez
I think this is a wonderful course. It goes into the key aspects that one needs to know to make a good composite. Jesus does not go into needles details and assumes a basic knowledge of photoshop; this make the course very manageable as far a its length. Highly recommended!