Lessons
Lesson Info
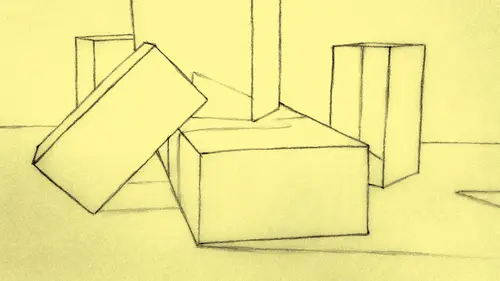
Sighting and Placing Angles
So, if I'm freehand drawing it without a lot of measurement, I really wanna learn how to sight angles. And so the way that you do that, is right now, it's pretty easy to put this down. It's also pretty easy to put these lines down because they're perpendicular to my ground plane, more or less. But how do we know what the angle of this is, and what the angle of that is? Well, something I love to do, is what I'll do is I'll line up my pencil to my eye. So, I'm lining up my pencil so that it lines up with this edge, but it's to my eye. And so what I can do in that case, is line it up, and bring that angle directly down to my paper. It's sort of a one for one sort of scenario. Takes some practice, but I'm sighting an angle, I'm bringing it down, and as soon as I sort of have a sense that it's right, I can go ahead and make a line that mimics that angle. And, of course this line is ultimately gonna span back into space, and hit a vanishing point on the right side. And then I can take this, ...
I can sight the angle of the way the block hits the ground. Bring it down. And then I can take this line further out. I know eventually it's gonna converge with this one, out to an imaginary vanishing point on the side. And then the same thing is true for this side. I can come out on the edge. Span it out to my vanishing point out here, which mimics what's happening here. And then here too, I can bring this line up and out. And I'm always, and then I also have our crisscross that we have. So this line, I can sight the angle, but I also know that there's some perspective happening here, two point perspective. This is gonna come out, a vanishing point. And, here too I can sort of sight this angle. And I can bring this out to a vanishing point on the horizon. So, once I've established this box, I take a look at it, and I say, in the drawing, I say, "Does this feel like it's flipping up at me, or does it feel like it's twisted or turning, or not sitting properly?" And I feel like it's okay. I feel like it looks pretty good. So if I feel like it's working alright, then I can start to maybe crisp up some of my foreground lines. And establish it in space. And once again, if I want to, I could possibly, like I'm seeing here, I could give myself a little ground plane. When you give yourself a ground plane, sometimes it's tough to get it to intersect the block on one side, at the exact place it would intersect it on the other side. You end up with this kind of weird skew. So, I would just be, sometimes I'll draw through the shape, very lightly, in order to kind of bring it out to the other side without it feeling tilted. Then you can also use a ruler to just sort of make sure that it's setting up well. So as soon as I have just even a hint of a ground plane, and I have this block sitting in space, it feels pretty believable. It feels like it's sitting, it's not flipping up, and it's two point perspective. So, that's a hands-on version of two point perspective. We've taken it from the diagrams. We've reiterated it here. And again, just practicing it, it's gonna be really important to draw lots and lots of blocks from different angles. So, what I wanted to do towards the end here, is talk a little bit about height versus width. I also wanna just show you a couple of more examples of two point ... Students who've used two point perspective, artists I know. So, here's a slide of a friend of mine, who's done some sort of architectural drawing. Quite technical, but also with some humor. And so here's a classic example of using two point perspective to draw a library scene. So Richmond Jeffrey did this one, and was nice enough to let me use it for this show. Okay, so sighting angles. Sighting angles is, we just practiced it a little bit, but sometimes seeing me hold a pencil out, it's a little hard to figure out exactly what I'm seeing. So what I did is I setup a little diagram to look at, and I'm gonna show you how I think about it, how I move into it, in order for you to practice this, and to sort of internalize the ideas a little bit better. So, block, looks familiar. Block in space. And, if I take that block, and I look at it in terms of how it hits the ground plane, this is really crucial in terms of placing something in space, in a way that's believable, and also that has some sense of positioning that really relates to what's actually happening in life. So let's try this. So, if we come back to this view, I actually have this same image, but I wanna use it as a way to explain what are these angles, and how would we use them? So if we shift back to the drawing table, we can see an image that looks familiar. And, I'm gonna show you a few things. So, we have this block, two point perspective. This block is in two point perspective. So let's just sort of reiterate that. In this case, this two point perspective is asymmetrical. So, it simply means that the block is turned a little bit in space from the midline. And, so I just wanna kind of go through and stabilize this block, and make it a little clearer. Okay. So, we have this block in two point perspective. But sometimes people have a really hard time with figuring out, okay, I've got the whole two point perspective thing down, but it's the angles that challenge me. So one of the first things I like to do, is I will ask myself ... I'll actually sort of visualize, and I'll do it here in a way that we can just visualize physically, which is I'll ask myself, how does the tip of the block, or the bottom edge of the block, when it's coming down, where does it sort of hit a horizontal ground plane? And I'll bring that horizontal ground plane, even though maybe the boundary of my picture is here, in my mind, or with a light line, I'll bring it all the way up to the bottom of the block, and physically how that might manifest is that I would maybe take my pencil, and visually drag my pencil up. So from my eye, my pencil is mimicking this line under the block. As soon as I do that, as soon as I hold my pencil up, and bring it under the block, and mimic that line, suddenly I have a guide. Or I have a relationship. If I have my pencil here, it's like I've created this imaginary line under the block, and I can see how this edge of the block relates to this line. And I can also see how this edge of the block relates to this line. And in angles. Is it a 90 degree angle, is it a 40 degree angle, is it a 23 degree angle. What kind of angle is it? So, in sighting the angle of the side of that block and bringing it down, and noticing in a sense, what the shape is. And I'm gonna just sort of shape it out here. So, if I can realize the shape that's created between the bottom edge of that box, and this implied horizontal ground plane, if I can get this shape right, it's actually what would be the negative shape. This shape in between things. If I can get this shape right, I can get the angle between these two lines right, then I know I've established this edge of the box with accuracy. So, that's helpful. And this angle is more like a 45 degree angle. If this was a whole sort of span of angles. But then if I look at this side, and I sight the angle, and bring it down, and sort of look at it. It helps me to put that horizontal plane in there. If I can get this angle to have some accuracy, and I'm coloring it in here. You could even do that. If you're really trying to establish it, and really see it, you can kind of create a sense of how this block hits the ground, and what are the angles created between itself and this implied ground plane. Becomes really useful. You can also flip this, and you can also do it, let's say for instance, in this drawing, or in this situation, I actually have a back edge of the table. And I can do it, this can also be helpful, I can bring the pencil down, not only bring it up, but I can bring it down, and impose a upper sort of plane. And you can either bring that, just trace that ground plane, or do an imagined one, where you bring it just a little further down. And then we have more angles to look at. So on the upper part of the box, we have more angles. What is the relationship between now, rather than the lower corner, the upper corner, and this implied horizontal? And, once again, we can take a look at how the relationship of this edge of the box relates to this back edge, and we can also look at how the relationship of this edge of the box relates to this back edge. And by noticing the space around the block, and noticing how the negative shapes around the block create these beautiful angles, we can start to create a more accurate drawing. And then the final thing about this, is that in the end, if we're talking about trying to find these angles, and thinking about negative space, drawing a block might not seem particularly exciting, but part of making these decisions, and looking at these angles, and placing a block in space, part of the decisions actually have to do with composition, which is a whole other conversation in a way. But, while we're at it, we could actually look at this, and say, let me get my blue pencil for this, we could say now that we're sort of looking at angles, and composing, and looking at negative shapes, is this boundary the most beautiful boundary for this particular drawing? I think it's a little too big. I think this drawing needs to be brought in a little bit. And so by kind of bringing in, you know when you look on your camera, and you zoom in and you zoom out, or you go onto edit, and you crop things in a certain way, to make them have more emphasis and more interest as images, we can do that freehand, by literally just sort of lightly recomposing, sketching in, new decisions about how we want our image to occur on our ground plane. So, I'm digging this. I think this is much more interesting. I like the placement of the block within this smaller arena. And you can see how by bringing the space in, also can help us sort of realize some of these negative shapes around the block. So those are some things to think about as you're starting to put your drawings together. Even with the simplest forms.
Class Materials
Bonus Materials with Purchase
Ratings and Reviews
DiDi Hendley
Excellent instructor! Simple to understand instructions, told in few words. Thanks Ms. Wynne and CreativeLive!
Wendy Nelson
Fantastic - I learned so much and got answers to things I was struggling with. This is a great beginner class.
Student Work
Related Classes
Illustration