Lessons
Lesson Info
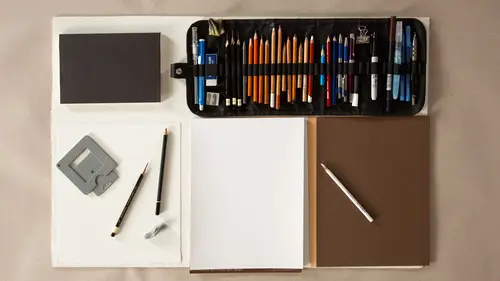
Materials
Hi, I'm Amy Win and I'm excited to have you here in my Pawtucket Rhode Island studio. And what we're gonna do is we're gonna learn some of the very basic first steps to getting into drawing. And I know when people start to draw, there can be a lot of fear around that, a lot of sort of apprehension around, you know, um putting marks down, but if you can remember back to when you were a little kid and you just took a crayon and started to scribble and how sort of liberated that was. Or if you watch a toddler with some paint on canvas or on the floor, you know, there's just this sort of unbridled creativity which we can re tap into. But the first steps really are about just tactile um understanding materials, putting marks down and also exploring how other artists make marks for inspiration. So in this course I'm gonna take you through materials and I'm also going to take you through some really basic first steps that have to do with creating expressive line, creating dimension. And reall...
y starting to kick start your drawing practice at whatever stage you're at, because maybe you haven't drawn since you were a little kid, or maybe you have drawn, but you want a new way in, you want to sort of re energize it. This is a perfect course for that as well. So I want to look first at just a couple of artists drawings, this one here, just in terms of materials in this drawing, this artist has used a water soluble ink, so there's this and I'm gonna show you exactly how to use that in this particular lesson. In terms of materials, ink is put down in a linear fashion and then water is brought in and it's like a bridge between drawing and painting this image here is done with a fine pen nib and a walnut ink, like a brown ink. There's so many choices when it comes to materials. If you go to an art store it can be completely overwhelming. So when you look at artist's drawings and actually almost keep a file of images and image library of people you like. You might notice a certain preference in the way drawings look and that might give you a little direction in terms of the types of materials you actually end up going to buy. This drawing here is softer, it's more of a chalk drawing, there's more smudgy atmospheric areas. So I'm also going to show you how to manipulate chalk and charcoal to create this sort of this beautiful effect. So let's talk about materials, materials. We go into the art store, there's like hundreds of pencils to choose from. And the reality is you could do beautiful drawings that just like a number two pencil that you might find in your drawer in the kitchen. Um but I love materials and I have certain materials that I use a lot and I also have a way to organize them that really works for me. And that is especially when I'm traveling or just, you know, even in the studio, I really like to have them organized in a roll rolling case like this. This allows me to group certain colors together and group certain effects that pencils make together depending on what I'm working on. And it also is a really portable way to travel because what this does is I can just basically roll this up, wrap it around and then I can just stick it into my pencil case my pencil bag and with all my other materials and it's really easy to work with. So I'm gonna unfurl this because it's actually from this setup that I'm going to pull a good number of the materials that I'm going to play with um to show you just about the potential of certain types of mark making with certain types of substances. So what we're gonna do is I'm gonna be demonstrating here, I'm not only gonna demonstrate different kinds of dry media, but also a little bit of wet media like ink media. And I'm also gonna do it on different types of surfaces. So you saw the number of pencils I have. Um we also when you go to the art store you can see many, many different sketch pads of different sizes and each one of these sketch pads is going to have a different kind of paper in it. Some is thin, some is thick, some as texture, some is colored. So this is something to absolutely look for. And also ask yourself in terms of scale, like if you are going on a trip and you'd like to bring a sketchbook, chances are you're not going to bring a huge 18 by 24 inch sketchbook. You probably pare it down and bring something smaller and more manageable. Um also paper, some are a little thicker and they're meant to take water based media, like a watercolor paper, which I'm going to show you. And other papers have different colors and they would show up lighter pigments. So let's jump in and I'd really love you to have the attitude of play. We're gonna play with these materials and that playing. A lot of people don't give themselves the time to play. And this idea of play and this idea of like just sort of seeing what happens is often for me the times where I feel like I'm making my best work. Um rather than having this destination in mind, like really staying in the process of putting marks down. So let's try that. Let's try a few things that we're gonna start right here with a basic graphite pencil, graphic pencil again is like your two B pencil, your yellow ticonderoga pencil that you might have at home. And This two B pencil that you have at home is going to give you a certain darkness when you use it. Um Art pencils have various hardness is um that is going to give you either a darker or lighter line. And as I use this I'm pushing and pulling, I'm noticing what the expressive potential of this particular drawing tool is and I'm also doing this so if I was going to make a tighter mark, I might shook up on my pencil as if I'm like writing home to mom and I might use that sort of grip to make marks that are more controlled. But as you might have noticed just a minute ago, holding a pencil almost like a spoon does more to activate the fingers, wrists and arm versus just the tips of your fingers. And so this is a really nice way to grip any kind of drawing tool if you're working on a little bit of a looser attitude or trying to free yourself up a little bit. So graph a it's a fabulous drawing tool. Another drawing tool that I use quite a bit is charcoal pencil and I'm gonna put the charcoal pencil right on the same white paper. This is a multimedia paper. It allows you to put a lot of different kinds of media on it. So this charcoal pencil, I want you to notice something when I put these marks down, they may feel like they're almost overpowering. The graphite graphite has this sheen, it's kind of silvery and charcoal has this luscious, velvety dark and this can really create a super dark effect velvety if you start to build it. And the other thing that happens with charcoal is that it's smudgy. So in terms of creating atmosphere in terms of creating sort of a misty sort of effect, charcoal is definitely your go to charcoal comes in pencils like this, but it also comes in sticks like this. And this sort of stick is nice because you can use the side of it to make wider sort of big areas of dark and then this is really nice for more linear work. So charcoal is a beautiful, beautiful medium for very dramatic and also atmospheric effects. Another thing that I love to work with is you can use colored pencils. Um you know, you might just have a few kicking around your house. You don't have to go break the bank and buy like, oh I want her set of things. I mean you kind of, you want to, but you can totally draw with things you might have around the house. Um like a blue colored pencil. A red colored pencil are kind of fun to use. But what I really love in terms of color, especially when I'm working with a figure, um is this sort of uh called a sanguine um earth red sort of pencil. Any sort of earth red pencil will do. And this to me gives you sort of an old master effect right from the get go. This quality of uh the sanguine color really sort of reminds me of the master drawings, italian french academic drawings. So I really love to use this and this is not smudgy, this is more waxy. So if you're not a big smudge, er then a waxy, your pencil or graphite might be more up your alley. So another option in terms of mark making might be a waxy er black pencil. Um This is actually sort of an oil based pencil, but again, like a black colored pencil could be nice because it gives you the same luscious dark that the charcoal might give you, but it's not smudgy. So you can make marks with staying power, you can make marks that really hold, even if you brush across it, that's not gonna smudge too much on you. So that's really over time, you'll develop your preferences around smudge or no smudge, thin marks, wide marks and that sort of experimentation takes time. A couple of things that I want to show you. One thing. This is kind of a nice segue, is that I'm gonna show you two pencils, and I'm gonna show you the tips of those pencils. Um and I'm gonna bring a piece of paper behind it. Just, you can really see the difference. So my graphite pencil, you can see uh this one here was sharpened with a knife. The this pencil here is sharpened with a pencil sharpener, so you can see the difference between the two tips of these pencils. And what I'd like to do is I'd like to actually teach you how to sharpen a pencil with a knife, because when I was in graduate school, that's how we were taught sharpen with a knife. And you might think, well, a pencil sharpener, like, this is so much easier, like, why would I want to sharpen with a knife? But my feeling about that is that this is going to give you like a quick, easy kind of clean conical shape to the to the lead. But to me I look at a lead like this and I'm like, oh, I really want to draw with that because it's organic, it's got a lot of facets to it, it's longer, I can make marks with the side of it and the tip of it. There's just something exciting about that and you'll decide on your preference over time. So this is the part where you definitely want to be careful. If you choose to sharpen a pencil with a knife, then you need to pay attention to a couple of things. One is you want to brace the hand that's holding the pencil on something so it doesn't wave around a lot because you want stability. This is an exacto knife. A sharper knife is a lot safer than a dull knife. So you really want to make sure it's a nice sharp blade. You also want to make sure that the blade is tightened into its holder. So I'm going to give a clean sheet here. Okay for this demonstration. So I'm going to hold this against the paper. I'm holding the pencil down, I'm holding my hand against the paper. I'm angling the knife at about 45 degrees. And then I'm starting up in the paint area of the pencil above the wood line and I'm just gonna whittle away as I'm whittling pieces off the pencil, I'm turning it in increments to the side so that I can start to shave off the wood all the way around. Mhm. This definitely takes practice, especially if you're working in this way sharpening a charcoal pencil, because charcoal pencils are brittle on the inside and they tend to break more. So a lot of my students and they break a lot of pencils learning how to do this, but once you really get the hang of it, it actually um you probably won't go back to using a regular pencil sharpener. So here's sort of a different kind of lead now. Um And to me, when I look at that led, I really think this is what I want to draw with. So the next step is always put your exact a knife top back on the exact a knife. If you lose your top, you can use like a wine cork gonna raise her to put the exact a knife in, but you really want to have safety be first. So I made a little bit of a mess here, but I'm not worried about it because what I love about these pencil shavings is that I can actually smudge them onto my paper to make sort of a mid tone and this is a great segue to learning a little bit about Airasia. So I've taken these pencil shavings, I've smudged them down and I'm going to work a little bit with erasing so that you can kind of see the different effects. So I have a couple different kinds of erasers. I have this plastic white eraser which creates very sharp effects. I'm going to show you that I'm using the edge of it to erase through that gray down to the paper. So you can actually use an eraser like this or one that's actually sort of a pencil shape like this to go back into a drawing and make lighter marks and it's actually kind of fun, fun way to work. So this typical racer does that and then this is a different sort of eraser, It's called a kneaded eraser and it's um you can stretch it and basically I'm going to bring this charcoal back just to demonstrate this. So let's say you have a line you did and you love the line, but you feel it's a little bit too intense or too heavy. You can basically take this eraser make a sort of flat area out of it, you can reshape it really into any shape you want and you can press into the area that you drew and then if you look, you see that actually a fair amount of that pigment ended up on the surface of the eraser and that actually lightened up this area without completely getting rid of the line. So the kneaded eraser is really nice for some subtle effects like that. All right, so graphite, charcoal colored pencils, all of those are really fun to work with. But what I'd like to also show you is some media that um has the ability to be dissolved by water. And I actually use this sort of media a lot when I'm going out to sketch outdoors, one of them actually is what we just sharpened, which is convenient. Um This is a watercolor paper as opposed to this paper. This paper has more of a tooth to it. It has a little bit of a grit and it's thicker than this paper. It's also a slightly buffer color. So you may over time really start to have preferences about the types of paper that you use. I like using watercolor paper when I'm using water based media because it doesn't curl up on you as much and it's a lot hardier. So if I'm working, let's say with this is I know it looks like graphite but I've got a little treat for you. Let's say I'm working on like I'm imagining the bark of a tree. Okay, sort of working with this idea of like texture, bark of a tree. Oh it's not too scary, it's just a graphite drawing, right? And just kind of playing building up some pigment here, getting a fair amount of the pigment down. Maybe really working with like a root system. So I'm playing here. Remember play? I'm working with my imagination. I'm not really caring if this is a masterpiece because I'm just like working with the material and that's actually really satisfying. So I put this down now, this is a super fun tool and a lot of our stores carry it. This is a water brush or in a quash brush and it has a chamber. And in that chamber you can put water. So it means that like if you're working outdoors with something water based, you don't have to bring like a whole can of water and brushes. This actually is a brush pen, there's a brush tip to it and the water on the inside. If you squeeze it just a little bit it comes down and it pulls up on your paper. So you can use this and you can use it to actually start to dissolve the water based pencil. So that is a water based graphite pencil and you can see how suddenly it's kind of gorgeous the way that you can keep some of the line, you can dissolve other aspects of the line and really bridge the gap between drawing and painting. It's a really, really fun thing to play with and work with. So, a brush like this, or just a little can of water. Um Water based uh water dissolvable graphite is really fun to use. I'm gonna show you one other type of water soluble media and then a little bit more of a dry media and then I think we'll have a really nice survey of effects. So this is ink and some people feel like I'm working with a pen, it's so permanent, it's so scary, I can't erase it, but I say just go for it and just play with it. Um You might have a whole little sketch book devoted to drawings that you don't think anyone's ever going to see and you can just make drawings. So this pen has one tip of it, I'm just gonna do it on the same paper because I'm still working with something that will ultimately be water soluble. Um This tip of the pen is like a brush pen, it's wide and this tip of the pen is narrower, so a lot of a lot of pens have two sides. Mm I'm gonna take the same quash brush. I'm gonna go in and I'm just gonna start to pull and dissolve this ink. And you can see that this to give you a potential for again moving from something linear early made to something more painterly. So, this is a super fun thing to try and I encourage you to try to work with that. All right, the last material that I want to show you is something I love quite a bit, which is working on a mid tone paper or a darkish paper, you could say. So paper comes in different colors. Here we have sort of a deep brown and here is sort of more of a topi color. I'm gonna put a light media on the brown and just so you can kind of see the contrast. It's almost like reversing drawing. We're so used to putting dark marks down on light, but this effect actually can be really beautiful and it's something that you can play with sort of flipping the process. So if I start to make marks, this is just a prisma colour white colored pencil. I can, you can see how, if you build these up over time that you can create some really bright brights and they can segue into the dark of the paper. If you're working totally another option for working with a light on dark is using a white charcoal pencil. And so you can put that pigment down and then you can actually smudge that to create more atmospheric effects. So, working with the black sea media, like a colored pencil or chalk in media on a light or dark paper is gonna really create different effects. And I would definitely recommend just try them out. So having a range of materials with you when you're working outdoors or where even you're working in your home, having things available is really important, because let's say you started drawing and you think it's gonna be done in ballpoint pen, which is, you know, I'll take mine out, it's kind of a fun thing to work with. Um you know, everybody has a ballpoint pen, so you can't make the excuse, you don't have anything to draw it with, right? So everybody has a ballpoint pen. Let's say you're working with a ballpoint pen and then suddenly you say, shoot, I really wish I had done this in red chalk or something, then if you have like a red chalk pencil or sanguine pencil at your disposal, you can just pull it out and work with it instead. So having a range of materials, a simple range of materials, even like three different pencils. If I was going to make a suggestion to start, I would buy like a super basic sketchbook, really inexpensive, you could even use xerox paper if you want to. Super inexpensive sketchbook, a ballpoint pen, a classic graphite pencil, maybe a charcoal pencil, those would be super places to start and then maybe an eraser. That's a great starting place. And actually you can do the majority of the things that I'm about to demonstrate in this course with those materials. So play with materials, See what you love, see what you don't love. And also ask yourself if you don't love the material, why is that? Is that the texture? Is that the effect? And look at a lot of artists, drawings for inspiration. To expand your drawing tools
Ratings and Reviews
Student Work
Related Classes
Illustration