Adding Color to the Couch to Create Shiny Leather
Lesson 14 from: Draw like an Interior DesignerJorge Paricio
Adding Color to the Couch to Create Shiny Leather
Lesson 14 from: Draw like an Interior DesignerJorge Paricio
Lesson Info
14. Adding Color to the Couch to Create Shiny Leather
Lessons
Introduction
01:14 2Materials and Tools to Use when Drawing
14:27 3Preliminary Furniture Plans on a Floor Plan
07:45 4Using a Scale Ruler and Templates
05:36 5Rendering Furniture on Floor Plan to give Volume and Depth
06:06 6Line Weights and Adding Texture
04:24 7Architectural Lettering
08:11 8Complete House Floor Plan
03:23Isometric Perspective
03:42 10Why 3-Point Perspective Doesn't Work
04:05 11Benefits of Two-Point Perspective
03:06 12Preliminary Sketches for a Living Room
11:29 13Using Different Textures of Materials in your Drawing
03:51 14Adding Color to the Couch to Create Shiny Leather
11:26 15Rendering Soft and Shiny Textures
09:09 16Starting Elevation for the Kitchen
07:54 17Full Rendering Elevation of the Kitchen
07:28 18Putting the Elevation at a Different Scale
10:33 19Two-Point Perspective for Kitchen
10:04 20Canson Paper with Pastels
05:35 21Transfer Line and Heights
08:27 22Finishing the Rendering Using Canson Paper
08:48 23Creating Chrome and Color Reflections
10:43Lesson Info
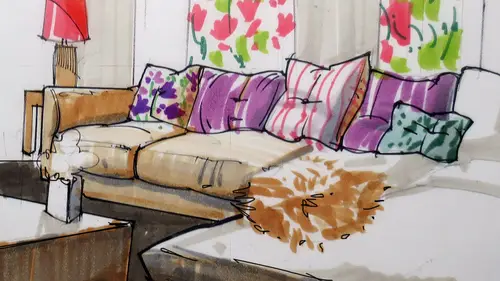
Adding Color to the Couch to Create Shiny Leather
So I have a, um so for over here, Um, and I wanted to it in Browned I have in black is to a brown one, just like that one. Doh I have button backs. Do I want to add them? Maybe not for these one. So what I would do first is take some markers and then the classrooms going to do it too, right? You guys will be doing the same thing. So give the leather is shiny. You have to be sure that you would have, um, remember growing up paint by numbers. Right? You would have these papers, and then you would have different space, that you would color them up. Let's work in a way like that. You first mark where you would have your highlights, and then we can render around those highlights. The next thing would be we need to have pairs of colors. So I have two markers here, one slightly darker than the other. Um, one thing that is very important at this point. And trust me when I say this, test your markers on the side. Always don't test your markers on the good paper. Remember what happened with my b...
lue. How dark it waas? You couldn't really see. It was blue. Uh, you do it here. It has to be the same paper. Okay, for light on dark tones. You're good with that. I'm good. Let's go for it. You said with a lighter tone and then you dio what I would call regular washes, which is just covering the entire surface from top to bottom with parallel strokes. Remember what I said about Palin strokes at the beginning of the class? Right. So we use Bella strokes to cover the entire surface. Miners, Your highlights. I favored vertical lines over here. In this case, I'm going to use angle lines. All right, so we do a first pass, we cover the entire surface, minus some highlights. Then still with the same marker, we gain shadows. One side of this stuff would be darker than the other. So what I'm going to do? Yes. This part over here would be darker as well as this part there for not with this color. I'll switch to the next one. We tested it here. We are okay with that. This is when you breathe. 123 I can do it. are you just doing parlance? Strokes, pilot strokes. Every now and then you stop and you look at your photographs. Who am I getting their my things. So remember, like anything? Um, let's be honest. You're gonna make me states. OK? So you're not gonna get it perfect the first time around. This is what happens all the time. I showed you already how we can fix them. But truly, the best way to fix your mistakes is by practicing. You're not gonna be like fried riding a motorcycle or anything that you would be doing for the first time. You're gonna be horrible the first time you do this. Little by little, you'll get better. So don't expect that you will excel the first time around, But trust me, the more you practice, the better you get. All right. Pilot strokes to get the main blinds going, we get a good sense off volume. Do I want to add button backs were not, uh maybe not, but rather to keep it simple here. But what I would want to dio is pick my reds tested on the side. I almost made the mistake of just drawing directly there. Um I'd like to have some strips over here. This is going to be These are going to be pillows. I'll add some lines there. Similar to what I have on this other ones. You don't need to do a lot. Or what if I You change your mind is like a strips. But then maybe now I'll do a floral motive over here. I like. I like that better. Something like that. And then remember what I said, Right? You have to use different line waits. This year's different line waits. I'll pick my box off black pens. Where is my favorite one? Yeah, that would be my paper mate. I work on the outline. Hey, wait a minute. How do the outlines really work? Do I have some folds over there? Um, when I do fools, I'll show them here, too. If I need to do a straight line, I wouldn't do a straight line with a ruler. No problem with that. Um, this is a large piece of furniture that is placed on the front. So whenever I have a piece of furniture on the front, I would want to use a thick or even thicker outline. All right, Um, problems that are very close to us. Received thicker outlines, something like that. Okay, I need 0.3 0.8 point eight. When are we working now with my these three pens. All right, if it is an object that has its own entity a pillow independent pillow, I would you slightly thicker Outline. Okay. For thin lines on the inside of the object, I would use, for example, to show wrinkles. I would use very thin black pence pencil pen lines. This guy is on its play out. All right. Thicker for the outside, Thin for the inside to show wrinkles. I started with the wrinkles over here, and I am going to dio thicker outlines to show the the pillow right there. Okay. And now what I would do is just the perimeter off the sofa over here. If you see that there is a straight line, don't be afraid of using a ruler. If you have two straight ruler, then we do these guy over here. All right, so we got the main shape of the object of thes sectional sofa going on inside lines. People this opened inside lines could be a bit thinner if you have. Ah, Siris of wrinkles. This is how you do them. A few diagonal, a few kind of valley lines like that, and then you kind of pick the valley up. That's a wrinkle. All right. Some lines like that. Check my photograph. Oh, you have too many wrinkles. I'm not gonna show them all. Um, I don't need to show whole days. That would be too much, but I would just do enough to get the illusion off. Still a few more wrinkles over here. All right, So you see, I am working with two line waits to define the main volume. In this case of this sectional sofa, I can work on extra lines on the floor to the fine. It better. I haven't even started on this table over here. Can work like that defining the main. These are straight lines to say what? I'm working this finger. It's pushed down. Um, this is my pivot point so I can work faster. All right. So I have my main lines there, and I would use extra lines to define better. My object can also use once you have your main lines thick and slightly thinner. on the inside. I can use pencils again. Time saving. You have them sharpened ahead of time. You can modify slightly your color. I wanted to have extra dark tones there. You see that? I have done that here to extra dark, extra dark tones. It's see these arm rest. I really wanted to be darker on the side. So that's when you use your pencil and then just squint. Remember that squint just to see where you're doing with your, um, with your contrast. All right, we have the unrest kind of bunching up over here. I would do something like this. All right, So this is how you would work roughly with your with your materials, pencil and markers combining thin on the inside again, thicker on the outside. The figure on the outside of you think that you can doesn't really stand out enough. You can always go darker or thicker. Um, just don't decide your markers. This is a Sharpie permanent marker. Um, be careful when you use permanent markers because you cannot really go back once they're in, they're in. All right,
Class Materials
Bonus Materials with Purchase
Ratings and Reviews
user-d2a6ef
Creative LIve Why don't you re-do this class! Its a great subject.....get a new camera operator, who knows the concept of learning from watching.