Lessons
Class Introduction: Develop Module Overview
10:15 2Profiles
11:34 3Basic Adjustments
11:45 4Basics Panel: Texture, Clarity, and Dehaze
05:31 5Basics Panel: Saturation and Vibrance
02:40 6Tone Curve
09:26 7HSL
04:48 8Split Tone
08:19Lesson Info
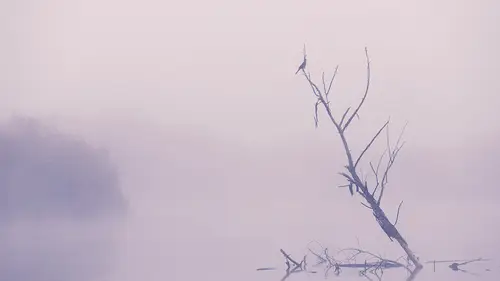
Split Tone
we're now going to talk a little bit about split, toning and split. Toning is fun because it's Ah, it's an interesting process. So I'm first. We're going to go to a landscape of some images in the slot canyons here and down in Arizona and in there I've already done a little split toning on this image, and I'm gonna run em and a reset it. So if you want to reset anything, you just simply hold the option or the all key down and just hit the reset on both sides. So both of these, when you kid the option of the all key, it turns to a reset. So what I'm gonna do is I like what I've done here. There's there's an area of sun, and then there's an area of shadow and the shadow is blue and the highlight is warm. That's just kind of natural. And so I like that. But I want to intensify it. So I want to make that look that I've got going on, and I'm actually gonna warm up the background a little bit so that that area back there is a lot warmer right, And this also by the way is a really great place...
to play with texture. So if I grab that texture not been, bring it up. Look what it does to that sandstone. It's just fantastic. You print that out after you've done a little texture manipulation on that. And, man, that stuff looks beautiful. It's just so many beautiful state lines converging and moving around. Love it. So sandstone and textures knob are best friends, so use the texture knob up. I'm taking the vibrance up a little bit, so I've got some good, but I I want to intensify the blue. And I lost it because I took the temperature up to try and warm up that area right here. And so now I'm gonna go down into the split toning area, and what I'm gonna do is I'm going to increase the saturation on the highlights, which is gonna be that stuff in the background and in the highlights. I'm just gonna So I'm taking it way up way more than I should, and and then I can either choose the hue so you can see that I'm adding green back there, or red or pink or whatever, Um, or the other thing I could do is click on the actual color. So if I click on this little color swatch here, it gives me an option to choose any of these colors or even better than that. In this, my favorite thing to do is simply click on it. Now I'm continually holding the click, and I drag the color dropper off of that panel and I go into the photograph and I point at the area back here That's warm and I let go, and I've just registered a specific color way back there in the background, and it's more of a red than it is an orange, which I wouldn't have really suspected. And so now that I've got that color now I can take the saturation down all the way and start bringing it up and see how I'm. I'm intensifying the color of all the of the lights of the highlights, and I'm doing it with the color that already exists in the highlight. So I'm really intensifying it correctly. I'm giving it the right tone. Okay, so I like that. So now I'm gonna do the same thing to the shadows and take the saturation all the way up. That's interesting. By warming up the shadows, I've just negated all of that. But it's kind of weird to So I'm gonna click on that color again. I'm gonna grab it and I'm dragging off here and I'm looking for the color of blue in those shadows. See that? And it changes based on wherever I'm going. So it's like a little bit more purplish over here, But over here it's much more blue. So I'm gonna choose that blue and then I'm gonna It's actually more of a purple And then I'm gonna grab the saturation and bring it all the way down and start adding it back in until I like what I see which I like that cool. And now just go to finish this off. I'm just gonna go up to the the tone curve and I'm just gonna grab the lights and bring him up a little bit. So see, I'm adding a little bit of pop to that. I'm doing it based on the light area of the photograph in the tone curve, so you can see how these all of these tools are really useful. And if you know which tool is the most effective for a given idea, or or ah, challenge. Then you'll be able to get your job done faster and just better. Okay, so split toning is fantastic for color as well as black and white. So I just showed you a split toning for color because most people just use it for black and white, which is sad because it's really fantastic on color. Um, it's great, by the way, for adding more sunset to a sunset. So if you take the highlights and add a little bit of warmth to him and then you take the shadows and add a little bit of warm to the shadows, you will take a sunset or kind of a so so sunset and make it a beautiful sunset because you're just warming up the shadows. And that's what kind of happens at sunset because the sun is going down and it's starting to bounce around through the atmosphere. It starts to fill in the shadows with warm light. So even though the shadows air getting more thick, they're getting deeper. They're getting warmer at the same time, so they're not as cold a shadow. So anyway, the sun. The an act extra sunset is really well accomplished just by using the split tone. Okay, So I can also use the split tone in circumstances where I have a black and white image go into the split toning and I could just add a tone of some sort. So in that case, I might add, So I'm again going saturation all the way up and choosing the tone, because that allows me to actually see the tone I'm choosing, some adding a blue tone there and then I'm gonna go in and add a warm tone to the highlights. And I like that kind of orange look. Okay, so now the saturation is way up. So it's wrong. Um, but now we're gonna take it all the way down, and we'll just add in a little bit of this blue tone and a little bit of this warm tone man, that looks good. And then I've got the balance Slider. The balance slider right here is fantastic. It's the it's. It's the perfect way to end split toning, and that's just by grabbing it. And you can go this way with it so that it's a little bit more blue in the shadows and a little less warm in the highlights or the other way where you're adding a little bit more warmth and it's just a hint of blue in the shadows. And so this is a really great way to finesse and look through and be like, OK, do I like that cooler look Or do I like that warmer look? And I Well, I really like that warmer look. But, man, I like that right there. I like that. So that's a really nice way to kind of finesse what you've just done. So once that's done Ah, wow, I really like that. So Oh, guess what? I should add texture to this. So I will take this and add just a little bit of texture to it so that the bird pops out a little bit better and the texture here inside of there inside of this stick turns out a little bit better. And if I wanted to, I could add a little bit of fog. See, I can increase the fog so I obscure that back there. Or I could decrease the fog. Now you're starting to see the actual individual wisps of fog so you can see how there's like it's like little floating clouds, your separating out the individual clouds of fog with that D. Hayes option. But you're also increasing the natural vignette of the of the lens, which, by the way, is another tool.
Class Materials
Bonus Materials with Purchase