How to Design Repeating Patterns
Lesson 22 from: Design Surface Patterns From ScratchBonnie Christine
How to Design Repeating Patterns
Lesson 22 from: Design Surface Patterns From ScratchBonnie Christine
Lessons
Day 1
1The World of Surface Pattern Design
35:40 2Living Your Creative Dream
22:15 3Introduction to Illustrator
27:16 4Basic Tools: Pen, Text, & Blob
22:28 5Color & Function Tools
32:27 6More Tools: Rotate, Duplicate, & Replicate
19:16 7Custom Color Palettes
18:49Essential Tools for Pattern Making
41:59 9Tools for Sketching Inspiration
27:50 10Inspire & Nourish Your Creativity
34:55Day 2
11Creating Objects from Scanned Sketches
17:04 12Tracing & Coloring Sketches
30:46 13Tracing & Coloring with the Pen Tool
37:44 14Working from a Photograph w/ Live Trace
36:24 15Hand Tracing Over Photographs
31:27 16Building Pattern Tiles in Illustrator
21:13 17Adding Textures to Illustrations
28:52 18An Unrefined Look in Illustrator
26:10 19Typography & Students Homework
21:39 20Legality of Design w/ Annie Tunheim
27:33 21Trademark & Licensing w/ Annie Tunheim
27:50Day 3
22How to Design Repeating Patterns
18:52 23Complex Cluster Patterns - Part 1
27:38 24Complex Cluster Patterns - Part 2
28:35 25Getting Noticed: Portfolios & Trade Shows
39:43 26How to Drape on Pattern Mock Ups
19:07 27Fun Stuff: Desktop Backgrounds
19:42 28Fun Stuff: Gift Cards & Tags
29:05 29Fun Stuff: Clip Art & Shipping Labels
28:17 30Spoonflower: Stephen Fraser
29:04 31Uploading Patterns for Web Printing
20:29Lesson Info
How to Design Repeating Patterns
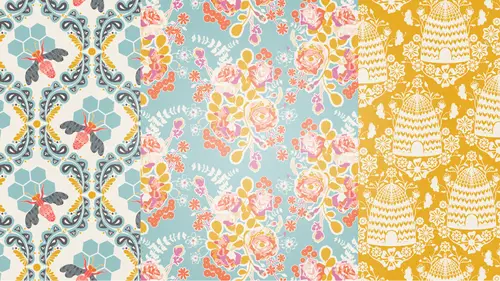
So what I want to start of with is, sharing again with you, the name. That I have come up with my collection and kind of the idea and story behind it. So, we can go ahead and fill up this next slide. I have named this Nourish, after Nourish Your Creativity. So, the theme I'm really going for is, the importance of feeding your creative soul. Cultivating beauty and the motivation and energy that you have behind your creativity. And why it's important to nourish all those things. And so, they're just some simple things that I like to do when I feel like, maybe a little zapped and my creativity is not flowing. And it's just simple things like, taking a walk in the sun and having a cup of tea, working in the daylight and things like that. So, this is what this pattern collection is loosely based around. And I am ready to get started on making repeating patterns. Are you? (laughs) Good. I want to start with, just a really simple pattern. Just to, help wrap your brain around how the repeating...
patterns are created. Many of you might already know how to create a repeating pattern. I felt like it was... It was simple to do, but when I was trying to learn Illustrator, I could not find out how to do it. It was the biggest mystery to me. And 12 months into Illustrator training, I finally figured out how to do this repeating pattern. And it's so simple you're not going to believe it, if you don't know how to do it. But, I hope to kind of unveil the mystery and we will get right into creating patterns. The first thing I'm going to do is, just work with the triangles that are on the vase that we made yesterday. So, I'm going to zoom in here. I already have my documents set up. And if you don't know how to do that, just make sure to refer back to a couple of the previous segments. On how to set up your document and import color pallettes. So, it's important when you design a pattern collection, that you have certain patterns that are more intricate and large. And then certain patterns, that are more simple and they tend to be used for, if it's fabric for like bindings and linings of bags. If it's for stationary they tend to be used for the bindings of a book. Or, maybe something that wraps around a pencil, paper or something like that. So, it's important to vary the complexity and the scale of your pattern collection. So, this is a mistake I made early on. As I just did all these busy, really complicated patterns. And when you look at a collection, which I'm going to show you a little later. Chaos comes to mind. There's nothing that's really simple to tone it down a little bit and marry it together. So, I'm going to start with a really simple triangle print, and I'm going to steal these triangles off of the vase that we made yesterday. Going to be using the vase in another pattern, but this is just going to be kind of the same element that we're going to carry throughout, the collection. So, in order to do that, I'm going to un-group this vase. And just come in here and delete everything except for the triangles. And the triangles are, a really light, beige color. So, I'll just turn them black for the time being. And I'll delete everything that we're not going to use here. I'm not going to use these dots, I don't think. Maybe I will use the dots. Let me keep the dots. Now I'll make this black, and delete these two bits that we're not going to use. And these two on the end, we made to look like it's wrapping around the vase. So, I'm not going to use any of those either. And I do need to bring in my color pallette here. Didn't do it on this one document. Which will be good, so we can go over that one more time. What I'm going to do is, delete all of these colors that come standard in a Illustrator document. So, I just click on the first color, hold the shift key down, and click on the last color. And I can drag and drop these to the trash can. Now to get the color pallette in here that I want to use. I'm going to come to the swatches panel fly-out menu. Scroll down to, open swatches library. Use it to find and, I've named this color pallette nourish. It's the same color pallette that we've kind of been using throughout the course. And it's also available to you in the color pallette AI file. If you have any time access to this course. So, that brings up the nourish color pallette and I'll just click right there on the folder to get it to show up in my swatches panel. So, I will change the color of these triangles to orange and these little dots, make sure I get all of them. To... Let's say teal. And so at this point in the game, color is not a huge deal. I like to get something, pleasing to the eye. So that I feel like we're going in some kind of the right direction. But, you can change the colors of any of your patterns for, as many times as you want. At any point in the game. I build patterns a couple of different ways. I'm going to show you all the ways today, but to start out with I'm just going to grab the rectangle tool. And instead of drawing a marquee of a rectangle, all I want to do is click once and bring up a rectangle dialog box. Where I can manually put in, what size I want this rectangle to be. This is going to be the size of your repeat. It doesn't matter what it is. It can be as big or as as small as you want. It can be a perfect square, it can be a rectangle. Unless you're working in a industry where you know for a fact what size the repeat needs to be. Or sometimes wallpaper needs to be at a one to one ratio or a one to two ratio. But, if you don't know that, I would say go with whatever your heart desires. So, this may change down the road but I'm going to start with... Maybe, let's say 500 pixels wide, by 250 pixels tall. And see what that looks like. Command zero zooms us out to the size of the art board. And I'm just going to select this and send it to the back. And change its color to... Maybe this pink right here. Also, I've got some layers that I don't tend to, well, now everything is on the same layer. So, I don't have anything on this layer one. So, I'm just going to drag and drop it to the trash can. Yeah, that's fine. So, what I need to do first is increase the size of my triangles and my circles. So, I just highlighted them and with the scale tool it drops my marquee right in the middle of those. Which is fine. And if I hold the shift key down and drag at a diagonal towards the top, it's going to increase the size of these proportionally. So, that looks good, to me and I'm going to bring it right over here. One thing that I tend to find a little distracting when I am working with patterns is, seeing this art board. And I have it white on white which is... A little less distracting, but I don't need to really know the size of my art board. So, what I'm going to do is hide it. And you can do that by going to view, hide artboards. And that just gives us a clean, white space to work with. So, what I want to do is, just start kind of building a pattern out of this. And I'm just going to see where it takes me. A lot of times, this is going to end up kind of being a stripe. So, dots, triangle, dots, triangle, stripe. And so, this middle row right here. To kind of give it some variation, I'm going to just reflect it upon itself so it kind of gives a different movement. So, I copied and pasted that down here. I'll do that again. This is, everything's highlighted, and to make a copy of it, all I do is grab it and start dragging it down. Holding the shift key to keep it inline, and the option key duplicates it. Now if I want to reflect this, I leave it highlighted. Grab the reflect tool by pushing O on my keyboard. That drops it right in the middle, which is exactly where I want it. And I can just start to drag it over here to reflect it. The shift key will make that an exact duplicate. So, I think I'm going to do that. Bring the top row, and just replicate it down here one more time. And so, I think this is what kind of our pattern is going to look like. I can tell already that I'm going to have to change the size of my repeat boundary, but we'll get to that in a second. So, the most important thing that you need to remember when your building a pattern is, that everything along the left axis of your rectangle or square has to match up on the right side. And everything on the bottom has to match on the top. So, I'm going to grab everything that pulls over on this left side. Deselect the rectangle, and just see what it looks like when I drag and drop it over here. Okay, so... There are maybe a couple of issues that I want to work with. But, the first thing I want to do is, get my rectangle close too, this repeat side. So, all I'm going to do is select the rectangle and I'm going to scale it from the left axis. So, I'll grab the scale tool by hitting S on my keyboard and dropping the marquee to the far left side. Instead of scaling from a diagonal, I'm going to scale directly horizontally in because, I don't want to change the height of my rectangle, just the width. So, I'm going to bring that in just like so and at this point I'm just going to eyeball that and we're going to make it exact in a little bit. But now if you can see this rectangle and this rectangle are identical. And they cross the axis right about at the same spot. So, the other thing you can remember is that your axis are what are important when you're creating repeating patterns. That's what has to match, but anything in the middle, you can play with. So, these dots look a little... A little crazy to me, so I'm going to move this one around that doesn't matter because it's in the middle of everything. I might just delete that one all together and bring this one up here. And I might delete this one too, move this one around a little bit too. I can also move these triangles with no problem. Scale those a little differently if I want to. Okay, I like where we're going with this. See a little gap right here so I think I'll add another dot there by just duplicating the one beside it. And maybe here too, I deleted those but I think I just needed to move them around a little bit. Okay so, our left and right borders are matching but, our top and bottom are not. So, the next thing I want to do is get those to where they are matching as well. To do that, I'm going to grab my rectangle and just scale it down, just like this. So, I want... I want it to go maybe right there. So, I have a couple of triangles that are coming off the bottom down here. And a couple of circles that are off my artboard up here. So anything that falls completely off of your repeating boundary box, you don't need. You can just deleted those. And these over here as well. So, let's see what this looks like. My, rectangle I can find out exactly what size it is now, since I changed it by opening the transform panel. It is... 359.026 by 203.494. That's going to be really hard to remember and it's not incredibly exact because I can... I can replicate these and make them exact in the moment. So, I'm going to make these numbers something I can remember. To do that, I can start. This one is 359 so I can just make that 360. That's going to automatically proportionally change the height of my rectangle. And it's real useful most of the time but in this case I want to be able to change the proportions on my own. So, all you have to do to do that is, un-click the constrain width and height proportions. The little, chain link right there. All you have to do is click that, and it looks like it's broken apart. And now I can, independently change this height. And I think I'll just do 205. So, my rectangle is now 360 by 205. Okay, so I want to deleted everything on the right side of my axis. And what I'm going to do is copy these. Make a copy of them by hitting command c. Command f makes a copy of them to the front. So there are two copies there now. And I'm going to move them 360 degrees to the right. To do that, you can right click, come down to transform and select move. So, I want to move them horizontally 360 degrees. Keep them zero vertically and if you want to see where that going to go you can hit preview. So now they are exactly the same on both of the axis So, the next thing I have to do is, get the triangles down here that are pouring over the bottom edge on the top edge. So, I'm not really sure if these two are without zooming way in, but it won't matter. I'm just going to take them up there anyways. So, I will do the same thing make a copy. Command c and command f brings them to the front. So, there are two copies there now. Command z undoes that action. Right click and go to transform, move. Now, I still get caught up on this a little bit sometimes because, it's backwards in what you think. To move it vertically, if you want to move it up it's negative and if you want to move it down it's regular. So, what was my number, two o five. So vertical negative two o five, horizontal is zero and if you hit preview you can see where it's going up there. Hit okay. So now everything that crosses the axis is correct. I'm going to go ahead and make a pattern and we'll see what this looks like. We may need to come back in and edit some things. But you should know that, if you want to move one of the elements that cross a border. You can do that, but you need to select both of them. So if I want to move this triangle, I need to select this one and this one. Then I can move them around. And I will know for a fact that they are still crossing that horizontal or vertical axis at the same spot. Okay, so the trick to creating a repeating pattern is, that behind your repeat there has to be a rectangle or a square with no stroke and no fill. The exact same size as your repeat. So, the easiest way to do that is just copy and paste this background color behind itself and give it no fill and no stroke. So, I'll grab the rectangle. I'll make a copy of it by, hitting command c. Command b pastes it behind. And you can see that it has this pink fill. What I want to do is give it no fill. Okay, so they are both there now, and all you have to do to create a pattern is select everything on your artboard that is in the pattern, drag and drop it over to your swatches panel. Okay, so now I can come over here to the right and draw any shape that you want to draw and fill it with our repeating pattern. And I think this is, I think this pretty cute. I need to see it... a little, reduced in scale to make sure that we don't have any gaps that we're looking at. So, the easiest way to do that is just with your rectangle selected. You can right click, come to transform and scale. And I will scale down, the pattern itself. The default in Illustrator is to transform the object. So all you need to do is click off of transform objects and that will automatically transform patterns alone. So you'll want to scale it uniformly and if I want to take this down to 50% that way I can see what's really going on with this pattern. Okay, so I see a couple of holes. Like I think this, right here needs maybe that dot moved over. But, I like that it looks kind of wavy. It's like kind of a wave stripe. This is again just a really simple pattern but, it's going to be great for coordinates. So, I'm going to come in here and maybe move just a couple of these around. I think that gap is coming from right here and right here. So, what I need to do is move this one over and I'm pretty sure that's going to remedy that problem. This is the time where I would also kind of move anything else around that I want to but, I think everything else is going to work out fine. I might, add one more dot right here. So, to do that, all you have do is hold the option key down. When you select something, if you drag it somewhere just hold the option key down and that will a duplicate of whatever it is you're working with. So, let's see what that looks like. I'm just going to replicate that process of selecting that and dragging it over to my swatches panel. And, that looks much better. So, this was the first version, and you can see this gap right here. If you watch there the second version, looks a little more evenly spaced.
Class Materials
bonus material with purchase
Ratings and Reviews
Emily Leggett
I am so glad I took the time to sit through all 3 days of this course. I have been to hour long classes that I can't wait to get out of and this one I sat in for 3 days and I am wishing it wasn't over. I take a lot of continuing education classes and am always trying to learn new things and I have to say this is by far the absolute most informative, educational, inspiring, and motivating classes I have ever taken. Bonnie Christine was an amazing teacher. She took the time to take us through all aspects of the process and even beyond showing us so many things that can be done with everything she taught us in this class. I think she did a great job with the class, was easy to follow and is someone I would love to learn from again. Great job on everything. I would recommend this class to anyone who wants to learn about surface pattern design and Illustrator. Great job to everyone involved in putting this course together!
a Creativelive Student
I'm about halfway through my first viewing of the course and I have to say, its been electrifying! There is so much quality information here, its an excellent starting point, and I do think I can start working towards a career in design now. It also makes me want to find more information and courses in the art and design area. Bonnie is such a joyful, honest and enthusiastic instructor and really, it feels like she';s hosting an amazing party for her friends. Thank you Bonnie for doing this course and thank you CreativeLive for pricing it so affordably
a Creativelive Student
Awesome awesome awesome course! Thank you Bonnie! Thank you Creative Live! I have learned so much... so much great information packed together in one class. I am so glad I bought the course so I can rewatch it any time I need to.