Custom Wall-Hanging Project - Finishing Work
Lesson 8 from: Customize Your Cross-StitchLisa Shaffer
Custom Wall-Hanging Project - Finishing Work
Lesson 8 from: Customize Your Cross-StitchLisa Shaffer
Lesson Info
8. Custom Wall-Hanging Project - Finishing Work
Lessons
Supplies and Resources
20:46 2Custom Wall-Hanging Project - Basic Cross Stitch
16:44 3Custom Wall-Hanging Project - Zig Zag Stitch
05:03 4Custom Wall-Hanging Project - Oblong Stitch
11:48 5Custom Wall-Hanging Project - Alternative Basic Cross Stitch
19:08 6Custom Wall-Hanging Project - Star Stitch
07:40 7Custom Wall-Hanging Project - Variations
15:54 8Custom Wall-Hanging Project - Finishing Work
25:46Lesson Info
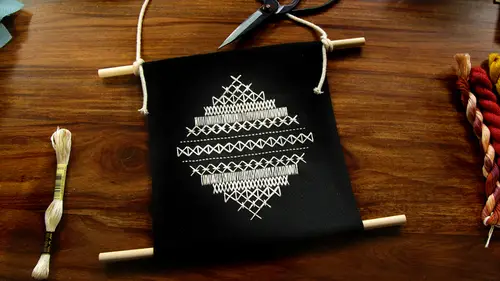
Custom Wall-Hanging Project - Finishing Work
So when we start to talk about the finishing work at this point, you're gonna want to have your scissors handy some black basic sewing thread is fine you're gonna want to get your dowels out your rope and your little piece of sticky back felt again you don't need to use the sticky back if you did you use this tiki back I'm going to show you a little hack where you can keep everything in place with the felt and then you can even do the stitching at a later date if you want I think that's possible so let's imagine that this is all finished here I'm going to take it off of my food and what you can do is you can iron it like I said it's pretty tough to still light iron I would do it on the back a little bit of steam should be just fine now what I like to do at this point is just remind myself how long the dowels are because everyone's going to be a little bit different even if you really measured this out to have it perfectly centered it's probably not going to sit exactly on the center I ...
kind of ball parked it on minds a little bit off so that's fine, so just keep that in mind when you start pulling things together so the first thing you're going to d'oh is you're going to create a border, you can kind of see, I left this a little bit space so you can see on this one on the overhead, how it's this is just a border here, so we're going to be folding in the sides first, and then we're going to be folding the top over the bar so it's about I left enough room so you could do about an inch on either side, but like I said, you're just going to have to be mindful if your design isn't like perfectly in the middle. What looks right to you is you fold it one side might be an inch, you know, I might be a little bit less or a little bit more, so I rely on my naked eye for this stuff a lot of the time, but you might want to use a ruler at home if that makes you more comfortable. So that's pretty good, and then I'm just going to check with my dowell again to make sure that that looks like it's, an appropriate amount of wood sticking out, and you can see that it's a pretty near match to the sample never take a little bit if you want to add a little bit more black space around it. Or not it's totally up to you so what I like about the aid of fabric is that you can get a really nice seam on it if you just simply run your a finger over it that state I mean that stays pretty nicely what you can dio as you can use some pins just some regular stick pins if you like toe hold it but you don't have to it should it should stay in place pretty well now what we're going to do is we're just going to do a basic you can do a back stitch or any type of hand selling stitch you like to dio I'm going to show you a way that you can't see it from the front to keep it kind of super secret from the front so what I like to do is any time I'm using I'm doing finishing work on an eight of fabric I like to double up my throat my selling fred just because the fabrics kind of thick and sewing thread is a little bit then and you don't want to be midway through a finishing stitch and then have it's now so by doubling it up I just mean running it through the needle and then nodding the two threads together at the end so on both sides you're just going to do a little finishing stitch you don't need to worry about the dowels yet put those to the side and what I like to do so you can't see the thread. One important thing is to always start at the bottom if you don't start pretty close to the bottom and to the end, what happens is that starts to slip and it gets a little bit crooked, so make sure that you're you know that you're not stitching it together over here, you're stitching it with the and that can come out towards that side, pull it through, and what you have is you have this beautiful little grid to use already for your finishing work, so you're just going to go through one space on the front, which he should not be able to see at all with the finishing work, and then the back you can skip is you skip a couple inches if you want with the finishing work and come up and through and just tack through one on the front and unless you're thread is like a super bad color match into the fabric. That's one thing to keep in mind if you do purchase or you die your own fabric for this project, you purchase something that's hand died. Make sure you bring it to purchase your threat for the finishing work, because if it looks blue and you just by what you think is a good match online or you don't have it with you you will be able to see a difference in the finishing work and then it's like not a surprised that's how we can see how you did it but I'm one for what happens on the underside is for your eyes only so if it's not straight away that you know who carries a cz long as it works and it feels like it's a strong stitch to you that's totally fine doesn't have to be straight it doesn't have to be the same distance between the stitches just get it done and then you couldn't not it however you would normally not hand stitching is fine like I said it's on the underneath if you're doing it right no one's going to see it not yet these air just the sides these air the side pieces I mean shouldn't go all the way up doing that stitch yeah, what you want to do is when you're using this fabric, you always want to have a finished edge because it does frey so you're going to finish everything and and then you'll see when we move to this next step I'm going to fold it in a little bit and then bring it up and I'll show you a little hack you can do with the sticky felt at that point if you want to, like, get it done and then stitch it later, but yeah, you always want to have a nice team on it. That's where I get very particular about the finishing work is with the fabric with the stitching, you know, it's okay, no one sees it, but if something if something is fraying just it makes it look sloppy and it's, you've put a lot of work into it, so and one of the reasons why we should finish it with felt in the back, where you're going to want to have something behind it, is that the light will show through, and that doesn't look so nice, so I'll show you here if we didn't put felt behind it, I don't know if you can see, but you can see where it seemed here and the lights coming through that's going to really affect your pattern and design. If it's on a different colored wall or something like that and it's the difference between looking like a craft and a piece of art, I personally I think so the felt is not it's, not a big enough deal, that you should skip it, you know, to see the lovely back light well, that I mean, seriously, that is super cool in its own right, and a lot of times when I'll photograph my work for instagram or to share people with the process of how we do it all often photograph one finished piece from the front and then another finished piece from the back next to it because it is kind of interesting, I think especially since I'm not super in tow, having that perfect back because I really can if I'm doing a piece okay said that has multiple colors and their interweaving with each other with the crosses and the stitching, I can't really worry about the back, so I think it's, you know, it's interesting to look out for process, but if you're doing this for a gift, I don't think they're really into being like, well, things that's great, okay, so let's assume that this is all stitched up front and back. The next step now is to consider the dowels, right? So again I left about an inch or more it's up to you you know how long you want to have it this one it's a bunch of space, it will depend upon where yours was in the hoop, but so I'm going to show you one of the reasons why you should stitch all the way at the top. I was sort of leaving this for the magic of television, but what starts to happen is when you're trying to create a seam here to have it look neat, this starts to slip and slide and sometimes you can't quite get the corner of the way it should be so really try toe stitch it all the way to the top it just makes it easier in the end so to put the dow's in, you're going to just make a little seem you can if you want to, you know it's not a bad idea to just put a stitch here and here toe hold that in I'll show you what that would look like any little step that's the one of the things about needlework is like don't cheat yourself out of the little tiny steps when you get excited and you want to finish something because it always makes a difference that little tiny extra thing that you can do that will make it easier when you're doing finishing work so that would basically just look like this just do one little stitch you can bring it all the way through to the front if you want and do that same thing we were doing just that one little space shouldn't be able to see it. You can do that once or twice oh my gosh and then just not it and you would repeat it on the other side so once you get that little seem we're going to take your data wall just wrap it around and you'll see that there's a point where you have enough space kind of you can see how I have it here may see right here you can see that that's flat against the fabric and you see that ok, so that's what you want and generally it should be enough that you can put a good gauge is can you put a pin through it that's a pretty good gauge so that means that's where you'd want that one and that's up to you with your pattern if you want to have more at the bottom or less at the bottom totally up to you I want to do the same thing make a seam you can go ahead and do the same method we were using for finishing the size and the top just stitch across to the one little stitch there I'll show you in a second once I get this set same thing at the other side. Okay, now at this point if you want to you can go ahead and stitch this or what you can d'oh is take a look at your sticky back felt see the size that's gonna fit in there and then when you stick it down you can stick it over this scene and then you can just stick stitch the end if you want on the on the sample I put the sticky back felt on underneath and then stitched over it completely out to you so because I did it this way here and you guys also kind of see that more or less it's a little bit? Yeah, it's a little bit different and the nice thing about this is if your dowell does slip at the bottom and you need to unstick it, the stitching is on the outside it's not covered up by the sticky felt you can't stick, you felt usually you can pull it apart, but that's, you know, that's one method this is just a quick hack if you wanted to do it so otherwise what you would do this kind of measure the felt to about there then bring this over so I'll show you that way so you can see what I did on the sample, so we're just going to take a look and you want to make another seem kind of where you're dowell ends up here in here with your finger, and the nice thing about making seems with your fingers is that they're not permanent, they kind of disappear, you're gonna want to measure your length of felt I'm fall parking and it doesn't need to be exact because you're going to be selling over it, but it's always good to just test it out, make sure that it's going to work and I need to cut a little bit more off here. That's one thing I would stress about finishing work is try not toe rush through it sometimes like I get super excited about being done with a project like I just want to finish that I'm so close but it's really not worth rushing through the finishing step especially when you've worked so hard along with something so this sticky back felt it just feels like this and again no if if I was doing a custom project like this for a customer I would probably use I might use a high quality will felt or high quality will acrylic blend and I would stick it on there but I did want to show you that there are you know there are other options make other choices does the bill could shape rather than using linen would be really hard to so lindenwood frey terribly so you would have to go I would suggest if you wanted to use linen machine seeming a piece of linen huh separately and then stitching that on I was living with just pray yeah okay so then that's what the back looks like and then this finishing stitches the same as the other ones that we walked through you're going to want to double up your thread and if you want to hide the knot which you might want to do you might not want to have the not on the outside you're just goingto hide the not under the flab so your first which is going to be in a little bit more than I would normally the not will be hidden and then you're going to just work backwards for that first stitch and then again just use that one space on the front should be pretty hidden and then you're gonna work back across the back you may run into a little bit of resistance where the felt is so it'll be thicker in this parts but like I said this fabrics pretty durable so don't worry about pushing through a little bit harder and it's up to you this is a place where you might want to have even stitches on the back might not but in terms of holding the fabric you don't need to worry about them being a specific sizes they're larger they're small the fabric will still hold really well does anyone have any questions about the finishing stitches or anything okay so I'm gonna show you how to finish this off again if you don't want a not in the front you kind of work the not back here on the side and then pull the thread through and snip it really close that looks nice neat so then with nodding the cord all I did was I did like a little rap thing and then I nodded it's totally up to you how you want to not it there's not any surefire way but show you on this end so I like to leave a little bit of space because I kind of like the way that looks and then I purposely afraid the cut really nerdy and I purposely freed the ends of this a little bit. She don't have to do what you can, okay, so I just wrapped it once and then tied a knot and the same for this side. And then you can have the end. Be super neat for now. That's totally up to you. There you go. So there's kind of one in process and one finished, and you can see the size on these in exactly the same. Yours might be a little bit different, too. I feel like the ten by twelve inch piece gives you enough leeway to end up with something based upon your design. That's roughly eight by ten or somewhere within there, she was having questions. Okay, so, thanks so much for joining us for customizing your cross stitch. I hope you had a really great time. I know I did, and you can find me all the places online. Please go ahead and visit my web site at www dot tomorrow's dot com and visit me on instagram, which is at some arose for photos of what I'm up, teo, and all the things that I'm doing you'll see photos of my in process. And also keep up on other classes and things that I'm doing. So, thanks so much. And I'll see you next time. Bye.
Class Materials
Bonus Materials with Purchase
Ratings and Reviews
Student Work
Related Classes
Cross-Stitching