Custom Wall-Hanging Project - Basic Cross Stitch
Lesson 2 from: Customize Your Cross-StitchLisa Shaffer
Custom Wall-Hanging Project - Basic Cross Stitch
Lesson 2 from: Customize Your Cross-StitchLisa Shaffer
Lesson Info
2. Custom Wall-Hanging Project - Basic Cross Stitch
Lessons
Supplies and Resources
20:46 2Custom Wall-Hanging Project - Basic Cross Stitch
16:44 3Custom Wall-Hanging Project - Zig Zag Stitch
05:03 4Custom Wall-Hanging Project - Oblong Stitch
11:48 5Custom Wall-Hanging Project - Alternative Basic Cross Stitch
19:08 6Custom Wall-Hanging Project - Star Stitch
07:40 7Custom Wall-Hanging Project - Variations
15:54 8Custom Wall-Hanging Project - Finishing Work
25:46Lesson Info
Custom Wall-Hanging Project - Basic Cross Stitch
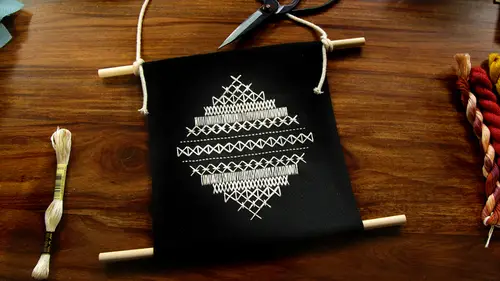
So the first step is if you don't have one of these beautiful pre cut piece of ten by twelve fabric you're going to cut your own peace at home and to do that you can use a ruler and you can make a pencil marker you don't have to you can just cut it right along the great because it does have a natural graduate you'll be ableto pretty easily keep it straight so you're going to want to dio is get it on your hoop and like I said, this isn't gonna fit completely over the who but you're not going to need to worry about that the hoop here is really for assistance in stitching you could actually do this project without the hoop it's totally fine I work a lot poop lis when I'm doing my own patterns it's easier once you kind of get used to doing it because you are putting a needle into something flexible but you could work without a hoop if you wanted to so the best way to get it on there is just to open the hoop is why did you can you don't want to get it a centered as possible it's a bit on th...
ere because the fabric doesn't go all the way around you might have to work backwards a little bit and pull it taut between the top and bottom once you get it on there and then you just tighten it and these do open really wide because like I said there the larger sizes air traditionally for quilting so minds a little bit loose but that's ok if yours has a little bit of given it ok, so for a project like this when we're doing something for home to corn it's going to be seen by a distance I know in the intro class we talked about using three strands of thread and classically the dmc flaws that we're going to be using comes in six strands but for a project like this I'm going to recommend that you use all six strands, especially since the's stitch count we're talking about is pretty big seven by seven is it's pretty sizable and you're really going to want to be able to see the stitches from far away so I feel like six is is a good place to go so when figuring out your length of thread I usually pull about three times if that feels too long for you the shorter the threat actually the easier it might mean that you have to stop created not and start again but then your thread you're not going to have to worry about it twisting and turning and getting in your way I'm going to not mine purists will say don't put a not um if you don't want to you don't have to if you don't you should leave about this much thread from the back of the fabric but since I'm working on instruction today I don't want it to come out I'm going to not it and also we're going to be finishing the back with the felt so no one's going to know if you know you can tell everyone you're a cross stitch purist and you could have a knot on the back they won't know okay, so I'm going to go back to one of the slides so we can get a closer look at that and then I'm gonna put this here so you guys can follow along with the pattern a little bit but when I'm going to show you right now appear is that just a cz we were talking about in the other class the classic stitch was we were using a five counts we were going cross one, two, three, four five we're doing the same thing but with seven so all of this all of these stitches the classic cross stitch, the variation of the star stitch, the zigzag here's ob along right straight stitch star stitch this is this you can do or you don't have to do this is just a little back stitch that I added, I don't think it's on the pattern simply because it's so tiny and there's seven by seven spaces in between this stitch and this stitch so you could put something here you could leave it blank or you could do another stitch here that's sort of an optional variation for you to decide, but I just did a little space to back stitch here and then this is a zigzag again, and then it's just repeated so the top is just a mere image of the bottom and that's what kind of creates this nordic kind of sweater pattern? But all of these, regardless of the stitch were using the seven by seven square. So even the ob long it's three by seven but then when you have the three and three did seven by seven, does that make sense? So in terms of starting the first ege just we're starting with the classic cross stitch so what you want to do and you you can measure I'm big for eyeing but ideas all the time, so maybe you want to take your measurement but um you want to start towards the top, but also realized too that this is the this is the size of the design so on top of the hoop this is going to fit well within the hoop. So you want to have space on the top in the bottom so there's plenty I don't want you to get nervous that if you start somewhere around, you know there you're going to run out of space because this fits well within the size and again, you have plenty I've left about an inch of fabric on either side to fold in when we're finishing so you have you have a lot of wiggle room is what I'm saying and if you feel like you want more wiggle room at home, you want to cut the fabric larger that's totally fine too that's that's more comfortable so the first, which is just the basic cross and were coming through and then we're counting over seven and then we're going down seven and that's going to start you off and if you have the pattern at home and you've downloaded that, you should be able to follow along okay, so that's, what you'll have first at the top and then you also have it again at the bottom. So then as you can see, basically what we're doing is we're adding two stitches to each row and that's how we're getting that patterned sort of diamond shape so at first were gonna be adding two stitches tetro so the next row is just the basic star stitch, so you're going to start with then instead of the first row is one basic cross stitch you're going to start with three basic cross stitch is so it's up to you what's easier for your count if you want to start directly below the first stitch because it makes more sense to you to then go out two stitches with you're counting that's totally fine or if you want to start your account, you would know that this is just the seventh hole so you could count backwards to one and start that way and the same goes for the rest of the rose I'm kind of a big fan of starting in the middle and working out, especially with the basic stitches when it comes to the ob long you might wanna count backwards and start here but kind of play around with it and see what works for you, especially with the larger stitches because there's less chance you'll have to pull some out and have an error so I'm going to start from the middle on minds you can kind of see what I'm talking about I'm going to count down seven and then over seven and with the star stitch you want to start with the basic crossed it before you attack it? I'm gonna finish the stitch and then I'm going to bring up the star stitch on the screen so you can take a look as a refresher so here's the stars stitch these air different variations on it for this project I just used a vertical smaller stitch across instead of both of them so you'll see here there's one running vertical on one running horizontal and for this pattern I just do the one running vertical so that's a way you can immediately create a variation on one of the more classic stitches that we've learned before is to either add or subtract so on this star stitch the vertical stitch is coming in at the second countdown so you're counting one you're coming up through the second then you're skipping there's an empty hole between that than the ex an empty hole and then down so you cannot another way to do it is just account too from the bottom when you make that stitch so you're going one two and then one two is where that comes in and this is a great stitch if you want to make your own variation right away you can change the direction even also change colors now if you want to you could have a different color on the tax ditch or you could have a completely different color on this road hi guys yeah are you totally surprised with how much you know yeah by talk is that true? Yeah so you're counting one you knew you're coming up for a second one and I'm go get that middle one and skip this one and going through them and then you can count on one two sometimes it's easier to count from the bottom and so yeah instead of because then you're getting involved with the stitches that you can't see how you doing good well ok ok now what do we do? They're going to start attacking check, okay? It looks good. Who? His record with the colors. So the next stitch you might recognize is the zigzag stitch and that one like I said, you can either start from the center or you'd be counting out seven from this stitch that went in so I'll give you a little refresher here's this exact great here this one and again just like here if you wanted to have an immediate variation, you could change the color of the vertical stitch there. Is it easier if you guys to leave these stitches up or to leave that probably to leave the pattern up, right? Yeah. Okay, one little hack um, that I talked about in the last class at all show you is sometimes we need we want to sort of make a mark so that we're following the graph and it's not necessarily where we want thread to go, so when I'm counting like right, here we go one, two, three, four, five, six, seven I'll actually put the needle through the fabric even though that's not warrant putting the thread so that then I have something to follow along with the counted steps and also what we're talking about little cross stitch hacks, chances are your thread will not at some point you might want to cry, depending on how deep and the project and how involved and committed you feel to it, try to relax. If it happens, it's not a big deal. You can always. If it happens and it's on the top or the bottom, you can always cut the knot. You can unworkable of your stitches, make another knot on the back and start with a new piece of thread. But one way you can try to avoid that, you know, not from happening in general, is that because in order for all the threads to stay together, they're individually twisted and then they're sort of twisted all together so that you get all the strands staying together, sort of the natural state for the threat is to twist back and forth so as we're moving it through the fabric it's going to want to twist. So one of the things you can do is lift up your piece and just let it hang. And I don't know if you saw that, but the threats have unraveled a little bit. So just let the threat hang every now and then, and that should hopefully prevent it from getting to completely nodded.
Class Materials
Bonus Materials with Purchase
Ratings and Reviews
Student Work
Related Classes
Cross-Stitching