Techniques For Carving
Lesson 4 from: Creative Pumpkin Carving Ideas, Patterns, and ToolsJason Hoppe
Techniques For Carving
Lesson 4 from: Creative Pumpkin Carving Ideas, Patterns, and ToolsJason Hoppe
Lessons
Lesson Info
Techniques For Carving
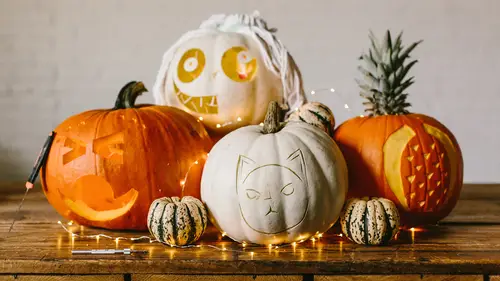
So we're gonna show you how to start carving a pumpkin. And so many people start at the very top where you just take the pumpkin and then you go and you cut out the top and then you pull the top off, which is fine, cause then you can clean it out, and you got your nice little pumpkin lid, but when we used to use candles to light the pumpkin, of course, you'd put the candle in and you'd burn your hand or you couldn't get it settled right there. So you don't have to cut the top off. I usually start with the bottom and cut the bottom off, and that way, you can set it over any light or any candle. And also, too, you can shave the bottom if you want to to have it set right there where you want. You want to change out your light or the candle, just lift it up, change it out, put your pumpkin back on the top. Now, if you do want to have the lid taken off the top, you certainly can, but I always start with the bottom. It's that much easier. And also, you don't have to take out the bottom. Mayb...
e you want to go ahead and do something from the back of the pumpkin. That works, too. That way, you can put things in the bottom of the pumpkin, as well. So there's no particular way, but I just like starting at the very bottom of the pumpkin. So I'm gonna start off with one of my larger saws here and it's got a little point on there so you can actually start and put it in there. And the whole reason why these saws work is because when you have a knife, it actually wedges the knife into the shell of the pumpkin, which makes it really difficult to move. Well, the saw actually takes out a little piece all the way around, so when you do this, you're actually removing a piece of the pumpkin, and it's just a very quick process here. And we're just gonna cut this out. Nice and easy. Now, this is not sharp, but pumpkins are pretty soft, so pretty easy to use. And since it's not sharp, you have a lot less risk of cutting yourself. And we're gonna cut that out. And there's the bottom of the pumpkin. Now we'll just push that in there and then we'll go for it. So I'm gonna wear some gloves here, only because it makes a horrific mess, so there we go. And we're gonna get a great big bowl here and we're gonna take this and we're gonna take all the fun stuff out of it here and just reach right around and grab it out. A lot of this stuff doesn't come out very easy, so I'm gonna use the scoop here, and with this scoop, this is the edge that I really want to use, so I can go and I can scrape the sides really well. And what's awesome about this is that you can really get a lot of this stuff out of here very quickly. Takes a little bit of time, but you can do it. Of course, a little bit larger opening there. I guess when I was a kid, it didn't seem like a really big hole in the pumpkin, but... Gonna scrape this all out. It happens pretty quick, and what I like about the ice cream scoop is that it's a little bit smaller than the large paddle here, and so you can get it in, especially with the smaller pumpkins. Now, like I said, keep in mind that you don't have to just go through the bottom. You can go through the back of it, too, if you need more space to clean it out, as well. And so we get most of that out of there, clean it out. There we go. Now, one little trick, if you don't want to clean out the pumpkin, what's a lot of fun, just take the pumpkin, cut a big opening in the face of the pumpkin and little teeny eyes, and just leave everything inside there and then it looks like you have this screaming pumpkin with all of these guts inside there. That's another fun one, you know? Why not? And as it gets older and starts to turn funky inside there, sure. Did that before, it's called the screaming pumpkin. So now we get that all cleaned out, happens to be pretty clean inside there. One more scrape, as well. Now, if you really want to do surface carving on these, this is where you can go in and you can spend a lot of time and take out more of the inner shell of the pumpkin so that you get a much thinner wall of the pumpkin. When you do that, you can just scrape and scrape and scrape and just get rid of all of the extra stuff that's in there and it just makes the surface carving that much nicer cause once you get a nice thin wall, when you light it, that light's gonna come through very nicely when you remove the outer skin out of the pumpkin. Almost there. Seemed to take so long when we were kids and now it just happens so quickly. Okay, I think we're pretty close to having that done. Great. Okay. There we have it. Wonderful. Move that over. So there we have the hole, put the candle or put the light right from underneath it or put it on a stand if you want to and then we're ready to start carving our pumpkin. So with this, I can just put this here and I can start carving this. I got my little template and I'm just gonna see where that goes. Can cut this out. The trick to this is make sure that you're always perpendicular to the pumpkin here so when you try to take these little shapes out there, you're not creating a little wedge to be able to pull these in or out. And I'm sure you've gone through and cut pumpkins before where you've cut the shapes out and then you get them stuck in there, wedged in there so you can't get those little shapes out, especially the more delicate shapes. But I just use a fork to kind of stick it in that section of pumpkin and just get a little bit of hold on it so I can pull out those little sections. And there is my little guy right there. Reach from the inside, poke it out from there. And really nice, just cut out the whole thing, nice and simple. And this is very low effort. It's not like using a knife where you gotta stick it in here, it's got a little poker, so you just poke it in the surface of the pumpkin, and away you go. If you have finer detail, that's what the smaller knife is gonna be for, so you can go in and do very fine detail. And the thickness of the pumpkin here pretty much makes everything sturdy. So we've got that. Cut it all out. And this always inspires me to go absolutely crazy for Halloween and carve pumpkins. I think the most I've carved in one hour was 15, and you can imagine how fast you could go here with doing this. And then just poke out the little things right there. So if you want to use cookie cutters, this is gonna be great for cookie cutters, as well. You can just go and apply a little bit of pressure to the surface and that's gonna go ahead and leave a little bit of mark in there. Takes a little bit of pressure right there. And you can see it's just gonna leave a little bit of mark and just kind of roll it around to get your shape on there. But power tools. Now, a lot of people use power tools to cut their pumpkins, which works great. You can use a little jigsaw, you can use a little reciprocating saw, just use a very thin blade so you can very easily turn and work your way around it. So I'm gonna use some of my hole saws here because this could work great for just a big circular mouth right on here. And so with this, I'm gonna take this and just set up my saw here, put my drill in. Get that set up. And it makes nice fast work of going through and giving your pumpkin some great holes. And this stuff goes everywhere, so take it slow. I know it's fun, but... There we have it. We got a great big mouth right there. And there we have our huge mouth and our screaming pumpkin. Now, one of the things that'll take off permanent marker here is rubbing alcohol, will just take that right off if you want to and then you can just do a little clean-up on there and that's one way that you can carve a pumpkin really quick and easy. If you wanted to have more fun with other techniques with pumpkin carving, as well, using saws or drills, you can go in and create multiple holes inside a pumpkin and that's a lot of fun, as well. And I'll just show you some of the techniques that we've done for these. And I'm just gonna use a drill here. This one's a half-inch drill. And you can go in and just create some kind of fun stuff here and just a simple little hole. And you can see how easy it goes through it and you can just create a whole series of holes. I've seen ones where they line them up on the ribs here, smaller at the top, bigger in the middle, just for something decorative. Little bit of fun. There you go. Some fierce eyebrows. Little bit of pumpkin shrapnel. And again, this stuff goes everywhere, but that's part of the fun. So there we have our little mean eyebrows right there. Cuts a perfect hole in a circle. And, you know, you can also use a hole saw to go ahead and just cut out the bottom here, make it nice and easy.
Class Materials
Bonus Materials with Free Purchase
Ratings and Reviews
Fran
Glad that I saw this, now! I love pumpkins!! Looking forward to the season You show a lot of great, and super creative techniques that I can't wait to try. Thank-you!
Claudia Ortega-Lukas
This video had some really good and cool ideas/techniques, however, you should do a zoom into the tools when you show them. I'd like to see close up the shape of each tool you demonstrated. Otherwise, it was fun!
Rhonda Chapin
I learned some great hacks and tricks. Going to carve my pumpkin this year with more enthusiasm! BTW something I thought might be helpful is to push pins to hold stencil designs on pumpkin since tape doesn't work.
Student Work
Related Classes
Holiday & Party Crafts